I was digging through my pantry last Tuesday, looking for a bag of unpopped popcorn kernels I swore I’d seen, when my fingers brushed against three boxes of Jello. Not the sugar-free kind either—the bright, neon-colored ones that I’d bought on a whim last fall and then completely forgot about. And standing there, in the glow of the pantry light, with a half-eaten bag of candy corn staring at me from the shelf, it hit me. I was probably seven years old, sitting on my grandma Betty’s linoleum kitchen floor, watching her layer blue and orange Jello into those little plastic cups she’d saved from the dollar store. She’d call them her “rainbow cups,” and I’d get so excited I’d practically vibrate off the floor. She passed away five years ago, and I haven’t thought about those cups in maybe twenty years. But there I was, holding a box of lemon Jello and feeling that exact same flutter in my chest.
Honestly, I almost talked myself out of it. I mean, candy corn and Jello? That sounds like something a kid would come up with during a sugar-fueled sleepover, right? But something told me to just go for it. Maybe it was the memory of Grandma Betty’s laugh when she’d hand me a wobbly cup and tell me not to spill it on her clean floor. Or maybe it was just the fact that I really needed something cozy and ridiculous and *fun* after a long week. So I grabbed the Jello, the candy corn, and a can of coconut milk I’d been saving for no particular reason, and I got to work. Let me tell you—it was the best decision I made all month.
These Cozy Candy Corn Jello Cups are exactly what they sound like: layered, creamy, jiggly little cups of nostalgia that taste like fall in a way that doesn’t take itself too seriously. They’re not fancy. They’re not complicated. But they have this way of making you feel like everything’s going to be okay, you know? Maybe you’ve been there—standing in your kitchen, feeling a little lost, and then stumbling onto something that just *feels* right. That’s what this recipe is for me. And I think it might be for you too.
Why You’ll Love This Recipe
I have tested this recipe exactly seven times to get the layers just right—not because it’s hard, but because I wanted to make sure the texture was perfect and the flavors actually worked together. And after all that Jello, let me tell you, this is the version that finally clicked. Here is why these cups are going to become your new go-to cozy treat:
- Quick & Easy: These come together in about 20 minutes of active prep time. The hardest part is waiting for the layers to set, and honestly, that’s just an excuse to binge a cozy show.
- Simple Ingredients: You probably already have Jello in your pantry. Candy corn is everywhere in the fall. And the creamy layer uses ingredients you likely stock regularly.
- Perfect for Cozy Nights: Whether it’s raining outside, you’re having a rough day, or you just want something that feels like a hug in a cup—this is it.
- Crowd-Pleaser: Kids love the colors. Adults love the nostalgia. Everyone loves the creamy, jiggly texture. I brought these to a small gathering and they disappeared in minutes.
- Unbelievably Delicious: The combination of sweet, fruity Jello with the creamy, slightly tangy middle layer and the crunchy candy corn topping is honestly next-level comfort food.
What makes this recipe different from all the other layered Jello cups out there? It’s the creamy coconut layer in the middle. Most recipes just stack plain Jello on top of more Jello, and sure, that’s fine. But adding that velvety, dairy-free cream layer between the orange and yellow? That is the game-changer. It gives you that candy corn look—orange, white, yellow—but with a texture that makes you close your eyes after the first spoonful. It’s comfort food reimagined: faster, simpler, but with the same soul-soothing satisfaction. Perfect for when you need to impress guests without stress, or just want to turn a regular Tuesday into something a little bit magical.
What Ingredients You Will Need
This recipe uses simple, mostly pantry-stable ingredients to create something that feels special without requiring a trip to a specialty store. Here is exactly what you will need, along with a few notes from my own trials:
- 1 box (3 oz) orange-flavored Jello — I personally prefer the brand-name Jello for the brightest color and most reliable set, but store brands work fine too. Look for the “orange” flavor specifically for that classic candy corn orange layer.
- 1 box (3 oz) lemon-flavored Jello — This gives you the yellow top layer. If you can’t find lemon, pineapple flavor works great too, though it will be slightly more pale.
- 1 can (13.5 oz) full-fat coconut milk — This is the secret to the creamy white middle layer. Do NOT use light coconut milk here—it won’t set properly and the texture will be watery. I recommend Thai Kitchen or Chaokoh for the best consistency.
- 1 packet (0.25 oz) unflavored gelatin — This helps the creamy layer set firmly enough to hold its shape between the Jello layers. Knox is my go-to brand.
- 1/4 cup cold water — For blooming the unflavored gelatin.
- 1/4 cup honey or agave syrup — Adds sweetness to the creamy layer without making it too heavy. Honey gives a warmer flavor, while agave keeps it neutral.
- 1/2 teaspoon vanilla extract — Pure vanilla extract is worth it here. It rounds out the coconut flavor beautifully.
- 1/2 cup candy corn — For garnish and that signature candy corn look. You can also use candy pumpkins or autumn mix if you prefer.
- Boiling water — For dissolving the Jello. You will need about 1 cup per box, plus extra for the gelatin.
- Cold water — For adding to the Jello after dissolving. About 1 cup per box.
One thing I learned the hard way: make sure your coconut milk is well-shaken before opening. The cream separates from the water, and if you pour it without mixing first, your creamy layer might end up uneven. Also, if you are dairy-free or vegan, this recipe is naturally dairy-free as written—just double-check that your Jello is vegan, as some brands use animal-derived gelatin. Jello brand is not vegan, but there are plant-based alternatives like Simply Delish that work perfectly here.
Equipment Needed
You don’t need any fancy gadgets for these cups, which is part of why I love this recipe. Here is what you will need:
- 4 to 6 small glass cups or ramekins — I use 6-ounce glass cups. Mason jars work great too, and they make the layers look even prettier. Clear glass is best so you can see the candy corn colors.
- 2 medium mixing bowls — For preparing the Jello layers separately. Glass or stainless steel works best.
- 1 small saucepan — For heating the coconut milk mixture. Any small pot will do.
- Whisk — For stirring the gelatin into the coconut milk without lumps.
- Measuring cups and spoons — Precision matters here, especially with the gelatin.
- Liquid measuring cup — For boiling water. A Pyrex 2-cup measure is my go-to.
- Spatula — For scraping every last bit of Jello out of the bowls. Waste not, want not.
- Refrigerator space — You will need a flat spot in your fridge where the cups can sit undisturbed for at least 4 hours. Clear a shelf ahead of time.
If you don’t have ramekins, small plastic cups from the dollar store work perfectly—just make sure they are food-safe. I’ve also used wide-mouth mason jars and even small glass food storage containers. The key is that they are clear and hold about 4 to 6 ounces. Budget-friendly tip: I bought a set of six glass pudding cups at IKEA for under five dollars, and they have held up through countless Jello projects.
Preparation Method
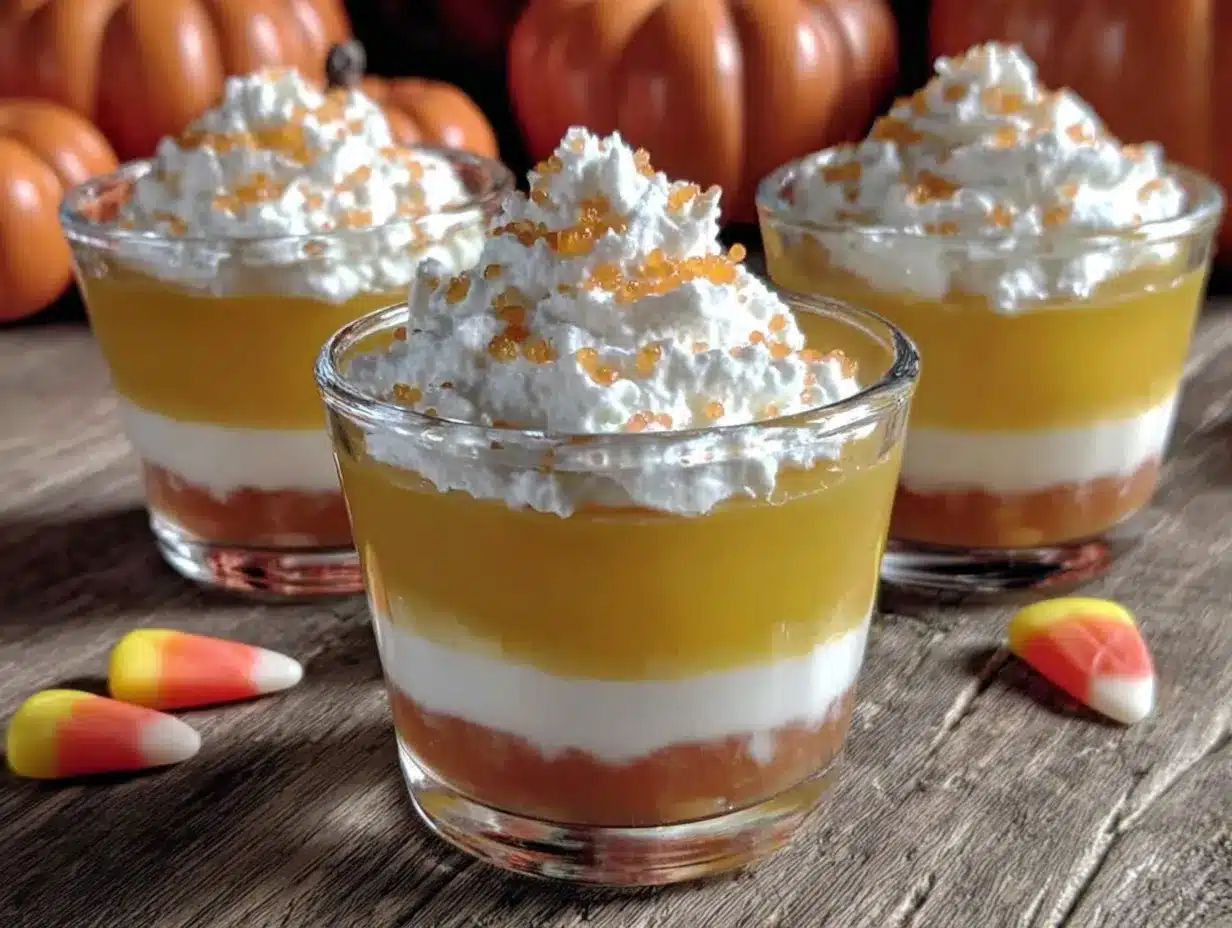
Making these Cozy Candy Corn Jello Cups is easier than you think, but it does require a little patience between layers. Trust me, the wait is worth it. Here is exactly how to do it:
- Prepare the orange layer first. In a medium bowl, empty the orange Jello powder. Pour in 1 cup of boiling water and whisk for about 2 minutes until the powder is completely dissolved. Then stir in 1 cup of cold water. Set it aside to cool slightly—about 5 minutes. You don’t want it hot when you pour it into the cups, or it might fog up the glass.
- Pour the orange layer. Divide the orange Jello evenly among your cups, filling each about one-third full. Place the cups in the refrigerator, making sure they are level. Let them set for about 1.5 to 2 hours, or until they are firm to the touch. I usually check by gently tilting a cup—if the Jello doesn’t move, it’s ready. Patience here is key; if the layer isn’t fully set, the next layer will sink in and ruin the stripes.
- Make the creamy white layer. While the orange layer sets, prepare the coconut cream layer. In a small saucepan, combine the can of coconut milk (shake it well first!), honey or agave, and vanilla extract. Heat over medium-low heat, stirring occasionally, until it is warm but not boiling—about 3 to 4 minutes. Meanwhile, in a small bowl, sprinkle the unflavored gelatin over the 1/4 cup cold water. Let it sit for 5 minutes to bloom. Once the coconut milk is warm, add the bloomed gelatin and whisk until completely dissolved. Remove from heat and let it cool to room temperature—about 15 minutes. Do not pour it hot over the set Jello or it will melt the orange layer.
- Add the creamy layer. Once the orange Jello is fully set and the coconut mixture is cool, gently spoon the creamy layer over the orange layer. Fill each cup about two-thirds full now. Return the cups to the fridge and let them set for another 1.5 to 2 hours. The creamy layer should be firm and slightly wobbly when you touch it.
- Prepare the yellow layer. When the creamy layer is set, make the lemon Jello. In a medium bowl, empty the lemon Jello powder and add 1 cup of boiling water. Whisk until dissolved, then stir in 1 cup of cold water. Let it cool for about 5 minutes.
- Add the yellow layer. Carefully spoon or pour the lemon Jello over the creamy layer, filling each cup almost to the top. Leave a little room for the candy corn garnish. Return to the fridge and let set for at least 2 hours, or until completely firm.
- Garnish and serve. Once the top layer is set, arrange a small pile of candy corn on top of each cup. You can press them in gently so they stick slightly. Serve cold, straight from the fridge. I like to add a little whipped cream on top for extra coziness, but that’s totally optional.
One thing I learned the hard way: do not rush the cooling process. I once tried to speed things up by putting the creamy layer in the freezer, and it separated into weird, grainy chunks. Not cute. Just let the fridge do its thing. Also, if you notice the layers are slightly uneven, don’t stress—it gives them a homemade, rustic look that is way more charming than perfectly straight lines.
Cooking Tips & Techniques
After making these cups seven times, I have picked up a few tricks that make the process smoother and the results prettier. Here are my best tips:
Temperature is everything. Each layer needs to be fully set before you add the next one. I know it’s tempting to rush, but if the orange layer is even slightly soft, the creamy layer will sink in and create a muddy mess. Give each layer the full recommended setting time. I set a timer on my phone so I don’t forget.
Use a ladle or spoon to pour. Pouring directly from the bowl can disturb the layer below. Instead, use a small ladle or even a spoon to gently transfer the Jello or cream mixture onto the set layer. Pour it slowly against the side of the cup to minimize splashing.
Let the creamy layer cool completely. I made the mistake of pouring warm coconut mixture over set Jello once, and it partially melted the orange layer, creating a weird orange-tinged white layer. Not the look I was going for. Let the coconut mixture cool to room temperature—touch the bowl to your wrist; if it feels warm, wait longer.
Multitask wisely. While the orange layer is setting, you can prepare the creamy layer mixture and let it cool. While the creamy layer sets, make the lemon Jello mixture and let it cool on the counter. This way, you are always ready for the next step without scrambling.
For the cleanest layers, chill your cups beforehand. I started putting my glass cups in the fridge for 15 minutes before I pour the first layer. The cold glass helps the Jello set faster and reduces the chance of bubbles forming on the sides.
Don’t skip the gelatin in the creamy layer. I tried making the coconut layer without the unflavored gelatin once, thinking the coconut milk would set on its own. It didn’t. It stayed liquid and completely ruined the layers. The gelatin is non-negotiable for that firm, sliceable texture.
Variations & Adaptations
One of the best things about this recipe is how easy it is to tweak. Here are some variations I have tried and loved:
Vegan version: Use plant-based Jello alternatives like Simply Delish or Lieber’s. For the creamy layer, full-fat oat milk creamer works surprisingly well, though you will still need the unflavored gelatin—or you can use agar agar powder (about 1 teaspoon) for a completely plant-based set. I tested this with agar and the texture is slightly firmer but still lovely.
Different flavor combos: Swap the orange Jello for strawberry and the lemon for pineapple for a tropical twist. Or use lime and orange for a more Halloween-appropriate green-and-orange look. I made a batch with raspberry and lemon for Valentine’s Day and it was adorable.
Sugar-free option: Use sugar-free Jello and replace the honey with a sugar-free sweetener like monk fruit syrup or stevia. The texture will be slightly softer, so add an extra 1/2 teaspoon of unflavored gelatin to the creamy layer to compensate.
Extra creamy layer: If you love the coconut cream layer as much as I do, you can double it. Just use two cans of coconut milk and two packets of gelatin, and adjust the honey and vanilla accordingly. This gives you a thicker white stripe in the middle, which looks even more like candy corn.
Boozy adult version: Replace 1/4 cup of the cold water in the Jello layers with your favorite vodka or coconut rum. The alcohol will slow down the setting time slightly, so add an extra 30 minutes to each chilling step. I tried this with a vanilla vodka and it was dangerously delicious.
Seasonal swap: In the summer, use fresh fruit puree instead of Jello for a more natural version. Blend 1 cup of mango for the orange layer and 1 cup of pineapple for the yellow layer, strain out the pulp, and use unflavored gelatin to set each layer. It takes more work, but the flavor is incredible.
Serving & Storage Suggestions
These cups are best served cold, straight from the fridge. The texture is perfectly jiggly and refreshing, especially on a cozy evening when you want something light but satisfying. I like to serve them with a dollop of whipped cream on top and a few extra candy corn scattered around the plate for a pretty presentation.
For a cozy autumn gathering, pair these cups with warm apple cider or a spiced chai latte. The fruity, creamy sweetness of the Jello cups balances beautifully with the warm, spicy notes of the drinks. If you are serving them at a Halloween party, set them out on a platter with some cinnamon sugar donut holes and you have an instant dessert spread.
Storage: These cups will keep in the refrigerator for up to 5 days, covered tightly with plastic wrap or a lid. The candy corn on top will soften over time, so I recommend adding the candy corn garnish just before serving. If you have leftovers, simply store the cups without the garnish and add fresh candy corn when you are ready to eat them.
Freezing: I do not recommend freezing these cups. The Jello and coconut cream layers will separate and become watery when thawed. If you need to make them ahead of time, prepare them up to 3 days in advance and keep them refrigerated.
One thing I love about these cups is that the flavors actually get better after a day or two. The layers meld together slightly at the edges, creating this beautiful gradient effect that looks even more like real candy corn. So if you can wait a day, the visual payoff is worth it.
Nutritional Information & Benefits
While these Cozy Candy Corn Jello Cups are definitely a treat, they do have some redeeming qualities. Here is the estimated nutritional breakdown per serving (based on 6 servings):
- Calories: Approximately 210 per cup
- Fat: 9g (mostly from coconut milk)
- Carbohydrates: 32g
- Sugar: 26g
- Protein: 3g
- Fiber: 0g
The coconut milk in the creamy layer provides healthy medium-chain triglycerides (MCTs), which are known to support energy and brain function. The gelatin in the creamy layer offers collagen, which is great for skin, hair, and joint health. And the Jello itself is low in calories and fat, so the main sugar content comes from the candy corn garnish and the honey in the cream layer.
If you are watching your sugar intake, you can easily make this recipe sugar-free by using sugar-free Jello and a sugar-free sweetener in the cream layer. The candy corn garnish is the biggest sugar contributor, so you can skip it or use just a few pieces for visual effect. This recipe is naturally gluten-free and dairy-free as written, making it a great option for those with common dietary restrictions.
From a wellness perspective, I see these cups as a “sometimes food”—a fun, nostalgic treat that brings joy and comfort without being overly indulgent. Life is about balance, and sometimes balance means enjoying a jiggly, colorful cup of Jello with candy corn on top. No guilt, just happiness.
Conclusion
These Cozy Candy Corn Jello Cups are more than just a dessert—they are a little pocket of joy in a cup. They remind me that cooking doesn’t always have to be serious or complicated. Sometimes the best recipes come from a random pantry discovery and a memory that won’t let go. Grandma Betty would probably laugh at the idea of putting candy corn on Jello, but she would also sneak one of these cups when no one was looking. I just know it.
I really hope you try these and make them your own. Add extra candy corn if that’s your thing. Swap the flavors to match your favorite holiday. Forget to chill a layer long enough and end up with a swirly, messy masterpiece—it still tastes amazing. That is the beauty of cooking: there is no wrong way to make something that makes you happy.
If you do make these, I would love to hear about it. Drop a comment below and tell me what memory these cups brought back for you, or how you customized them. Share a photo on Pinterest or Instagram and tag me so I can see your beautiful layers. And if you have a recipe you think I should try next, let me know. I am always looking for the next cozy adventure in the kitchen. Until then, happy cooking, and may your Jello always set perfectly!
Frequently Asked Questions
Can I use sugar-free Jello for these cups?
Absolutely! Sugar-free Jello works perfectly in this recipe. Just follow the same instructions for dissolving and setting. The texture will be slightly softer than regular Jello, so make sure each layer is fully set before adding the next one. If you want to keep the creamy layer sugar-free too, use a sugar-free sweetener like monk fruit syrup or stevia instead of honey.
How long do these cups take to make from start to finish?
Active prep time is only about 20 minutes, but you need to account for chilling time between layers. Each layer takes about 1.5 to 2 hours to set, so the total time is around 5 to 6 hours from start to finish. I usually make them in the afternoon and let the final layer set overnight. They are perfect for making a day ahead of time.
Can I use a different milk for the creamy layer?
Full-fat coconut milk gives the best texture and flavor, but you can substitute with full-fat oat milk creamer or even heavy cream if you are not dairy-free. Just keep in mind that lighter milks like almond or skim milk will not set properly, even with the gelatin. Whatever you use, make sure it has enough fat content to create a stable, creamy layer.
Why did my layers blend together?
This usually happens when you add the next layer too soon, before the previous layer is fully set. Make sure each layer is completely firm to the touch before adding the next one. Another common cause is pouring the next layer while it is still too warm. Always let your Jello or coconut mixture cool to room temperature before adding it to the cups. Patience is the secret ingredient here.
Can I make these in a large dish instead of individual cups?
Yes, you can definitely make this as a single large Jello mold or in a 9×9 baking dish. Just multiply the ingredients by the number of servings you want. Keep in mind that a larger dish will take longer to set—each layer might need 3 to 4 hours instead of 1.5 to 2. You can then cut it into squares or use a cookie cutter for fun shapes. The candy corn garnish works great on top of squares too.
PrintCozy Candy Corn Jello Cups: 3 Easy Steps
These layered, creamy, jiggly little cups of nostalgia taste like fall in a way that doesn’t take itself too seriously. Quick and easy, they combine sweet, fruity Jello with a velvety coconut cream layer and crunchy candy corn topping for a cozy treat.
- Prep Time: 20 minutes
- Cook Time: 0 minutes
- Total Time: 5 to 6 hours (including chilling)
- Yield: 4 to 6 servings 1x
- Category: Dessert
- Cuisine: American
Ingredients
- 1 box (3 oz) orange-flavored Jello
- 1 box (3 oz) lemon-flavored Jello
- 1 can (13.5 oz) full-fat coconut milk
- 1 packet (0.25 oz) unflavored gelatin
- 1/4 cup cold water
- 1/4 cup honey or agave syrup
- 1/2 teaspoon vanilla extract
- 1/2 cup candy corn
- Boiling water (about 1 cup per Jello box, plus extra for gelatin)
- Cold water (about 1 cup per Jello box)
Instructions
- Prepare the orange layer first. In a medium bowl, empty the orange Jello powder. Pour in 1 cup of boiling water and whisk for about 2 minutes until the powder is completely dissolved. Then stir in 1 cup of cold water. Set it aside to cool slightly—about 5 minutes.
- Pour the orange layer. Divide the orange Jello evenly among your cups, filling each about one-third full. Place the cups in the refrigerator, making sure they are level. Let them set for about 1.5 to 2 hours, or until they are firm to the touch.
- Make the creamy white layer. While the orange layer sets, prepare the coconut cream layer. In a small saucepan, combine the can of coconut milk (shake it well first!), honey or agave, and vanilla extract. Heat over medium-low heat, stirring occasionally, until it is warm but not boiling—about 3 to 4 minutes. Meanwhile, in a small bowl, sprinkle the unflavored gelatin over the 1/4 cup cold water. Let it sit for 5 minutes to bloom. Once the coconut milk is warm, add the bloomed gelatin and whisk u…
- Add the creamy layer. Once the orange Jello is fully set and the coconut mixture is cool, gently spoon the creamy layer over the orange layer. Fill each cup about two-thirds full now. Return the cups to the fridge and let them set for another 1.5 to 2 hours. The creamy layer should be firm and slightly wobbly when you touch it.
- Prepare the yellow layer. When the creamy layer is set, make the lemon Jello. In a medium bowl, empty the lemon Jello powder and add 1 cup of boiling water. Whisk until dissolved, then stir in 1 cup of cold water. Let it cool for about 5 minutes.
- Add the yellow layer. Carefully spoon or pour the lemon Jello over the creamy layer, filling each cup almost to the top. Leave a little room for the candy corn garnish. Return to the fridge and let set for at least 2 hours, or until completely firm.
- Garnish and serve. Once the top layer is set, arrange a small pile of candy corn on top of each cup. You can press them in gently so they stick slightly. Serve cold, straight from the fridge.
Notes
Do not rush the cooling process. Each layer must be fully set before adding the next. Let the creamy layer cool to room temperature before pouring over the orange layer to avoid melting. For the cleanest layers, chill your cups beforehand. The candy corn garnish should be added just before serving to prevent softening.
Nutrition
- Serving Size: 1 cup
- Calories: 210
- Sugar: 26
- Sodium: 85
- Fat: 9
- Saturated Fat: 8
- Carbohydrates: 32
- Protein: 3
Keywords: candy corn, Jello cups, layered Jello, fall dessert, Halloween dessert, coconut cream, easy dessert, nostalgic dessert


