It was 11:47 PM on a random Thursday, and I was wide awake with a weird, specific craving. I wanted green bean casserole—that creamy, crispy-topped classic from every holiday table—but I also wanted it to be a finger food. A little bite. Something you could walk around with at a party. I didn’t have a big baking dish or a crowd to feed that night, but I had a pint of cremini mushrooms staring at me from the fridge and the last can of fried onions from Thanksgiving. And the idea that arrived, half-asleep and half-brilliant: what if I stuffed those mushrooms with everything I loved about the casserole?
Honestly, the first batch was a mess. I overfilled the mushroom caps, the filling was too loose, and half of them tipped over in the pan like tiny, defeated boats. But that first bite—the earthy mushroom, the creamy green bean mixture, the crunch of fried onions—I knew I was onto something. I mean, I literally stood there at my kitchen counter at midnight, eating them straight off the baking sheet, nodding to myself like I’d just solved a culinary mystery. It was one of those moments where you’re tired and impulsive, but also completely vindicated.
You know that feeling when you take a classic dish and just… mess with it in the best way? That’s this recipe. It takes the nostalgic comfort of green bean casserole and turns it into a party-ready, handheld appetizer that’ll steal the show. And let me tell you, after testing this about six more times (for science, obviously), I’ve got it down to a foolproof system. These stuffed mushrooms are the thing I now bring to every gathering, and they disappear faster than anything else on the table.
Why You’ll Love This Recipe
These Green Bean Casserole Stuffed Mushrooms aren’t just another appetizer—they’re the appetizer that’ll have people asking for the recipe before the party’s over. Here’s why I keep coming back to them, and why you will too:
- Make-Ahead Magic: You can prep the filling and clean the mushrooms a day in advance. When guests arrive, just stuff, top, and bake. No last-minute stress.
- Simple Ingredients, Big Flavor: Everything you need is probably already in your pantry or fridge. Canned green beans, cream of mushroom soup, fried onions—this is comfort food at its most accessible.
- Perfect for Parties: These are bite-sized, easy to eat standing up, and look way more impressive than they are complicated. They’re the ultimate crowd-pleaser for potlucks, game days, or holiday gatherings.
- Totally Customizable: I’ve made these with fresh green beans, added crispy bacon, and even swapped in a from-scratch mushroom sauce. The base recipe is forgiving and fun to play with.
- Unbelievably Delicious: The combination of tender mushroom, creamy filling, and crispy topping is next-level. It’s like your favorite holiday side dish got a serious upgrade.
What makes this different from other stuffed mushroom recipes is the texture. The filling isn’t just a mush—it’s got actual green bean pieces for bite, a creamy binder that holds everything together, and that essential fried onion crunch on top. It’s not just another version. It’s the best version. And honestly, it’s the kind of recipe that makes you close your eyes after the first bite because it tastes exactly like the holidays, but in the most convenient, party-friendly package.
What Ingredients You Will Need
This recipe uses simple, mostly pantry-staple ingredients to deliver that classic green bean casserole flavor in a totally new form. The magic is in how they come together, so let’s break down each one.
- Large Cremini Mushrooms (20-24 mushrooms, about 1.5 lbs): Look for mushrooms that are firm, about 2 inches across, with intact stems. Cremini have a deeper, earthier flavor than white button mushrooms, which makes the final dish feel more substantial. I recommend grabbing a few extra in case some break during cleaning.
- 1 can (14.5 oz) Green Beans, drained and finely chopped: Canned green beans are the classic choice here—they’re soft, easy to chop, and blend perfectly into the filling. If you want to use fresh, blanch them first for 2 minutes in boiling water, then shock in ice water. Frozen works too, just thaw and pat them really dry.
- 1 can (10.5 oz) Condensed Cream of Mushroom Soup: This is the glue that holds everything together. I know some folks love making their own, and you can, but the canned version gives that nostalgic flavor we’re after. Campbell’s is my go-to for consistency.
- 1/2 cup Sour Cream: Adds a little tang and richness that balances the earthy mushrooms. Full-fat works best here—low-fat can make the filling a bit watery.
- 1/2 cup Shredded Cheddar Cheese: Melts into the filling for extra creaminess and a subtle sharpness. I use medium cheddar, but sharp cheddar works beautifully too.
- 1/4 cup Grated Parmesan Cheese: Adds a salty, nutty depth that you don’t get from cheddar alone. Don’t skip it—it’s the secret to making the filling taste more sophisticated.
- 1 small Onion, finely diced: Sautéed until soft and golden, it adds sweetness and texture. Yellow or white onions both work fine.
- 2 cloves Garlic, minced: Because everything is better with garlic. Fresh is best, but jarred minced garlic works in a pinch.
- 1/2 teaspoon Dried Thyme: A little herbaceous note that complements both the mushrooms and the green beans. If you have fresh, use 1 teaspoon.
- Salt and Black Pepper, to taste: Go easy on the salt since the soup and cheese are already salty. Freshly cracked black pepper makes a difference here.
- 1 cup French Fried Onions (like French’s), plus more for topping: This is non-negotiable. They provide that signature crunch and savory flavor that makes green bean casserole what it is. I’ve tried making my own, and honestly, the store-bought ones are perfect for this.
- 2 tablespoons Olive Oil or Melted Butter: For brushing the mushroom caps before baking. It helps them brown and keeps them from drying out.
Equipment Needed
You don’t need anything fancy here—just a few basic kitchen tools that you probably already own. Here’s what you’ll need:
- Large Baking Sheet: A rimmed baking sheet is ideal to catch any filling that might bubble over. I like using a half-sheet pan for even heat distribution.
- Parchment Paper or Silicone Baking Mat: Trust me on this one. It makes cleanup a breeze and prevents the mushrooms from sticking.
- Sharp Knife and Cutting Board: For dicing the onion, mincing garlic, and chopping the green beans. A sharp knife makes all the difference when you’re prepping 20+ mushroom caps.
- Small Skillet: For sautéing the onion and garlic. A non-stick or stainless steel pan works well.
- Mixing Bowls: One medium bowl for the filling, one small bowl for the melted butter or oil.
- Small Spoon or Melon Baller: For scooping out the mushroom stems and later stuffing the caps. A melon baller is actually perfect for this—it creates a neat little cavity.
- Pastry Brush: For brushing the mushroom caps with oil or butter. If you don’t have one, you can use a paper towel to rub it on.
- Paper Towels: For cleaning the mushrooms. Never rinse mushrooms under water—they absorb it like sponges and get soggy.
If you don’t have a melon baller, no worries. A small measuring spoon (1/4 teaspoon size) works just as well for scooping out the stems. And if you’re making these for a big party, you can prep everything on one baking sheet and bake in batches if needed.
Preparation Method
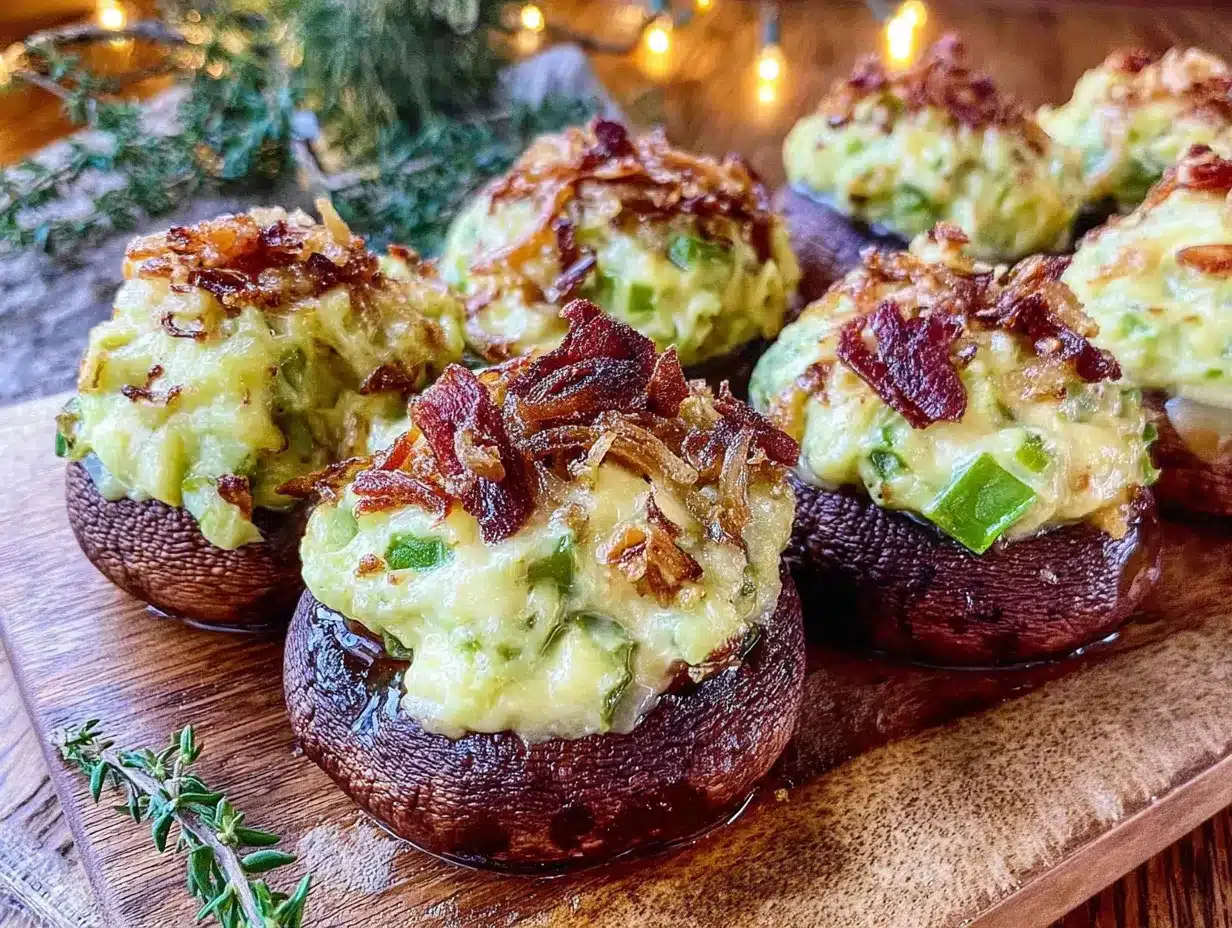
Let’s get into the actual cooking. I’ve tested this method about a dozen times, so trust me when I say these steps will give you perfect results every single time.
- Preheat your oven to 375°F (190°C). Line a large baking sheet with parchment paper or a silicone mat. This is your golden ticket to easy cleanup—trust me, you don’t want to scrub baked-on filling later.
- Clean the mushrooms. Take a damp paper towel and gently wipe each mushroom to remove any dirt. Do NOT rinse them under water—they’ll soak it up and turn into sad, soggy little boats. Pop the stems out carefully. You can save the stems for another use (like soup or stock), or just discard them. Set the caps aside.
- Make the filling base. In a small skillet over medium heat, add a drizzle of olive oil. Sauté the diced onion for about 4-5 minutes until it’s soft and translucent. Add the minced garlic and cook for another 30 seconds until fragrant. Remove from heat and let it cool slightly.
- Mix the filling. In a medium bowl, combine the drained and chopped green beans, cream of mushroom soup, sour cream, shredded cheddar, grated parmesan, sautéed onion and garlic, dried thyme, and a generous pinch of black pepper. Stir until everything is well combined. Fold in 1 cup of the fried onions. The mixture should be thick and scoopable—not runny. If it seems too loose, add a tablespoon more of the fried onions to absorb excess moisture.
- Prepare the mushroom caps. Arrange the mushroom caps on the prepared baking sheet, cavity-side up. Brush the outside of each cap lightly with olive oil or melted butter. This helps them brown and keeps them from drying out in the oven. Don’t skip this step—I learned the hard way that dry mushrooms are sad mushrooms.
- Stuff the mushrooms. Using a small spoon or your melon baller, fill each mushroom cap generously with the green bean mixture. Don’t be shy—pile it up a little. The filling will settle as it bakes. You want each mushroom to look like a little present.
- Top with extra crunch. Sprinkle the remaining fried onions over the tops of the stuffed mushrooms. Press them down gently so they stick to the filling. This is what gives you that iconic crispy topping in every bite.
- Bake. Place the baking sheet in the preheated oven and bake for 18-22 minutes. The mushrooms should be tender, the filling should be hot and bubbly, and the fried onions should be golden brown. If you want extra crispy tops, you can broil them for the last 1-2 minutes—but watch them carefully so they don’t burn.
- Rest and serve. Let the mushrooms cool on the baking sheet for about 5 minutes before transferring to a serving platter. This resting time is crucial—the filling sets up a bit and won’t slide off when you pick them up. Serve warm.
A quick note on timing: the first time I made these, I was rushing and didn’t let the mushrooms rest. Big mistake. The filling was so loose it just slid right off and made a mess. Give them those 5 minutes—it’s worth it.
Cooking Tips & Techniques
After making these stuffed mushrooms more times than I care to count, I’ve picked up a few tricks that make the process smoother and the results better. Here’s what I’ve learned:
Choose mushrooms that are similar in size. This ensures even cooking. If you have a mix of big and small mushrooms, the small ones will overcook while the big ones are still firm. I aim for mushrooms that are about 2 inches across—big enough to hold a good amount of filling, but small enough to eat in two bites.
Don’t overfill the mushrooms. I know I said to be generous, but there’s a fine line. If you pile the filling too high, it’ll slide off during baking. Aim for a nice dome that’s about 1/4 inch above the rim of the mushroom cap. It’ll settle and look perfect after baking.
Make the filling a day ahead. This is my favorite hosting hack. The flavors actually meld together and get better overnight. Just store the filling in an airtight container in the fridge, and when you’re ready to bake, stuff the mushrooms straight from the fridge—you might need to add 2-3 minutes to the baking time.
One mistake I made early on: I used low-fat sour cream and low-fat cream of mushroom soup to try to make it “healthier.” The filling was watery and bland. Trust me, use the full-fat versions. This is a party appetizer—it’s supposed to be indulgent.
For the crispiest topping: Add the fried onions halfway through baking instead of at the beginning. Bake the stuffed mushrooms for 10 minutes, then pull them out, add the fried onions on top, and bake for another 10-12 minutes. This keeps the onions from getting soggy from the filling. It’s an extra step, but it makes a real difference.
If you’re making these for a crowd: Set up an assembly line. Clean all the mushrooms first, then make the filling, then stuff them all at once. I can get through 24 mushrooms in about 15 minutes this way. And if you’re doubling the recipe, use two baking sheets and rotate them halfway through baking.
Variations & Adaptations
One of the best things about this recipe is how flexible it is. I’ve experimented with a bunch of variations, and here are my favorites:
The Bacon Lover’s Version: Cook 4 slices of bacon until crispy, crumble them, and mix half into the filling. Sprinkle the remaining bacon on top along with the fried onions. The smoky, salty flavor pairs beautifully with the earthy mushrooms. I made this for a Super Bowl party and it was the first thing to disappear.
Fresh Green Bean Version: If you’re not a fan of canned green beans (though I personally love them for this), use fresh. Blanch 1 cup of trimmed, chopped fresh green beans in boiling water for 2 minutes, then shock in ice water. Drain well and pat dry before adding to the filling. The texture is a little firmer, which some people prefer.
Gluten-Free Adaptation: This one’s easy. Use a gluten-free cream of mushroom soup (Pacific Foods makes a good one) and gluten-free fried onions. The rest of the ingredients are naturally gluten-free. I’ve tested this version for a friend with celiac disease, and nobody could tell the difference.
Vegan Option: Swap the sour cream for a dairy-free version (I like Tofutti or Kite Hill), use a vegan cream of mushroom soup, and replace the cheeses with vegan shreds. The filling won’t be quite as creamy, but it still tastes great. Add a tablespoon of nutritional yeast to the filling for that cheesy flavor.
Spicy Twist: Add 1/4 teaspoon of cayenne pepper or a chopped jalapeño (seeds removed) to the filling. The heat cuts through the richness and adds a nice kick. I tried this on a whim one night, and now it’s my husband’s favorite version.
Make It a Meal: If you want to turn these into a main dish, use portobello mushroom caps instead of cremini. They’re bigger and more substantial. Stuff them with the same filling, bake for 25-30 minutes, and serve with a side salad. It’s a fun twist on a classic comfort food dinner.
Serving & Storage Suggestions
These stuffed mushrooms are best served warm, right out of the oven, when the filling is hot and bubbly and the topping is still crispy. I like to arrange them on a large platter, garnished with a sprinkle of fresh parsley or chives for a pop of color. They’re perfect for passing around at parties, and they hold up well on a buffet table for about 30 minutes before they start to cool.
What to serve alongside: These mushrooms pair beautifully with other finger foods. I often serve them with a creamy dill dip for extra dipping, or alongside mini quiche lorraine bites for a full appetizer spread. For a holiday party, they’re great next to a cranberry brie puff pastry bites—the tart cranberry balances the rich, creamy mushrooms.
Storage: If you have leftovers (which honestly, rarely happens in my house), store them in an airtight container in the fridge for up to 3 days. The texture will change a bit—the mushrooms will soften and the topping won’t be as crispy—but they’ll still taste great.
Reheating: The best way to reheat these is in the oven or an air fryer. Pop them in a 350°F (175°C) oven for 5-7 minutes, or in an air fryer at 350°F for 3-4 minutes. The microwave works in a pinch, but the mushrooms will be softer and the topping won’t be crispy. If you’re reheating for a party, add a sprinkle of fresh fried onions on top right before serving to bring back that crunch.
Freezing: You can freeze the unbaked stuffed mushrooms. Arrange them on a baking sheet and freeze until solid, then transfer to a freezer bag. When you’re ready to bake, add 5-7 minutes to the baking time—no need to thaw. I’ve done this for holiday prep, and it’s a lifesaver.
One thing I’ve noticed: the flavors actually get better after a day in the fridge. The mushrooms absorb some of the creamy filling, and everything melds together. So if you’re making these for a party, don’t stress about making them fresh—they’re almost better the next day.
Nutritional Information & Benefits
Let’s be real—these are an indulgent party appetizer, not a health food. But that doesn’t mean they’re completely without redeeming qualities. Here’s a rough breakdown per stuffed mushroom (based on 24 mushrooms):
| Nutrient | Amount per Mushroom |
|---|---|
| Calories | 85 |
| Total Fat | 5g |
| Saturated Fat | 2g |
| Carbohydrates | 7g |
| Fiber | 1g |
| Protein | 3g |
| Sodium | 220mg |
Mushrooms themselves are a great source of B vitamins, selenium, and copper, which support immune function and energy metabolism. The green beans add a little fiber and vitamin K. And honestly, the portion control of serving these as individual bites makes it easier to enjoy them without overdoing it—unlike a big scoop of traditional green bean casserole.
If you’re watching your sodium, you can use low-sodium cream of mushroom soup and cut back on the added salt. And for a lighter version, swap the sour cream for plain Greek yogurt—it works surprisingly well and adds a little extra protein.
Conclusion
These Green Bean Casserole Stuffed Mushrooms are the kind of recipe that makes you look like a hero at any gathering. They take everything you love about that classic holiday side dish and turn it into something portable, party-friendly, and honestly, even more delicious. The earthy mushrooms, the creamy filling, that essential crunch on top—it’s a combination that just works.
I love this recipe because it’s proof that you don’t need complicated techniques or fancy ingredients to impress people. It’s comfort food, reimagined. It’s the dish that gets people talking and reaching for seconds. And it’s the recipe I keep coming back to, party after party, because it never fails.
Now I want to hear from you. Have you tried making these? Did you add your own twist? Drop a comment below and let me know how they turned out—I love seeing your creations. And if you’re looking for more party-perfect appetizers, don’t forget to check out those cranberry brie bites I mentioned earlier. Happy cooking, friends!
Frequently Asked Questions
Can I use white button mushrooms instead of cremini?
Absolutely. White button mushrooms are a little milder in flavor, but they work perfectly. Just make sure they’re firm and about the same size for even cooking.
Can I make these vegetarian or vegan?
Yes! The recipe is already vegetarian as written. For a vegan version, use dairy-free sour cream, vegan cream of mushroom soup, and vegan cheese shreds. I’ve tested it, and it’s still delicious.
How far in advance can I prep these?
You can clean the mushrooms and make the filling up to 24 hours ahead. Store them separately in the fridge, then stuff and bake when you’re ready. You can also freeze the unbaked stuffed mushrooms for up to 3 months.
Why did my filling turn out watery?
This usually happens if the green beans weren’t drained well enough, or if you used low-fat sour cream or soup. Pat the green beans dry with a paper towel before chopping, and stick with full-fat dairy for the best texture.
Can I double this recipe for a large party?
Definitely. Just double all the ingredients and use two baking sheets. Rotate the sheets halfway through baking for even cooking. If your oven can’t fit both sheets on the same rack, bake them one after the other—the filling holds up well.
PrintGreen Bean Casserole Stuffed Mushrooms: Easy Party Appetizer

These Green Bean Casserole Stuffed Mushrooms take the classic holiday side dish and turn it into a bite-sized, party-ready appetizer. Creamy, crunchy, and packed with nostalgic flavor, they’re the perfect finger food for any gathering.
- Prep Time: 20 minutes
- Cook Time: 22 minutes
- Total Time: 42 minutes
- Yield: 20-24 stuffed mushrooms 1x
- Category: Appetizer
- Cuisine: American
Ingredients
- 20–24 large cremini mushrooms (about 1.5 lbs)
- 1 can (14.5 oz) green beans, drained and finely chopped
- 1 can (10.5 oz) condensed cream of mushroom soup
- 1/2 cup sour cream
- 1/2 cup shredded cheddar cheese
- 1/4 cup grated Parmesan cheese
- 1 small onion, finely diced
- 2 cloves garlic, minced
- 1/2 teaspoon dried thyme
- Salt and black pepper to taste
- 1 cup French fried onions (like French’s), plus more for topping
- 2 tablespoons olive oil or melted butter
Instructions
- Preheat oven to 375°F (190°C). Line a large baking sheet with parchment paper or a silicone mat.
- Clean mushrooms with a damp paper towel. Remove stems and set caps aside.
- In a small skillet over medium heat, sauté diced onion in a drizzle of olive oil for 4-5 minutes until soft. Add minced garlic and cook 30 seconds more. Remove from heat and let cool slightly.
- In a medium bowl, combine chopped green beans, cream of mushroom soup, sour cream, cheddar cheese, Parmesan cheese, sautéed onion and garlic, dried thyme, and black pepper. Stir well. Fold in 1 cup of fried onions.
- Arrange mushroom caps cavity-side up on the prepared baking sheet. Brush caps lightly with olive oil or melted butter.
- Fill each mushroom cap generously with the green bean mixture. Top with remaining fried onions, pressing gently to adhere.
- Bake for 18-22 minutes, until mushrooms are tender, filling is bubbly, and topping is golden brown. For extra crispy tops, broil for 1-2 minutes at the end.
- Let cool on the baking sheet for 5 minutes before serving. Serve warm.
Notes
For the crispiest topping, add fried onions halfway through baking: bake for 10 minutes, add onions, then bake for another 10-12 minutes. Make filling a day ahead for better flavor. Use full-fat dairy for best texture. Let mushrooms rest 5 minutes after baking to set filling.
Nutrition
- Serving Size: 1 stuffed mushroom
- Calories: 85
- Sugar: 1
- Sodium: 220
- Fat: 5
- Saturated Fat: 2
- Carbohydrates: 7
- Fiber: 1
- Protein: 3
Keywords: green bean casserole, stuffed mushrooms, party appetizer, holiday appetizer, finger food, cremini mushrooms, comfort food


