There used to be a tiny bakery on the corner of Elm and 5th, called “The Sugar Moon,” that made the most incredible dirt cups for Halloween. They weren’t just pudding and crushed cookies—they were little works of art, with layers so clean you could see the “soil” strata and gummy worms that looked like they were genuinely wriggling their way out of the earth. When they closed their doors two years ago, I was genuinely heartbroken. I mean, I actually stood outside and stared at the “For Lease” sign. After maybe a dozen attempts—some were too soupy, others were more like a sweet cement block—I finally cracked the code. This is that recipe, and let me tell you, it is exactly what you need for a Halloween party that feels like a party, not a chore.
This isn’t about fussing with complicated baking or hunting down weird ingredients. It’s about creating something that looks absolutely spectacular—the kind of thing that makes kids gasp and adults do a double-take—with almost zero effort. Honestly, you can have these ready in under fifteen minutes of active time. The hardest part is waiting for the pudding to set, and even that is a passive, hands-off job. You know that feeling when you want to do something fun for a holiday but you’re already running on fumes? These dirt cups are the answer. They are the ultimate weeknight Halloween win: impressive, delicious, and ridiculously easy.
Why You’ll Love This Recipe
I’ve tested this recipe about seven times to get the texture and the “look” just right. Let me tell you, the difference between a sad, soggy dirt cup and a perfect one is all in the details. Here is why this version works every single time.
- Unbelievably Quick: We are talking about 15 minutes of hands-on time. No oven, no mixer, no stress. Perfect for a busy weeknight or a last-minute classroom party.
- Simple Ingredients: You probably have most of this in your pantry right now. Instant pudding, cold milk, Oreos, and some gummy worms. That is it.
- Perfect for Halloween: This is the quintessential spooky treat. It’s fun, it’s nostalgic, and it looks like a tiny graveyard you can eat.
- Crowd-Pleaser: Kids absolutely lose their minds over these. But honestly, I’ve seen grown adults sneak a second one when they think no one is looking.
- No-Fail Results: Unlike a cake that can sink or cookies that can spread, this recipe is practically foolproof. If you can stir, you can make these.
What makes this recipe different from the dozens of others out there? It’s the texture. So many dirt cups end up with a layer of pudding that is either too runny or has a weird skin on top. I use a specific trick—whipping the pudding for a full two minutes—that gives it a mousse-like lightness. It isn’t just another version; it is the best version. This is the recipe that makes you close your eyes after the first spoonful, not because it’s fancy, but because it is exactly what you wanted it to be.
What Ingredients You Will Need
This recipe uses super simple ingredients to deliver that classic, nostalgic flavor. The magic is in the assembly, not the grocery list.
- 1 (3.9-ounce) package Instant Chocolate Pudding Mix: This is non-negotiable for speed. Do not use cook-and-serve pudding; it takes too long and the texture is different. I prefer Jell-O brand for its reliable creaminess.
- 2 cups Cold Whole Milk: Whole milk gives the richest, creamiest texture. You can use 2% in a pinch, but avoid skim milk—the pudding won’t set as firmly. It needs that fat to feel luxurious.
- 1 (14.3-ounce) package Regular Oreo Cookies (about 36 cookies): You need the classic Oreo, not the Double Stuf. The filling-to-cookie ratio matters here. We want the dark cookie crumbs to look like dirt, and the filling helps bind them.
- 1 (4.25-ounce) package Gummy Worms: Get the sour or regular kind—whatever you prefer. I like the colorful, squiggly ones that look like they are actively trying to escape the cup.
- 8 (5-ounce) Clear Plastic Cups: Clear cups are essential for the visual effect. You want people to see those layers! Disposable ones are perfect for parties.
- Optional: Green Decorating Gel: For making little “grass” or “moss” tufts on top. It is a tiny detail that makes a huge impact, but totally optional.
- Optional: Gummy or Plastic Spiders: For extra creepy-crawly decoration. I sometimes toss a few on top for a “bug infestation” look.
Ingredient Selection Tip: When buying the Oreos, check the package to make sure the cookies aren’t broken. You want whole cookies for crushing, as pre-crushed crumbs can be too fine and dusty.
Equipment Needed
You don’t need any fancy gadgets for this one. Just a few basics you already have in your kitchen.
- Large Mixing Bowl: For making the pudding. Any large bowl will do.
- Whisk or Electric Mixer: A whisk works great, but an electric hand mixer makes it even faster and ensures a lump-free pudding. I usually just use a whisk to keep cleanup minimal.
- Measuring Cups: For the milk. A liquid measuring cup is best.
- Food Processor or Ziploc Bag + Rolling Pin: This is for crushing the Oreos. A food processor is fast and gives you a consistent crumb. If you don’t have one, put the cookies in a Ziploc bag and go to town with a rolling pin. It is a great way to release some stress!
- 8 Small Clear Plastic Cups (5-ounce): The star of the show for presentation. You can also use small mason jars or even espresso cups.
- Spatula or Spoon: For layering the pudding and crumbs.
Preparation Method
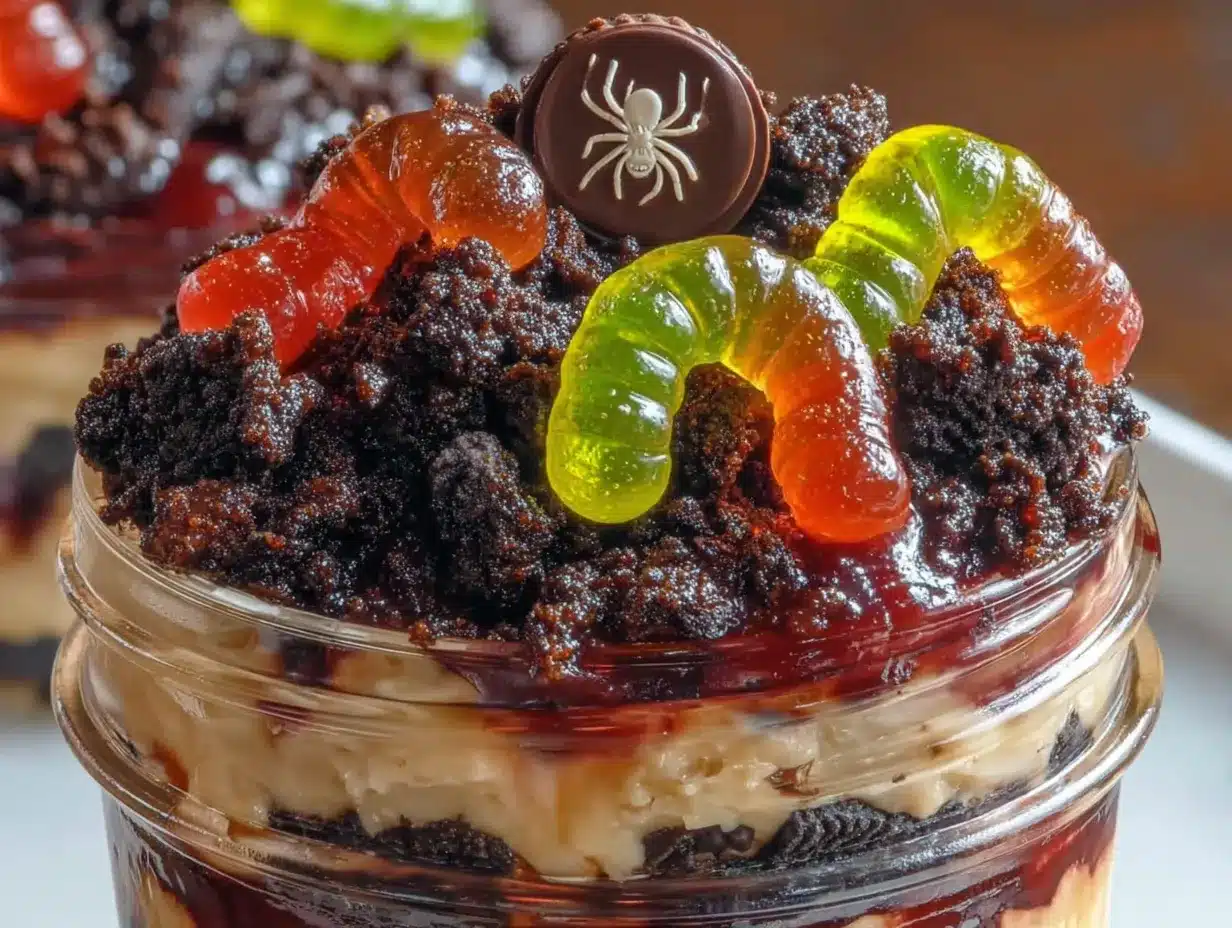
Let’s get down to business. Follow these steps, and you will have the cutest (and tastiest) Halloween treat on the block.
- Crush the Oreos (5 minutes): Place all 36 Oreos (filling and all) into your food processor. Pulse until you have fine, dark crumbs that look like potting soil. You want a few slightly larger pieces for texture, but mostly a fine crumb. If using a Ziploc bag, seal it tightly, removing as much air as possible, and crush them with a rolling pin. Set the crumbs aside.
- Make the Pudding (5 minutes): In your large mixing bowl, pour the 2 cups of cold milk. Whisk in the instant chocolate pudding mix. Whisk vigorously for 2 full minutes. I set a timer for this—it is the most important step. If you don’t whisk it long enough, the pudding won’t set properly and will be runny. After 2 minutes, the mixture will be thick and creamy. Let it sit for 5 minutes to fully set.
- Prepare the Cups (2 minutes): Take your 8 clear cups. You are going to create layers. Start with a generous tablespoon of Oreo crumbs in the bottom of each cup. Press it down lightly with the back of a spoon. This is your “base dirt.”
- First Pudding Layer (3 minutes): Spoon about 3 tablespoons of the prepared pudding over the Oreo layer in each cup. Use a spatula to spread it evenly. You want a nice, clean layer.
- Add the Worms (2 minutes): This is the fun part. Take a few gummy worms and poke them into the pudding layer. Make sure one end is sticking up, as if the worm is trying to escape. You can also bend a few so they look like they are burrowing.
- Second Pudding Layer (3 minutes): Divide the remaining pudding evenly among the 8 cups, spooning it over the worms. This will hide them partially, creating the “dirt” effect. Smooth the top of the pudding.
- Top with “Dirt” (2 minutes): Sprinkle a generous layer of the remaining Oreo crumbs over the top of each cup. You want to completely cover the pudding. It should look like a tiny pot of soil.
- Decorate and Chill (2 minutes + 1 hour): Place a few more gummy worms on top of the “dirt,” looking like they are crawling out. If you have the green decorating gel, you can add a few little “grass” tufts. Cover the cups loosely with plastic wrap and refrigerate for at least 1 hour before serving. This allows the flavors to meld and the cookies to soften slightly, creating that perfect “dirt” texture.
Sensory Cue: When you pull them out of the fridge after an hour, you will see the Oreo crumbs have darkened slightly, looking even more like real, damp earth. The worms will look like they are truly alive and moving.
Cooking Tips & Techniques
After my many trials, here are the things I learned the hard way so you don’t have to.
- The Whisking Mistake: My first batch was a disaster because I under-whisked the pudding. I was in a hurry and only stirred it for about 45 seconds. The result? A soupy mess that never set. Trust me on the 2-minute timer. It is non-negotiable.
- Don’t Over-Crush the Oreos: If you turn the Oreos into a fine powder, it will clump and look like mud, not dirt. You want a texture that has some variation. A few slightly larger chunks are fine and add to the “earthy” look.
- Layer Strategically: When you add the top layer of “dirt,” don’t just dump it all in the center. Use a spoon to sprinkle it evenly, covering every bit of exposed pudding. A patchy top ruins the illusion.
- Timing is Everything: These are best made the day before or at least 4 hours before serving. The pudding needs time to set fully, and the Oreo crumbs need time to soften into that perfect, cake-like texture. It is a great make-ahead dessert for a party.
- Multitasking: While the pudding is setting for its 5-minute rest, use that time to crush the Oreos. It keeps the workflow moving and you aren’t standing around doing nothing.
Variations & Adaptations
This recipe is a fantastic base for all sorts of spooky fun. Here are a few ways I’ve tweaked it over the years.
- Peanut Butter Dirt Cups: Before adding the first pudding layer, drop a teaspoon of creamy peanut butter into each cup. It adds a salty, rich flavor that pairs beautifully with the chocolate. My husband loves this version.
- Gluten-Free Version: Use gluten-free chocolate sandwich cookies (like Glutino brand) and ensure your pudding mix is certified gluten-free. Most instant pudding is, but always check the label.
- Mint Chocolate Chip Dirt Cups: Use instant white chocolate or vanilla pudding mix and add a drop of green food coloring. Instead of Oreos, use crushed chocolate wafer cookies or gluten-free chocolate cookies. Add some gummy bugs instead of worms for a “mossy” look.
- Vegan Dirt Cups: Use a vegan instant chocolate pudding mix (like Simply Delish) and replace the milk with oat milk or full-fat coconut milk. Use vegan chocolate sandwich cookies (like Newman-O’s). The coconut milk adds a lovely richness.
- Spooky Graveyard: Instead of just worms, add a few small gummy skeletons or plastic tombstones to the top. You can also add a piped “RIP” message using the green decorating gel.
Serving & Storage Suggestions
These little cups are best served cold, straight from the fridge. The contrast between the cool, creamy pudding and the slightly softened “dirt” is pure magic.
- Serving Temperature: Serve chilled. Do not let them sit at room temperature for more than 30 minutes, especially if you are using dairy.
- Presentation: Arrange the cups on a platter or a large baking sheet. You can scatter a few extra gummy worms and plastic spiders around the base of the cups for a truly creepy display. For a party, consider labeling them with a tiny sign that says “Worm Farm.”
- Storage: Store any leftovers (if you have any!) in the refrigerator, covered with plastic wrap or a lid, for up to 3 days. The texture will change slightly as the Oreos continue to soften, but they will still be delicious.
- Reheating: Do not reheat these. They are meant to be cold. If they have been in the fridge for more than a day, the “dirt” might be very soft, almost like a cake. That is actually a different, but still tasty, texture.
- Flavor Development: Honestly, these taste even better the next day. The flavors have time to meld, and the pudding sets perfectly. They are a fantastic make-ahead dessert for a Halloween party.
Nutritional Information & Benefits
Let’s be real: these are a treat, not a health food. But here is a rough breakdown and a few things to keep in mind.
Estimated Nutritional Values (per serving, 1 cup):
- Calories: ~380
- Fat: ~15g
- Carbohydrates: ~55g
- Protein: ~6g
- Sugar: ~40g
Health Considerations: The main benefit here is happiness, honestly. But on a practical note, using whole milk provides some calcium and vitamin D. The Oreos, while not a health food, do provide a small amount of iron. For a slightly healthier version, you can use reduced-fat Oreos and 2% milk, but the texture will be a little less luxurious.
Dietary Considerations: This recipe is not gluten-free (due to the Oreos) and contains dairy. For a gluten-free option, see the variations section above. It also contains soy (in the Oreos).
Personal Wellness Perspective: I believe in balance. We eat salads most nights, but on Halloween? We eat dirt cups. It is about enjoying the moment and the company. A little bit of sugar and nostalgia is good for the soul.
FAQs
Can I use a different brand of pudding mix?
Yes, you can use any brand of instant chocolate pudding mix. Just make sure it is the “instant” variety, not the cook-and-serve kind. The cook-and-serve will take much longer and the texture will be different.
Can I use a different type of cookie?
Absolutely. You can use chocolate wafer cookies, gluten-free chocolate sandwich cookies, or even crushed brownies for a different flavor and texture. Oreos are just the classic choice for that “dirt” look.
How far in advance can I make these?
You can make these up to 2 days in advance. Store them in the refrigerator, covered. They actually taste better after a day because the flavors have time to meld together.
Can I freeze these dirt cups?
I do not recommend freezing them. The pudding will become icy and the texture will be ruined. They are best made fresh and stored in the fridge.
My pudding didn’t set. What went wrong?
This usually happens for two reasons: you didn’t whisk it for the full 2 minutes, or your milk wasn’t cold enough. Make sure you use very cold milk and set a timer for a full 2 minutes of vigorous whisking. If it still doesn’t set, you can try adding a little more pudding mix.
Conclusion
So there you have it. The dirt cups that finally let me stop dreaming about The Sugar Moon and start enjoying Halloween again at home. They are easy, they are fun, and they are absolutely guaranteed to be the hit of your party. I love this recipe because it proves you don’t need to be a pastry chef to create something that looks and tastes spectacular. It is a little bit of kitchen magic that anyone can do.
I would love to see your creepy creations! Leave a comment below and tell me how yours turned out. Did you add spiders? Did you use different worms? Share a photo on Pinterest and tag me so I can see your spooky spread. Go make some dirt—I promise you won’t regret it!
Easy Halloween Oreo Dirt Cups with Gummy Worms
These no-bake dirt cups are the ultimate Halloween treat: layers of creamy chocolate pudding and crushed Oreo ‘dirt’ with gummy worms peeking out. Quick to assemble and guaranteed to be a hit at any spooky gathering.
- Prep Time: 15 minutes
- Cook Time: 0 minutes
- Total Time: 1 hour 15 minutes
- Yield: 8 servings 1x
- Category: Dessert
- Cuisine: American
Ingredients
- 1 (3.9-ounce) package Instant Chocolate Pudding Mix
- 2 cups Cold Whole Milk
- 1 (14.3-ounce) package Regular Oreo Cookies (about 36 cookies)
- 1 (4.25-ounce) package Gummy Worms
- 8 (5-ounce) Clear Plastic Cups
- Optional: Green Decorating Gel
- Optional: Gummy or Plastic Spiders
Instructions
- Crush the Oreos: Place all 36 Oreos (filling and all) into a food processor. Pulse until you have fine, dark crumbs that look like potting soil. Set aside.
- Make the Pudding: In a large mixing bowl, pour the 2 cups of cold milk. Whisk in the instant chocolate pudding mix. Whisk vigorously for 2 full minutes. Let it sit for 5 minutes to fully set.
- Prepare the Cups: Take your 8 clear cups. Start with a generous tablespoon of Oreo crumbs in the bottom of each cup. Press it down lightly with the back of a spoon.
- First Pudding Layer: Spoon about 3 tablespoons of the prepared pudding over the Oreo layer in each cup. Spread evenly.
- Add the Worms: Take a few gummy worms and poke them into the pudding layer, making sure one end is sticking up.
- Second Pudding Layer: Divide the remaining pudding evenly among the 8 cups, spooning it over the worms. Smooth the top.
- Top with ‘Dirt’: Sprinkle a generous layer of the remaining Oreo crumbs over the top of each cup, completely covering the pudding.
- Decorate and Chill: Place a few more gummy worms on top. If desired, add green decorating gel for grass tufts. Cover loosely with plastic wrap and refrigerate for at least 1 hour before serving.
Notes
For best results, use whole milk and whisk the pudding for a full 2 minutes. These can be made up to 2 days in advance and taste even better the next day. Do not freeze.
Nutrition
- Serving Size: 1 cup
- Calories: 380
- Sugar: 40
- Fat: 15
- Carbohydrates: 55
- Protein: 6
Keywords: Halloween, dirt cups, Oreo, gummy worms, no-bake, chocolate pudding, easy dessert


