The woman at the craft fair booth watched me eyeing her caramel apples for a solid five minutes before she finally spoke. “You’re overthinking it,” she said, not unkindly. She was right—I was trying to figure out how her glossy caramel stayed perfectly in place without sliding off the apple in one sad sheet. She handed me a sample on a stick and shrugged. “It’s just patience and a good thermometer. But if you’re in a hurry, slice ’em first.” That was three Octobers ago, and honestly, that conversation changed my whole approach to Halloween treats. I went home and immediately started experimenting with sliced apples instead of whole ones, because let’s face it—who has time to dip individual apples when you’re trying to get costumes sorted and pumpkins carved? These Quick Spooky Caramel Apple Slices Bar came out of that messy, wonderful afternoon of trial and error. My kitchen looked like a caramel bomb went off, but the result was so good I almost didn’t care about the cleanup. Almost.
The beauty of this recipe is that it respects your time. You know that feeling when you want to make something festive for Halloween but you’re already running on fumes? Maybe you’ve been there, staring at a bag of apples and wondering if you can just hand out granola bars instead. This is your solution. The apples are sliced into rings or wedges, dipped in quick caramel, and then the real fun begins—decorating them like little spooky creatures. Think monster faces, ghostly white chocolate drizzles, or spiderweb patterns that take about ten seconds each. The whole thing comes together in under thirty minutes, and the cleanup is surprisingly manageable. Plus, kids can help with the decorating part, which means you get a few minutes of peace while they go wild with sprinkles and candy eyes. It’s a win-win, honestly.
I keep coming back to this recipe because it solves a real problem: how to make something that looks impressive without spending your whole evening in the kitchen. The caramel sets quickly on the slices, so you’re not waiting around for things to cool. And because you’re working with slices instead of whole apples, you get more surface area for toppings and fewer awkward bites. The woman at the craft fair was right—sometimes the best solutions come from letting go of perfection and just getting started. This recipe stays in my Halloween rotation because it’s the kind of treat that makes people smile, and it doesn’t demand more from you than you have to give. That’s rare, and I’ll take it every time.
Why You’ll Love This Recipe
Let me tell you why this has become my go-to Halloween treat year after year. It’s not just about the taste—though the combination of crisp apple, buttery caramel, and crunchy toppings is honestly hard to beat. It’s about how easy it makes your life when you’re juggling a million things.
- Quick & Easy: You can have these ready in under 30 minutes. No candy thermometers required if you use the shortcut method I’ll share below. Perfect for those evenings when you realize the school Halloween party is tomorrow and you’ve got nothing.
- Simple Ingredients: Apples, caramel candies, a little cream, and whatever toppings you have in your pantry. No specialty baking stores needed—I promise you can find everything at your regular grocery store.
- Perfect for Halloween: These are great for classroom parties, trunk-or-treat events, or just a fun activity with the kids. They’re less messy than whole caramel apples and much easier to eat.
- Crowd-Pleaser: I’ve brought these to three different Halloween gatherings now, and every single time, people ask for the recipe. Kids love decorating them, and adults love eating them.
- Unbelievably Delicious: The ratio of apple to caramel is spot-on because you’re controlling how much goes on each slice. No more biting into a whole apple and getting all caramel in one bite and plain apple in the next.
What makes this recipe different from the dozens of other caramel apple recipes out there is the slicing technique. By cutting the apples into rings or wedges, you get more surface area for the caramel to cling to, and you can decorate each piece individually. This means you can make a whole platter of different spooky designs without spending hours. It’s the kind of recipe that makes you look like a Halloween hero with minimal effort.
This isn’t just good—it’s the kind of treat that makes people close their eyes after the first bite. The caramel is soft and chewy, the apple is crisp and tart, and the toppings add that little crunch that makes everything better. It’s comfort food reimagined for a holiday that’s supposed to be fun, not stressful. Perfect for impressing guests without breaking a sweat, or turning a regular Tuesday into something memorable.
What Ingredients You Will Need
This recipe uses simple, everyday ingredients to create something that looks and tastes like you spent hours on it. Most of these are probably in your kitchen right now, which is exactly how I like to cook on busy weeknights.
- Apples: 4 medium apples (about 600g). I prefer Granny Smith for their tartness that balances the sweet caramel, but Honeycrisp or Fuji work beautifully too. Look for firm apples without bruises—they’ll hold up better during dipping. If you’re using organic apples, just give them a good wash; otherwise, I recommend peeling them to remove any wax coating that might prevent the caramel from sticking.
- Caramel candies: 400g (about 50-60 individual wrapped caramels). I use Kraft Caramels because they melt evenly and have a consistent texture, but any brand works. Unwrap them while you’re waiting for water to boil—it’s tedious but worth it. For a shortcut, you can use 1 can (400g) of dulce de leche, though the texture will be slightly softer.
- Heavy cream: 60ml (¼ cup). This thins the caramel to a dippable consistency and adds richness. You can substitute half-and-half or even whole milk in a pinch, but the caramel won’t be quite as luscious. For a dairy-free version, use full-fat coconut cream.
- Butter: 30g (2 tablespoons), unsalted. This gives the caramel a silky finish and helps prevent it from seizing. If you only have salted butter, just reduce or skip any additional salt.
- Vanilla extract: 5ml (1 teaspoon). Pure vanilla adds depth, but imitation works fine here since the caramel is already quite flavorful. I’ve used both and honestly can’t tell the difference once the toppings go on.
- Toppings (choose your favorites):
- White chocolate chips: 100g (about ½ cup), melted, for drizzling ghost faces or spiderwebs
- Semi-sweet chocolate chips: 100g (about ½ cup), melted, for contrast designs
- Sprinkles: Halloween-themed or any color you like
- Crushed pretzels: 50g (about ½ cup), for a salty crunch that balances the sweetness
- Mini candy eyes: These are non-negotiable for the spooky factor—you can find them at craft stores or online
- Chopped nuts: 50g (about ½ cup), peanuts or almonds work great
- Shredded coconut: 30g (about ¼ cup), toasted for extra flavor
- Optional flavor additions:
- Sea salt: A pinch of flaky sea salt on top of the caramel takes these to another level. Trust me on this one.
- Cinnamon: 2g (½ teaspoon) mixed into the caramel for a warm, autumnal note
- Espresso powder: 1g (¼ teaspoon) to deepen the caramel flavor without making it taste like coffee
For the apples, I recommend buying a few extra in case some get damaged during slicing or dipping. It happens to the best of us—I once dropped three slices in a row because my hands were sticky. Also, if you’re making these ahead for a party, consider using lemon juice (about 15ml or 1 tablespoon) mixed with water to toss the sliced apples and prevent browning. Just pat them dry before dipping.
Equipment Needed
You don’t need much for this recipe, which is part of its charm. Here’s what you’ll want to have on hand:
- Sharp knife and cutting board: A good chef’s knife makes clean slices through apples without crushing them. I use my 8-inch Wüsthof, but any sharp knife works. If your knife is dull, the apple slices will be jagged and might break during dipping.
- Apple corer or melon baller: To remove the seeds from the center of each slice. An apple corer is faster, but a melon baller gives you more control. You can also just use a small knife—it takes a little longer but gets the job done.
- Small saucepan: For melting the caramel. A heavy-bottomed pan distributes heat evenly and prevents scorching. I’ve used a cheap non-stick pan for years and it works fine, just keep the heat low.
- Parchment paper or silicone baking mat: To line your baking sheet so the caramel slices don’t stick. Wax paper will work in a pinch, but parchment is more reliable.
- Baking sheet: Large enough to hold all your apple slices in a single layer. I use a half-sheet pan, but any rimmed baking sheet works.
- Forks or skewers: For dipping the apple slices into the caramel. Wooden skewers are cheap and disposable, but forks work too—just wipe them off between dips to avoid caramel buildup.
- Microwave-safe bowl (optional): If you’re melting chocolate for drizzling, a microwave is faster than a double boiler. Just use 30-second intervals and stir between each one.
- Piping bags or zip-top bags: For drizzling melted chocolate in decorative patterns. A small zip-top bag with the corner snipped off works perfectly and costs nothing.
If you don’t have an apple corer, don’t run out and buy one just for this recipe. A paring knife works fine—just cut around the core and remove the seeds. I’ve done it both ways and honestly, the knife method gives you more control over the shape of your slices.
Preparation Method
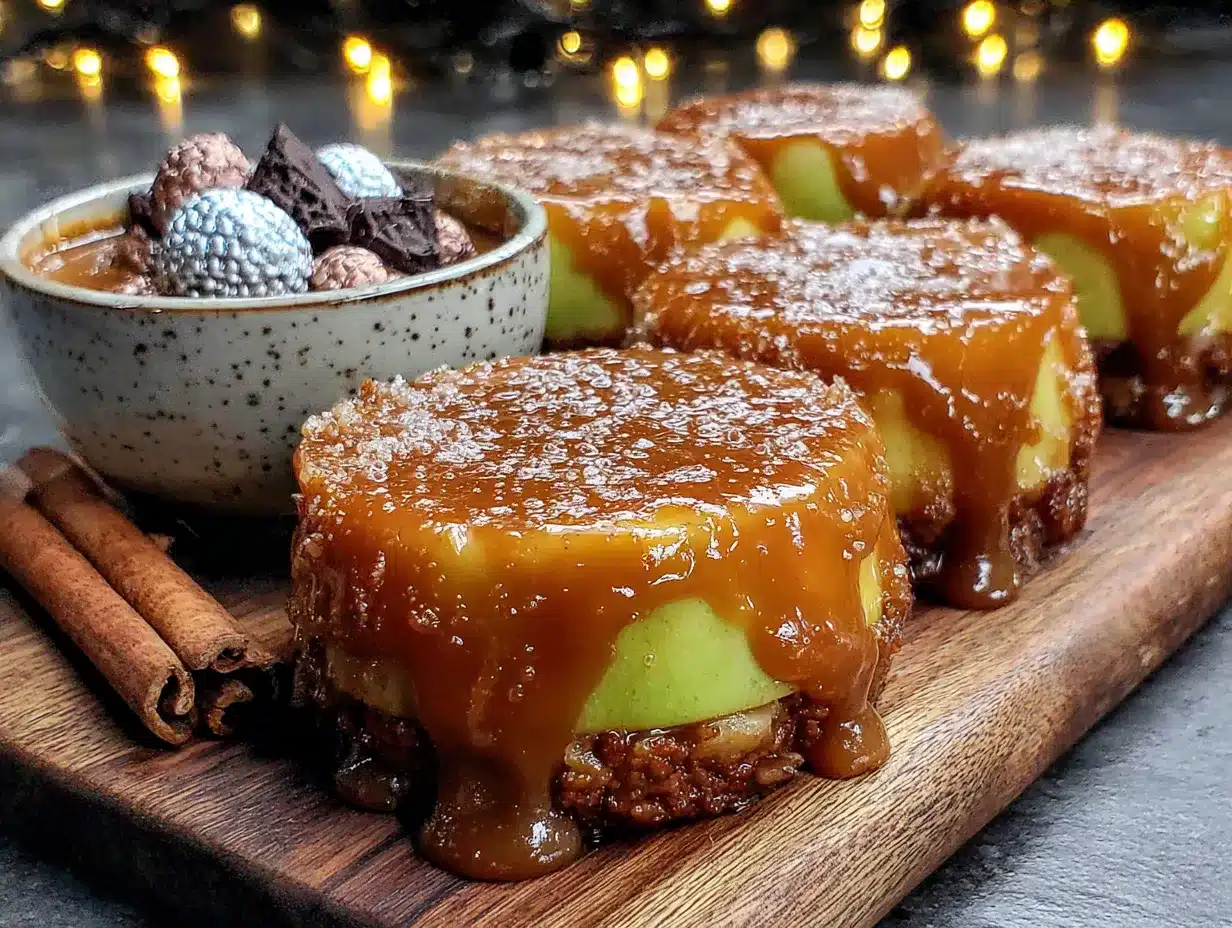
Let’s get into the actual making of these spooky treats. I’ve broken it down into clear steps so you can follow along without stress. Take your time with the first batch—you’ll get faster as you go.
- Prepare your apples: Wash and dry 4 medium apples thoroughly. If they’re not organic, consider peeling them to remove any wax coating. Slice each apple into rings about 1cm (½ inch) thick, or into wedges if you prefer. You should get about 4-5 rings per apple, or 8 wedges. Use a small knife or melon baller to remove the seeds from the center of each slice. Don’t worry if some slices break—you can still dip and eat those, they just won’t look as pretty. Place the slices on a parchment-lined baking sheet and pat them dry with a paper towel. Moisture is the enemy of caramel adhesion, so be thorough here.
- Make the caramel: Unwrap 400g of caramel candies and place them in a small saucepan with 60ml (¼ cup) heavy cream and 30g (2 tablespoons) butter. Set the pan over low heat—I know it’s tempting to crank it up, but low and slow is the way to go. Stir constantly with a silicone spatula or wooden spoon until everything is melted and smooth, about 8-10 minutes. The mixture will look grainy at first, then suddenly become glossy and uniform. Remove from heat and stir in 5ml (1 teaspoon) vanilla extract. If you’re adding cinnamon or espresso powder, stir that in now. Let the caramel cool for 2-3 minutes—it should be warm but not hot enough to burn your finger when you test it.
- Dip the apple slices: Working one at a time, insert a fork or skewer into an apple slice and dip it into the warm caramel. Let the excess drip off for a few seconds—you want a thin, even coating, not a thick glob. Place the dipped slice back on the parchment-lined baking sheet. Repeat with the remaining slices. If the caramel starts to thicken as it cools, return the pan to low heat for a minute and stir until it loosens up. Don’t microwave it to reheat—I’ve done that and ended up with scorched caramel that tasted burnt.
- Add your toppings: While the caramel is still warm and sticky, sprinkle on your chosen toppings. This is where the spooky fun begins. For ghost faces, press two mini candy eyes onto the caramel and drizzle a little white chocolate for the mouth. For spiderwebs, drizzle melted white chocolate in a spiral pattern and drag a toothpick through it from center to edge. For monster faces, use green sprinkles and candy eyes. Work quickly—the caramel sets in about 5-7 minutes at room temperature. If it hardens before you’re done, the toppings won’t stick as well.
- Let them set: Place the baking sheet in the refrigerator for 15-20 minutes to allow the caramel to firm up completely. This step is important—if you try to serve them too soon, the caramel will slide off the apple slices. I learned this the hard way when I served them at a party and ended up with caramel puddles on the plate.
- Serve or store: Once set, arrange the spooky caramel apple slices on a platter and serve within 2-3 hours for best texture. If you’re making them ahead, store them in the refrigerator in a single layer, covered loosely with plastic wrap, for up to 24 hours. Let them sit at room temperature for 10 minutes before serving to soften the caramel slightly.
A quick note on timing: the whole process from start to finish takes about 30 minutes of active work, plus 15 minutes of chilling time. If you’re making these for a party, I recommend dipping and decorating the slices in batches of 4-5 at a time so the caramel doesn’t harden before you get to the toppings.
Cooking Tips & Techniques
After making these spooky caramel apple slices more times than I care to count, I’ve picked up a few tricks that make the process smoother. Let me share what I’ve learned so you don’t have to repeat my mistakes.
The biggest mistake people make is rushing the caramel. I get it—you’re hungry, the kids are impatient, and you want these done. But if you melt the caramel on high heat, it will scorch and develop a bitter, burnt flavor. Keep the heat low and stir constantly. The caramel is ready when it’s smooth and flows off the spoon like thick honey. If it’s too thick to dip, add another tablespoon of cream. If it’s too thin, let it simmer for another minute or two while stirring.
Temperature matters more than you think. The caramel should be warm but not hot when you dip the apples. If it’s too hot, it will slide right off the apple slices. If it’s too cool, it will be too thick to coat evenly. I test it by dipping a finger in—if it feels comfortably warm without burning, it’s ready. This usually takes about 2-3 minutes off the heat. Also, make sure your apple slices are at room temperature, not straight from the fridge. Cold apples cause the caramel to seize and become grainy.
Here’s a trick for even coating: Instead of dipping the apple slices straight down, tilt them at a 45-degree angle and rotate as you pull them out. This creates a thinner, more even layer and reduces drips. I also tap the fork against the side of the pan to remove excess caramel before placing the slice on the parchment. This prevents those sticky puddles that make a mess of your serving platter.
Don’t skip the drying step. Moisture is the enemy of caramel adhesion. After washing your apples, dry them thoroughly with a clean kitchen towel, then let them sit on the counter for 5 minutes. Any remaining moisture will cause the caramel to slide off in patches. I once made the mistake of dipping slightly damp apples and ended up with caramel that looked like it was peeling—not a good look for a party platter.
Timing is everything with toppings. Add your sprinkles, nuts, and candy eyes while the caramel is still warm and tacky. If you wait too long, the caramel will set and the toppings won’t stick. I like to have all my toppings ready in small bowls before I start dipping, so I can work quickly. For melted chocolate drizzles, wait until the caramel has set completely (about 10 minutes in the fridge) so the chocolate doesn’t mix into the caramel and create a muddy look.
Variations & Adaptations
One of the best things about this recipe is how easy it is to customize. Here are some variations I’ve tried and loved, plus a few that my friends swear by.
- Dietary adaptations: For a dairy-free version, use coconut cream instead of heavy cream and dairy-free caramel candies (I like the ones from Enjoy Life). The texture will be slightly softer, but the taste is still fantastic. For a vegan option, use maple syrup-based caramel—combine 120ml (½ cup) maple syrup with 60ml (¼ cup) coconut cream and a pinch of salt, simmer until thickened. For a gluten-free version, just check your toppings—most sprinkles and chocolate chips are gluten-free, but pretzels are not, so swap them for crushed nuts or seeds.
- Flavor variations: Add 5ml (1 teaspoon) of pumpkin pie spice to the caramel for a fall twist. I tried this last year and it was a huge hit at our Halloween potluck. You can also add 15ml (1 tablespoon) of bourbon or rum for an adult version—just stir it in after removing the caramel from the heat so the alcohol doesn’t cook off. For a salted caramel version, sprinkle flaky sea salt on top of each slice right after dipping. The salt cuts through the sweetness beautifully.
- Seasonal swaps: In the fall, use Honeycrisp or Macoun apples for their complex flavor. In winter, when apples are less exciting, use pear slices instead—they’re softer but work well with the caramel. In spring or summer, try this with fresh peaches or nectarines for a totally different treat. Just note that softer fruits won’t hold up as well, so serve them immediately after making.
- Different cooking methods: If you don’t want to use the stovetop, you can melt the caramel in a microwave-safe bowl using 30-second intervals, stirring between each one. It takes about 2-3 minutes total. The texture won’t be quite as smooth, but it’s faster and requires less cleanup. For a no-cook version, use store-bought caramel sauce—just make sure it’s thick enough to coat the apples. You might need to refrigerate it for 10 minutes to thicken it up.
- Personal variation I love: My favorite version involves dipping the apple slices in dark chocolate first, letting it set, then dipping them in caramel and adding crushed peanuts. It’s like a candy bar on a stick. The chocolate layer prevents the caramel from making the apple soggy, and the combination of flavors is incredible. I made these for a Halloween party last year and they disappeared in minutes.
Serving & Storage Suggestions
These spooky caramel apple slices are best served within a few hours of making them, but with proper storage, they can last a bit longer. Here’s what I’ve learned from experience.
Serving temperature and presentation: Serve these at room temperature for the best texture—the caramel should be soft and chewy, not hard. If they’ve been in the fridge, let them sit out for 10-15 minutes before serving. Arrange them on a large platter with the decorated sides facing up so everyone can see the spooky designs. I like to put them on a black or orange platter for Halloween, but any dark surface makes the colors pop. For a party, insert small wooden skewers into each slice so guests can grab them without touching the caramel.
Complementary dishes and beverages: These pair beautifully with warm apple cider or a hot caramel latte. For a Halloween party spread, serve them alongside other finger foods like popcorn balls, pumpkin-shaped cookies, or a cheese board with apple slices. They’re also great as a dessert after a hearty meal—the sweetness is a nice contrast to savory dishes like chili or roasted vegetables.
Storage instructions: Store leftover slices in the refrigerator in an airtight container, layered between sheets of parchment paper to prevent sticking. They’ll keep for up to 2 days, but the apples will start to release moisture and soften the caramel after 24 hours. For longer storage, you can freeze them for up to 1 month—just place them in a single layer on a baking sheet, freeze until solid, then transfer to a freezer bag. Thaw in the refrigerator overnight before serving.
Reheating methods: If the caramel hardens too much in the fridge, let the slices sit at room temperature for 20 minutes. Don’t microwave them—it will melt the caramel and make a mess. If you’re serving them straight from the freezer, let them thaw in the fridge for 2-3 hours, then bring to room temperature. The texture won’t be quite as good as fresh, but they’re still delicious.
How flavors develop over time: The caramel will absorb some of the apple’s moisture after a few hours, making it softer and slightly more infused with apple flavor. I actually prefer them after an hour or two in the fridge—the flavors meld together beautifully. Just don’t wait longer than 24 hours, or the apples will start to brown and the caramel will become watery.
Nutritional Information & Benefits
Let’s talk about what’s actually in these treats, because I know we all wonder. While they’re not health food, they do have some redeeming qualities.
Estimated nutritional values (per slice, based on 20 slices total): Approximately 180 calories, 7g fat, 30g carbohydrates, 2g protein, 1g fiber, and 22g sugar. These numbers will vary depending on your toppings and apple variety. The caramel adds most of the sugar, so if you’re watching your intake, go light on the toppings or use a sugar-free caramel alternative.
Health benefits of key ingredients: Apples are a good source of fiber and vitamin C, and they contain antioxidants that support heart health. The caramel provides quick energy from sugar, which can be helpful if you’re running around with kids on Halloween night. Nuts add healthy fats and protein, while dark chocolate offers antioxidants. It’s not a balanced meal, but it’s a treat, and treats have their place in a healthy diet.
Dietary considerations: This recipe is vegetarian but not vegan (unless you use the substitutions mentioned above). It contains dairy and gluten (from the pretzels and some sprinkles), so check your toppings if you have allergies. The caramel candies may contain soy lecithin, so read labels carefully. For a low-sugar version, use sugar-free caramel and dark chocolate with at least 70% cocoa content.
Potential allergens: Dairy (caramel, cream, butter, white chocolate), gluten (pretzels, some sprinkles), nuts (if you add them), and soy (in some caramel candies). Always check labels if you’re serving people with allergies. I once made these for a school party and had to make a separate batch without nuts for one child—it was easy enough to do, just keep some slices plain.
Personal wellness perspective: I believe in enjoying treats in moderation, especially around holidays. These caramel apple slices are a once-a-year indulgence for my family, and that makes them special. The apples provide some nutritional value, and the portion control is built in—each slice is a satisfying serving without being excessive. If you’re looking for a healthier version, try using dark chocolate instead of white chocolate and adding more nuts for protein and healthy fats.
Conclusion
These Quick Spooky Caramel Apple Slices Bar have become a staple in my Halloween rotation for good reason. They’re fast enough to make on a busy weeknight, fun enough to get the kids involved, and impressive enough to bring to any party. The caramel is rich and buttery, the apples are crisp and tart, and the toppings let you get as creative as you want. I’ve made them with ghost faces, spiderwebs, and monster designs, and every batch disappears just as fast.
What I love most about this recipe is how forgiving it is. If your caramel is a little too thick, add more cream. If your apple slices break, just eat them as a snack. The point is to have fun and make something that brings people together. Halloween can be stressful enough without worrying about perfect caramel apples. This recipe takes the pressure off and lets you enjoy the process.
I’d love to hear how yours turn out! Drop a comment below with your favorite topping combinations or any spooky designs you come up with. Share this recipe with a friend who needs a last-minute Halloween treat idea, and tag me in your photos if you post them on social media. Remember, the best recipes are the ones that make you smile, and these definitely do that. Happy Halloween, and happy snacking!
Frequently Asked Questions
Can I use pre-made caramel sauce instead of melting candies?
Yes, you can use store-bought caramel sauce, but you’ll need to thicken it first. Refrigerate the sauce for 10-15 minutes until it reaches a consistency similar to honey. If it’s too thin, it will slide right off the apple slices. I’ve used this shortcut when I was really short on time, and it worked fine—just don’t expect the same chewy texture as melted caramel candies.
How do I prevent the apple slices from browning?
Toss the sliced apples in a mixture of 15ml (1 tablespoon) lemon juice and 60ml (¼ cup) water before dipping. Pat them dry thoroughly afterward. The lemon juice slows down oxidation without affecting the taste too much. You can also use a commercial product like Fruit-Fresh, but lemon juice works just as well and costs less.
Can I make these a day ahead for a party?
You can make them up to 24 hours in advance, but the texture is best within a few hours of making. If you must make them ahead, store them in the refrigerator in a single layer, covered loosely with plastic wrap. Let them sit at room temperature for 10-15 minutes before serving. The apples will release some moisture over time, so the caramel might be slightly softer than fresh.
What’s the best way to clean caramel off my pots and pans?
Fill the saucepan with warm water and let it soak for 15-20 minutes. The caramel will dissolve on its own. If there’s stubborn residue, add a drop of dish soap and bring the water to a simmer, then scrub gently. Avoid using abrasive sponges on non-stick pans. For utensils, soak them in warm water immediately after use—dried caramel is much harder to remove.
Can I use other fruits instead of apples?
Absolutely! Pears work wonderfully—they’re softer but have a similar texture. Firm peaches or nectarines are great in summer. Banana slices are delicious but delicate, so dip them gently. Just keep in mind that softer fruits won’t hold up as well and should be served immediately. I’ve also used pineapple rings for a tropical twist, and they were a huge hit.
PrintQuick Spooky Caramel Apple Slices: Easy Halloween Treat

These quick and easy caramel apple slices are perfect for Halloween. Sliced apples are dipped in homemade caramel and decorated with spooky toppings like candy eyes and chocolate drizzles, all in under 30 minutes.
- Prep Time: 15 minutes
- Cook Time: 10 minutes
- Total Time: 25 minutes
- Yield: 20 slices 1x
- Category: Dessert
- Cuisine: American
Ingredients
- 4 medium apples (about 600g), such as Granny Smith, Honeycrisp, or Fuji
- 400g caramel candies (about 50–60 individual wrapped caramels)
- 60ml (¼ cup) heavy cream
- 30g (2 tablespoons) unsalted butter
- 5ml (1 teaspoon) vanilla extract
- 100g (½ cup) white chocolate chips, melted
- 100g (½ cup) semi-sweet chocolate chips, melted
- Halloween-themed sprinkles
- 50g (½ cup) crushed pretzels
- Mini candy eyes
- 50g (½ cup) chopped nuts (peanuts or almonds)
- 30g (¼ cup) shredded coconut, toasted
- Optional: pinch of flaky sea salt
- Optional: 2g (½ teaspoon) cinnamon
- Optional: 1g (¼ teaspoon) espresso powder
Instructions
- Wash and dry apples thoroughly. If not organic, peel to remove wax. Slice each apple into rings about 1cm (½ inch) thick, or into wedges. Remove seeds from center using a small knife or melon baller. Place slices on a parchment-lined baking sheet and pat dry.
- Unwrap caramel candies and place in a small saucepan with heavy cream and butter. Cook over low heat, stirring constantly, until melted and smooth, about 8-10 minutes. Remove from heat and stir in vanilla extract. Add cinnamon or espresso powder if using. Let cool for 2-3 minutes.
- Working one at a time, insert a fork or skewer into an apple slice and dip into warm caramel. Let excess drip off, then place on parchment-lined baking sheet. Repeat with remaining slices. If caramel thickens, reheat gently on low.
- While caramel is still warm, add toppings: press candy eyes for ghost faces, drizzle white chocolate for spiderwebs, or use sprinkles and candy eyes for monster faces. Work quickly as caramel sets in 5-7 minutes.
- Refrigerate baking sheet for 15-20 minutes to firm up caramel completely.
- Serve within 2-3 hours for best texture. Store leftovers in refrigerator in a single layer, covered loosely with plastic wrap, for up to 24 hours. Let sit at room temperature for 10 minutes before serving.
Notes
For best results, dry apple slices thoroughly before dipping to ensure caramel adheres. If caramel becomes too thick, add a tablespoon of cream. To prevent browning, toss slices in lemon water (1 tablespoon lemon juice + ¼ cup water) and pat dry. For dairy-free, use coconut cream and dairy-free caramel candies.
Nutrition
- Serving Size: 1 slice
- Calories: 180
- Sugar: 22
- Sodium: 120
- Fat: 7
- Saturated Fat: 4
- Carbohydrates: 30
- Fiber: 1
- Protein: 2
Keywords: Halloween, caramel apples, apple slices, spooky treats, easy dessert, kid-friendly, fall recipe


