This was supposed to be a batch of my standard butterscotch blondies—the ones I’ve made a hundred times for bake sales and Sunday night desserts. But I grabbed a bag of candy corn instead of butterscotch chips, my toddler was “helping” by dumping sprinkles into the bowl, and the oven beeped angrily because I’d preheated it to the wrong temperature. I was already late picking up my oldest from soccer practice, and honestly? I almost just scraped the whole thing into the trash. What came out was nothing like the plan—and better.
You know that feeling when a kitchen disaster actually saves the day? The blondies came out golden, chewy on the edges and soft in the middle, with little pops of candy corn sweetness throughout. My kids devoured them before they even cooled. My husband asked if I’d bought them from a bakery. And me? I just stood there, spatula in hand, wondering why I’d ever stressed about the perfect recipe in the first place. This is that recipe now—the one I make every October without fail. It’s the kind of happy accident that makes you trust your instincts a little more next time.
Why You’ll Love This Recipe
Let me tell you why these blondies have become my secret weapon for Halloween season. I’ve tested this recipe five times now—tweaking the butter ratio, adjusting the bake time, even trying different candy corn brands (stick with Brach’s, by the way). What I landed on is foolproof, even when your kitchen is chaos and you’re multitasking with a toddler on your hip.
- Quick & Easy: From bowl to oven in under 10 minutes, and ready to eat in 30. Perfect for those after-school Halloween party emergencies.
- Simple Ingredients: Butter, sugar, eggs, flour, vanilla—things you already have. Plus a bag of candy corn that somehow always appears this time of year.
- Perfect for Halloween: Classroom parties, trunk-or-treat events, or just a fun Friday night treat that gets everyone in the spooky spirit.
- Crowd-Pleaser: My picky five-year-old who “doesn’t like sweets” ate three. The neighbor kids asked for the recipe. Even my mother-in-law approved—and she never approves.
- Unbelievably Delicious: The candy corn melts into little chewy pockets of sweetness, while the blondie base stays buttery and rich. It’s comfort food with a festive twist.
What makes this different from every other Halloween dessert out there? Most candy corn recipes are either too sweet or the candy gets rock-hard after baking. I figured out that tossing the candy corn in a little flour before mixing prevents it from sinking to the bottom and keeps it soft. That’s the kind of tip you only learn from making the mistake yourself—trust me, I’ve had my share of candy-on-the-bottom disasters.
These blondies aren’t just good—they’re the kind that make you close your eyes after the first bite. They’re perfect for impressing other parents without stressing yourself out, or turning a regular Tuesday into something a little more magical.
What Ingredients You Will Need
This recipe uses simple, pantry-friendly ingredients to deliver big flavor without the fuss. Most of these are probably already in your kitchen, which is exactly how I like it when I’m feeding a family on a sensible budget.
For the Blondie Base:
- 1/2 cup (1 stick) unsalted butter, melted (I use Kerrygold for the richest flavor, but any brand works)
- 1 cup packed light brown sugar (adds that deep, caramel-like sweetness)
- 1 large egg, room temperature (cold eggs can make the batter seize up)
- 1 teaspoon vanilla extract (pure, not imitation, if you can swing it)
- 1 cup all-purpose flour (spooned and leveled—don’t scoop directly from the bag)
- 1/2 teaspoon baking powder (for that slight lift without being cakey)
- 1/4 teaspoon salt (balances the sweetness perfectly)
For the Candy Corn Goodness:
- 1 1/2 cups candy corn (about one standard 14-ounce bag—save the rest for snacking)
- 1 tablespoon all-purpose flour (for coating the candy—this is the secret to keeping them from sinking)
Optional but Recommended:
- 1/2 cup white chocolate chips (adds another layer of sweetness and texture)
- Orange and yellow sprinkles (because Halloween deserves extra sparkle)
- Flaky sea salt for sprinkling on top (trust me on this one—it makes the sweet pop)
Ingredient Tips from My Kitchen: I’ve made these with both light and dark brown sugar, and light brown sugar gives the best texture—dark brown makes them a little too dense. If you’re out of butter, you can substitute coconut oil, but the flavor won’t be as rich. For a dairy-free version, use plant-based butter and skip the white chocolate chips. And here’s something I learned the hard way: don’t use the “harvest” mix with the little pumpkins and ghosts—they don’t melt the same way. Stick with classic candy corn.
Equipment Needed
You don’t need fancy equipment for these blondies—that’s part of why I love this recipe. Here’s what you’ll need:
- 8×8-inch baking pan: Glass or metal both work, but metal gives slightly crispier edges. If you only have a 9×9, the blondies will be thinner and bake a few minutes faster.
- Mixing bowls: One medium for the wet ingredients, one small for the flour mixture. I use my grandmother’s old Pyrex bowls, but anything works.
- Whisk and rubber spatula: A whisk for combining the wet ingredients, a spatula for folding in the candy corn. A wooden spoon works in a pinch.
- Parchment paper: This is non-negotiable for easy removal. Let the paper hang over the edges like handles.
- Measuring cups and spoons: Dry measures for flour and sugar, liquid measure for the melted butter (or just use the markings on the butter wrapper).
- Cooling rack: Helps the blondies cool evenly so the edges don’t get soggy. No rack? Just slide them onto a cutting board after 10 minutes.
I’ve made these in a disposable foil pan when I brought them to a school party, and they turned out just fine. Don’t let missing equipment stop you—this recipe is forgiving.
Preparation Method
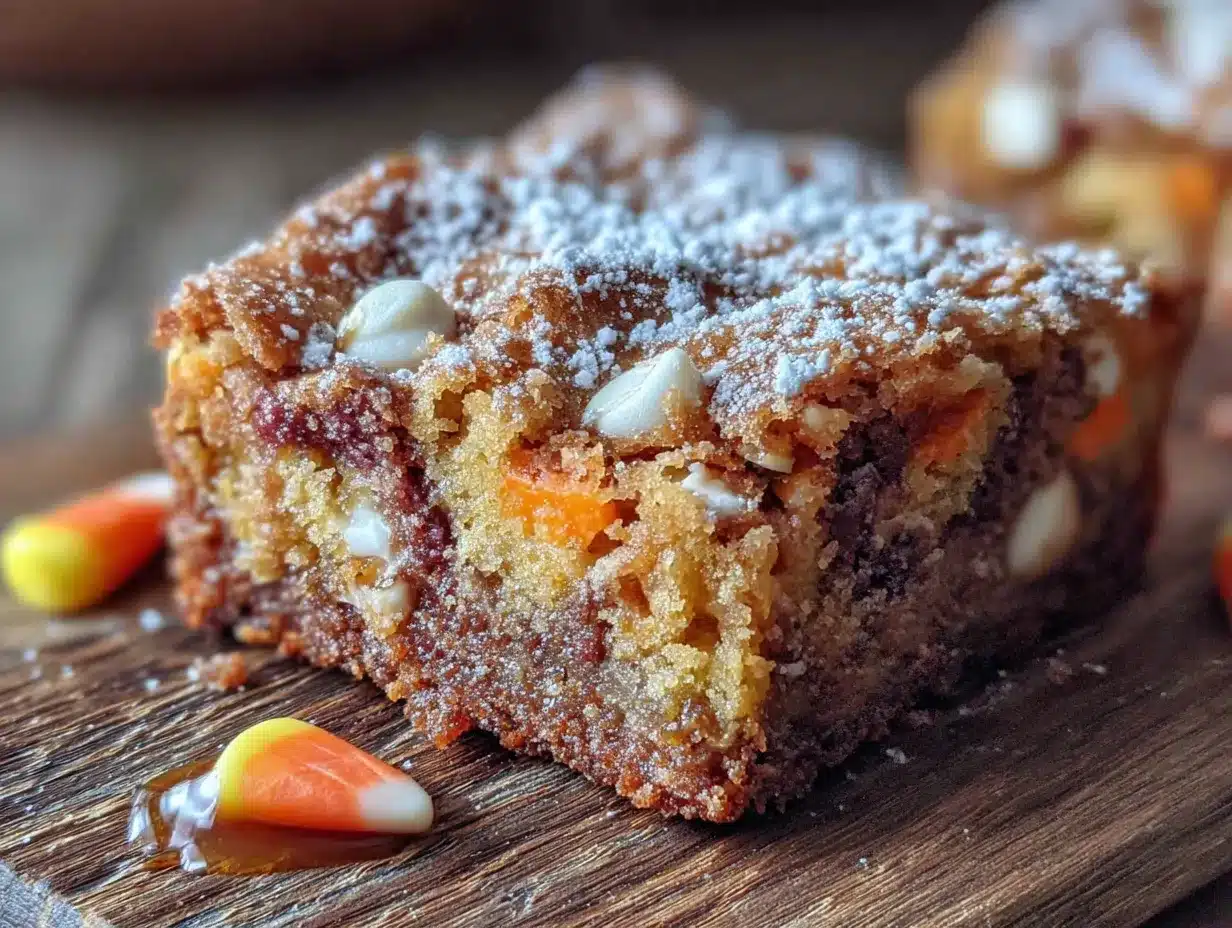
Follow these steps carefully, and you’ll have perfect blondies every time. I’ve included all the little details I wish someone had told me the first time.
- Preheat your oven to 350°F (175°C). Line your 8×8 pan with parchment paper, leaving a 2-inch overhang on two opposite sides. This creates handles for lifting the blondies out later. Lightly grease the parchment with butter or non-stick spray.
- Melt the butter. In a microwave-safe bowl, melt the 1/2 cup butter in 30-second intervals, stirring between each. You want it just melted—not hot. Let it cool for 2 minutes while you gather the other ingredients. Hot butter can scramble the egg, and nobody wants that.
- Mix the wet ingredients. In a medium bowl, whisk together the melted butter and 1 cup brown sugar until smooth. It should look like wet sand. Add the 1 large egg and 1 teaspoon vanilla, and whisk vigorously for about 30 seconds until the mixture is glossy and slightly thickened. This little bit of extra whisking helps create that crackly top everyone loves.
- Combine the dry ingredients. In a small bowl, whisk together 1 cup flour, 1/2 teaspoon baking powder, and 1/4 teaspoon salt. Make sure there are no lumps—baking powder loves to hide in clumps.
- Fold the dry into the wet. Pour the flour mixture into the butter mixture. Use your rubber spatula to fold gently—just until no streaks of flour remain. Overmixing will make the blondies tough. A few small lumps are totally fine.
- Prepare the candy corn. In a separate small bowl, toss the 1 1/2 cups candy corn with 1 tablespoon flour. This coating is the secret to keeping the candy evenly distributed. Without it, every piece sinks to the bottom and you get a sad, candy-free top layer.
- Fold in the candy corn. Gently fold the floured candy corn into the batter. If you’re adding white chocolate chips or sprinkles, fold those in now too. The batter will be thick and slightly sticky—that’s exactly right.
- Transfer to the pan. Scrape the batter into your prepared pan and spread it evenly with the spatula. It will be thick—don’t worry, it spreads as it bakes. Sprinkle with flaky sea salt if you’re using it.
- Bake for 22-25 minutes. The edges should be golden brown and pulling away from the sides slightly. The center will look just barely set and might jiggle a tiny bit—that’s how you get soft, fudgy blondies. A toothpick inserted in the center should come out with a few moist crumbs, not wet batter.
- Cool completely in the pan on a wire rack. This is the hardest part, I know. But cutting them warm will make them crumble. After about 30 minutes, use the parchment handles to lift the whole block out onto a cutting board. Let it cool another 15 minutes before slicing into 16 squares.
Cooking Tips & Techniques
I’ve made this recipe about a dozen times now, and I’ve collected some hard-won wisdom along the way. Here’s what I wish I’d known from the start.
Don’t overbake. This is the number one mistake people make with blondies. They look underdone in the center when they’re actually perfect. I pulled my first batch out at 28 minutes and they were dry by morning. Now I set my timer for 22 minutes and check every minute after that. Remember: they continue cooking in the hot pan after you pull them out.
Room temperature egg matters. I know, I know—who plans ahead for baking? But a cold egg seizes up the melted butter and gives you a lumpy batter. If you forgot to take it out of the fridge, place it in a bowl of warm water for 5 minutes. Works like a charm.
The flour-coating trick is non-negotiable. I learned this after my first batch had all the candy corn welded to the bottom of the pan. The flour creates a little barrier that keeps the candy suspended in the batter. I also toss my white chocolate chips in the same bowl of flour for good measure.
Use a light hand when mixing. I’m a vigorous stirrer by nature—it’s just how I cook. But blondie batter needs a gentle touch. Fold until just combined, then stop. Overmixing develops the gluten and gives you tough, cakey blondies instead of soft, chewy ones.
Let them cool completely. I know the smell is intoxicating. I know your kids are circling the kitchen like little sharks. But warm blondies are fragile blondies. I once tried to cut them after 15 minutes and ended up with a pan of crumbs. Patience pays off here.
Variations & Adaptations
One of the things I love about this recipe is how flexible it is. Here are some ways to make it your own:
Chocolate Lover’s Version: Swap 1/2 cup of the flour for 1/4 cup cocoa powder. Add 1/2 cup chocolate chips along with the candy corn. The bitterness of the cocoa balances the candy corn sweetness beautifully—I made this for a Halloween potluck and it disappeared first.
Nutty Crunch: Fold in 1/2 cup chopped pecans or walnuts. Toast them first in a dry skillet for 3-4 minutes to bring out their flavor. My husband, who claims he doesn’t like sweets, ate four of these in one sitting.
Gluten-Free Adaptation: Substitute the all-purpose flour with a 1:1 gluten-free baking flour (I like Bob’s Red Mill). Add 1/4 teaspoon xanthan gum if your blend doesn’t already include it. The texture is slightly more delicate, but still delicious.
Mini Blondie Bites: Use a mini muffin tin lined with paper liners. Fill each cup about 2/3 full and bake for 12-14 minutes. Perfect for classroom parties or Halloween goodie bags. My daughter’s teacher specifically requests these now.
Spooky Swirl: Before baking, drop spoonfuls of cream cheese mixture (4 oz cream cheese, 2 tablespoons sugar, 1 egg yolk) on top and swirl with a knife. It creates a marbled effect that looks impressive with zero extra effort.
Allergen-Friendly: Use dairy-free butter and skip the white chocolate chips for a dairy-free version. For egg-free, substitute with a flax egg (1 tablespoon ground flaxseed mixed with 3 tablespoons water, let sit 5 minutes). The texture will be slightly denser but still satisfying.
Serving & Storage Suggestions
These blondies are versatile enough for any Halloween occasion. Here’s how I serve and store them:
Serving Temperature: Room temperature is best—the texture is perfect and the candy corn is soft but not melty. If you’re serving them warm, pop individual squares in the microwave for 10 seconds. Add a scoop of vanilla ice cream for an extra-special treat.
Presentation Ideas: Arrange on a platter with orange and black napkins. Dust with powdered sugar for a “ghostly” effect. Or stack them in a clear cellophane bag tied with a orange ribbon for Halloween party favors. I’ve also cut them into triangles and arranged them like candy corn pieces on a plate—the kids loved it.
Complementary Dishes: Serve with apple cider, hot chocolate, or a pumpkin spice latte for adults. They also pair beautifully with a fruit salad—the tartness of apples or pears cuts through the sweetness.
Storage Instructions: Store in an airtight container at room temperature for up to 5 days. Layer them with parchment paper between each layer to prevent sticking. Do not refrigerate—it dries them out. If your kitchen is warm, they’ll keep fine for 3 days.
Freezer Tips: These freeze beautifully! Wrap individual squares tightly in plastic wrap, then place in a freezer bag. They’ll keep for up to 3 months. Thaw at room temperature for about 30 minutes, or microwave frozen for 20 seconds for a warm treat. I always stash a few in the freezer for those “I need a treat” moments.
Flavor Development: Honestly, these are even better the next day. The flavors meld overnight, and the texture becomes perfectly chewy. If you can resist eating them all on day one, you’re in for a treat on day two.
Nutritional Information & Benefits
Let’s be real—these are a treat, not a health food. But I believe in being informed, so here’s what you’re working with:
Per Serving (1 blondie, based on 16 servings):
- Calories: 215
- Fat: 8g
- Carbohydrates: 35g
- Sugar: 24g
- Protein: 2g
- Fiber: 0.5g
- Sodium: 95mg
Dietary Considerations: This recipe contains dairy, eggs, and gluten. For allergen-friendly versions, see the Variations section above. The candy corn is typically gluten-free, but always check the label if that’s a concern.
Healthier Perspective: I’ve tried making these with whole wheat flour and coconut sugar, and honestly? They weren’t as good. Sometimes a treat should just be a treat. That said, these are portion-controlled at 16 per pan, and one is usually enough to satisfy a sweet craving. I’d rather have one really good blondie than three mediocre healthy ones.
Ingredient Benefits: Butter provides vitamin A and healthy fats. Eggs offer protein and B vitamins. And candy corn? Well, it makes people smile—and that counts for something in my book.
Conclusion
These Kid-Friendly Halloween Candy Corn Blondies started as a mistake, but they’ve become a tradition in our house. They’re proof that you don’t need fancy techniques or expensive ingredients to make something memorable—just a little creativity and a willingness to embrace the happy accidents.
I’d love for you to try these and make them your own. Maybe you’ll add chocolate chips like my neighbor does, or skip the candy corn entirely and use M&Ms for a year-round version. That’s the beauty of a simple recipe—it’s a starting point, not a rulebook. Tag me in your photos or drop a comment below telling me how yours turned out. Did your kids help? Did you burn the first batch like I almost did? I want to hear it all.
Happy Halloween, friends. May your kitchen be messy, your candy corn plentiful, and your blondies perfectly chewy.
Frequently Asked Questions
Can I use other Halloween candy instead of candy corn?
Absolutely! Chopped-up Reese’s cups, chopped Kit Kats, or even chopped Snickers work great. Just keep the total amount to about 1 1/2 cups. Avoid anything with a hard shell like M&Ms—they don’t soften during baking and can be tough to bite into.
Why did my candy corn sink to the bottom?
This happens when you skip the flour-coating step. Tossing the candy corn in 1 tablespoon of flour before adding it to the batter creates a barrier that keeps it suspended. Also, make sure your batter isn’t too thin—it should be thick and scoopable, not runny.
Can I make these ahead of time for a party?
Yes! They actually taste better the next day. Bake them up to 2 days in advance, store in an airtight container at room temperature, and cut into squares just before serving. They also freeze beautifully for up to 3 months.
My blondies came out dry. What went wrong?
Most likely, they were overbaked. Blondies should look slightly underdone in the center when you pull them out—they continue cooking in the hot pan. Also, make sure you’re measuring your flour correctly: spoon it into the measuring cup and level it off, don’t scoop directly from the bag.
Can I double this recipe?
Yes! Double all ingredients and bake in a 9×13 pan. Increase the baking time to 30-35 minutes, checking for doneness around the 28-minute mark. You’ll get about 24 blondies from a double batch—perfect for larger parties or bake sales.
PrintKid-Friendly Halloween Candy Corn Blondies: Easy 30-Min Recipe
These chewy, buttery blondies are packed with candy corn for a festive Halloween treat. Ready in just 30 minutes, they’re perfect for parties, bake sales, or a fun family dessert.
- Prep Time: 10 minutes
- Cook Time: 22-25 minutes
- Total Time: 30 minutes
- Yield: 16 servings 1x
- Category: Dessert
- Cuisine: American
Ingredients
- 1/2 cup (1 stick) unsalted butter, melted
- 1 cup packed light brown sugar
- 1 large egg, room temperature
- 1 teaspoon vanilla extract
- 1 cup all-purpose flour
- 1/2 teaspoon baking powder
- 1/4 teaspoon salt
- 1 1/2 cups candy corn
- 1 tablespoon all-purpose flour (for coating candy corn)
- 1/2 cup white chocolate chips (optional)
- Orange and yellow sprinkles (optional)
- Flaky sea salt for sprinkling (optional)
Instructions
- Preheat your oven to 350°F (175°C). Line an 8×8-inch baking pan with parchment paper, leaving a 2-inch overhang on two opposite sides. Lightly grease the parchment with butter or non-stick spray.
- Melt the butter in a microwave-safe bowl in 30-second intervals, stirring between each. Let it cool for 2 minutes.
- In a medium bowl, whisk together the melted butter and brown sugar until smooth. Add the egg and vanilla, and whisk vigorously for about 30 seconds until glossy and slightly thickened.
- In a small bowl, whisk together the flour, baking powder, and salt until no lumps remain.
- Pour the flour mixture into the butter mixture. Fold gently with a rubber spatula until just combined—do not overmix.
- In a separate small bowl, toss the candy corn with 1 tablespoon flour until evenly coated.
- Gently fold the floured candy corn into the batter. If using white chocolate chips or sprinkles, fold them in now.
- Scrape the batter into the prepared pan and spread evenly. Sprinkle with flaky sea salt if desired.
- Bake for 22-25 minutes, until edges are golden brown and the center is just barely set. A toothpick inserted in the center should come out with a few moist crumbs.
- Cool completely in the pan on a wire rack. After about 30 minutes, use the parchment handles to lift the blondies out onto a cutting board. Let cool another 15 minutes before slicing into 16 squares.
Notes
Tossing candy corn in flour prevents it from sinking to the bottom. Do not overbake—blondies should look slightly underdone in the center when removed. Let cool completely before cutting to avoid crumbling. Store in an airtight container at room temperature for up to 5 days. Freeze individual squares wrapped in plastic wrap for up to 3 months.
Nutrition
- Serving Size: 1 blondie
- Calories: 215
- Sugar: 24
- Sodium: 95
- Fat: 8
- Carbohydrates: 35
- Fiber: 0.5
- Protein: 2
Keywords: candy corn blondies, Halloween blondies, easy blondies, kid-friendly Halloween dessert, 30-minute recipe


