The PTA Halloween party was in six hours and I’d completely forgotten. My son had reminded me three times that week, and I’d nodded along, thinking “plenty of time.” Well, plenty of time evaporated somewhere between the grocery run and the laundry mountain. The sign-up sheet said “treats for 30 kids” and I was staring at a pantry that had half a bag of marshmallows, a box of cereal, and some white chocolate chips I’d bought for a different project entirely.
Everyone else would be bringing elaborate cupcakes with fondant spiders and those creepy-crawly cookies that look way too real. I mean, one mom posted a picture of her graveyard cake on the class chat and I nearly deleted the app. The pressure was real. My kid was counting on me, and I was this close to swinging by the gas station for those pre-packaged brownies. You know that feeling when you want to be the cool parent but your brain just refuses to cooperate?
Then I saw the Rice Krispies box. And the marshmallows. And it clicked. I could make the simplest treats ever and just… ghost-ify them. Honestly, I was panicking so hard I melted the butter on too high heat and had to start over. The kitchen smelled like burnt butter and regret for a solid ten minutes. But the second batch? Perfect. I shaped them into little rounds, drizzled white chocolate, and stuck on some candy eyes. They looked ridiculous. They looked adorable. They looked like something a panicked mom threw together in forty-five minutes.
And you know what happened? The kids went absolutely wild. The elaborate graveyard cake sat half-eaten. A mom asked me for the recipe before I’d even put the tupperware lid back on. I stood there, slightly sheepish, explaining that it was basically cereal and marshmallows with a ghost costume. The whole thing took less than an hour, cost maybe eight bucks, and somehow made me look like a Halloween hero. I’ve been making these every year since, and honestly? I’m not even embarrassed anymore. Sometimes the best recipes come from the biggest disasters.
Why You’ll Love This Recipe
These Easy Halloween Rice Krispie Ghost Treats are the kind of recipe that saves your bacon when you’re short on time and shorter on patience. I’ve tested this method about a dozen times now, tweaking the marshmallow-to-cereal ratio until it hits that perfect chewy-but-not-rock-hard texture. Here’s why this one wins every single time:
- Quick & Easy: From start to finish, you’re looking at about 45 minutes. Most of that is cooling time. The actual hands-on work is maybe 15 minutes. Perfect for weeknight Halloween prep or last-minute school parties.
- Simple Ingredients: You probably have everything already. Marshmallows, butter, Rice Krispies cereal, white chocolate chips, and candy eyes. That’s it. No special trip to the fancy baking store.
- Budget-Friendly: This whole batch costs under ten dollars. For 24 treats, that’s less than 50 cents each. Compare that to bakery Halloween cookies that run three bucks a pop.
- Kid-Approved: My kids help make these every year now. They love squishing the marshmallow mixture and sticking on the eyes. And eating them? Forget about it. They disappear faster than candy on November 1st.
- Crowd-Pleaser: I’ve brought these to three different Halloween events now and they always get the same reaction. Kids love the ghost shape, adults love the nostalgia, and everyone loves that they’re not overly sweet.
What makes this recipe different from all those other rice krispie treat recipes out there? It’s the texture. I use a little less butter than standard recipes, which keeps the treats from getting greasy. And I melt the marshmallows low and slow, so they stay stretchy instead of turning into concrete. The white chocolate drizzle sets up firm but cracks nicely when you bite into it. It’s comfort food reimagined for spooky season — faster, cheaper, but with the same soul-soothing satisfaction.
What Ingredients You Will Need
This recipe uses simple, pantry-friendly ingredients to create something that looks like you spent hours on it. Trust me, I’ve made these with whatever I had on hand during a snow day panic and they still turned out great. Here’s what you’ll need:
- 6 tablespoons unsalted butter — salted butter works too, just skip the extra salt I mention below. I prefer Land O’Lakes for consistent results. Cut it into chunks so it melts evenly.
- 1 (10-ounce) bag mini marshmallows — the mini ones melt faster and more evenly than the big ones. Jet-Puffed is my go-to brand. If you only have jumbo marshmallows, chop them in half first.
- 6 cups Rice Krispies cereal — generic crisp rice cereal works fine here. I’ve tried store brands and honestly can’t tell the difference. Just make sure it’s fresh and not stale.
- 1/4 teaspoon salt — optional but highly recommended. It balances the sweetness and makes the flavors pop. I use fine sea salt.
- 1 cup white chocolate chips — Ghirardelli melts the smoothest, but any brand works. Look for “real white chocolate” not “white melting wafers” if you want that creamy flavor. For a cheaper option, store brand chips work fine.
- 1 tablespoon coconut oil or vegetable shortening — this thins the white chocolate so it drizzles easily. Coconut oil adds a subtle flavor I love; shortening keeps it neutral.
- 48 candy eyes — the little black-and-white ones you find in the baking aisle. Wilton makes good ones. You’ll need two per ghost. Grab an extra pack because someone will eat them straight from the bag.
Substitution Notes: For a dairy-free version, use vegan butter and dairy-free white chocolate chips. The texture will be slightly different but still delicious. If you can’t find candy eyes, use mini chocolate chips or draw faces with melted dark chocolate. I’ve done both and they work great. For a gluten-free option, make sure your crisp rice cereal is labeled gluten-free — some brands use malt flavoring that contains gluten.
Ingredient Tip: Fresh marshmallows make a huge difference. If your marshmallows are hard and stale, the treats will turn out stiff. Give the bag a squeeze — they should be soft and springy. And please, for the love of Halloween, don’t use the flavored marshmallows. I tried strawberry once. It was a mistake.
Equipment Needed
You don’t need fancy tools for these ghost treats. Here’s what I use every time:
- Large pot or Dutch oven — 4-quart or larger. You need room to stir the cereal into the marshmallow mixture without it spilling everywhere. I use my old Le Creuset but a regular stockpot works fine.
- Rubber spatula — the silicone kind that won’t scratch your pot. A wooden spoon works too, but the marshmallow sticks to wood like crazy. Trust me on this one.
- 9×13-inch baking pan — for pressing the treats into an even layer. If you don’t have one, a rimmed baking sheet works. Just make sure it has sides.
- Parchment paper or wax paper — absolutely essential for preventing sticking. I line my pan and also have a sheet ready for the cutting board.
- Sharp knife or pizza cutter — a pizza cutter makes cleaner cuts through the marshmallow mixture. A regular knife works but you’ll need to wipe it clean between cuts.
- Small microwave-safe bowl — for melting the white chocolate. Glass works best. Avoid plastic bowls — they can hold onto grease and mess up your chocolate.
- Fork or small whisk — for drizzling the white chocolate. A fork gives you that nice thin drizzle. A whisk works but you’ll get thicker lines.
- Wire rack — for letting the white chocolate set. If you don’t have one, a sheet of wax paper on the counter works fine.
Budget-Friendly Tip: Don’t run out and buy a fancy Dutch oven. A regular pot from the dollar store works perfectly. I made my first batch with a beat-up pot I found at a thrift store for three bucks. The treats turned out exactly the same.
Preparation Method
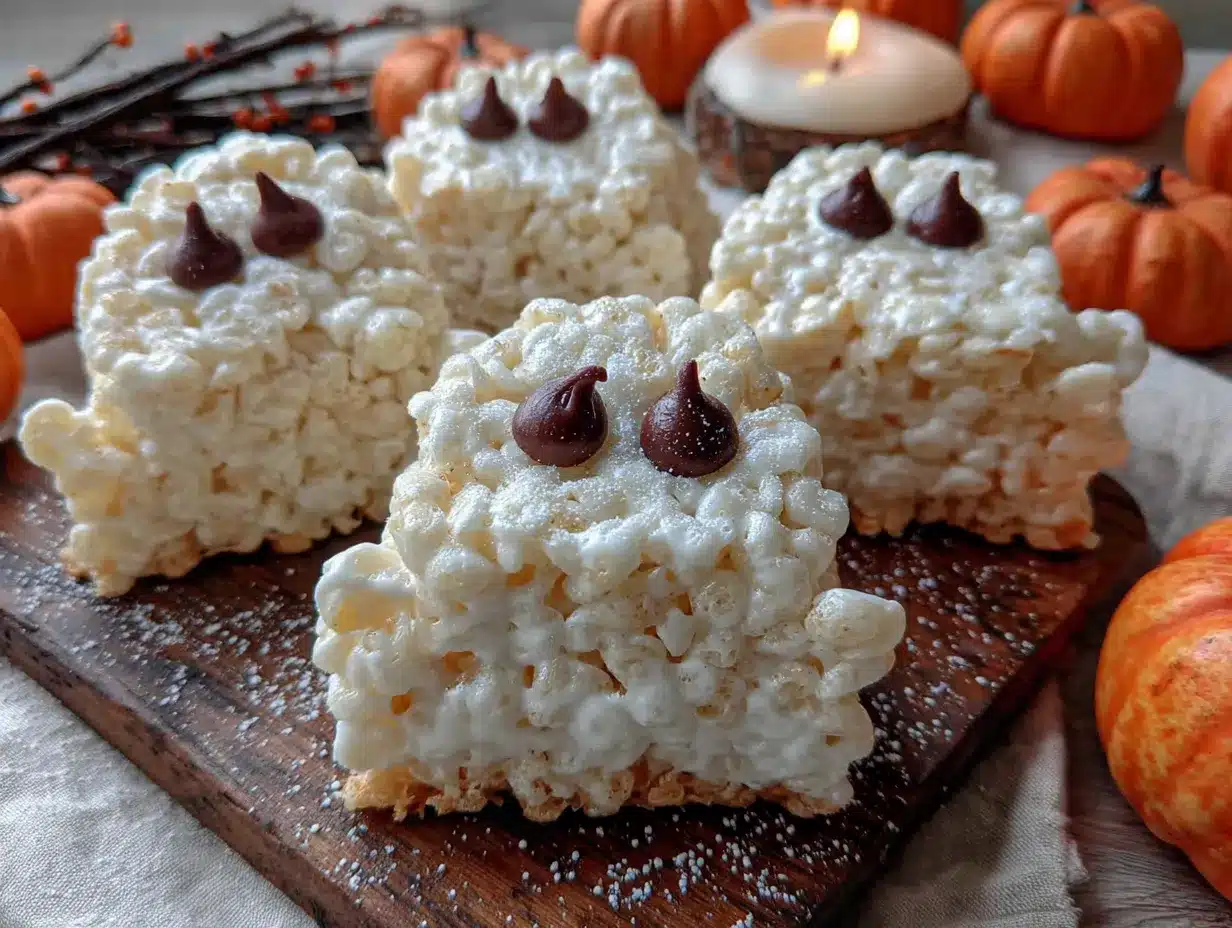
Alright, let’s make some ghosts. I’ve broken this down so even a panicked parent can follow along. Take your time with the marshmallow melting — that’s where most people mess up.
- Prep your pan. Line a 9×13-inch baking pan with parchment paper, leaving some overhang on two sides. This makes lifting the treats out way easier. Lightly spray the parchment with non-stick cooking spray. Don’t skip this — marshmallows stick to everything.
- Melt the butter. In a large pot over medium-low heat, melt the 6 tablespoons of butter. Swirl the pot occasionally so it melts evenly. This takes about 2-3 minutes. Watch it carefully — burnt butter smells terrible and will ruin the flavor.
- Add the marshmallows. Pour in the entire bag of mini marshmallows. Stir constantly with your rubber spatula until they’re completely melted and smooth. This takes about 5-7 minutes on medium-low heat. The mixture should look glossy and stretchy when you lift the spatula. If you see lumps, keep stirring. Don’t crank up the heat — low and slow is the secret.
- Season and combine. Remove the pot from heat. Stir in the 1/4 teaspoon salt if using. Then add the 6 cups of Rice Krispies cereal all at once. Fold gently until the cereal is evenly coated. Work quickly here — the marshmallow mixture sets fast. You’ll see some streaks of white cereal at first, keep folding until it’s all that same golden color.
- Press into the pan. Scrape the mixture into your prepared pan. Spray your spatula with cooking spray (or rub it with butter) and press the mixture into an even layer. Don’t press too hard or the treats will be dense. You want them thick but not compressed. Let them cool completely at room temperature — about 30 minutes. Don’t put them in the fridge, they’ll get hard.
- Cut into shapes. Once cooled, lift the block out using the parchment overhang. Place on a cutting board. Use a sharp knife or pizza cutter to cut into 24 rectangles (about 2 inches by 2 inches). For ghost shapes, you can use a ghost cookie cutter if you have one. I usually just cut rectangles and round the corners with a knife. It’s faster and wastes less.
- Melt the white chocolate. In a microwave-safe bowl, combine 1 cup white chocolate chips and 1 tablespoon coconut oil. Microwave in 20-second intervals, stirring between each, until smooth. This usually takes about 60-90 seconds total. Don’t overheat or the chocolate will seize up and get grainy. If that happens, stir in another teaspoon of coconut oil to smooth it out.
- Drizzle the ghosts. Dip a fork into the melted white chocolate and wave it back and forth over the treats. You want a thin, uneven drizzle — ghosts are supposed to look messy. Let the chocolate fall in natural patterns. Work quickly before the chocolate sets. If it gets too thick, pop it back in the microwave for 10 seconds.
- Add the eyes. While the white chocolate is still wet, press two candy eyes onto each ghost. Place them close together near the top. Press gently so they stick. If the chocolate has started to set, dab a tiny bit of fresh melted chocolate on the back of each eye before sticking it on.
- Let the chocolate set. Place the decorated treats on a wire rack or parchment-lined sheet. Let them sit at room temperature until the white chocolate is firm — about 20-30 minutes. If you’re in a hurry, pop them in the fridge for 10 minutes. Just know they might get a little condensation when you take them out.
Sensory Cue: When the marshmallow mixture is ready, it should feel like warm taffy when you stir it. If it’s runny, you overheated it. If it’s stiff and hard to stir, you didn’t melt it enough. The perfect texture stretches about 2 inches when you lift the spatula before breaking.
Cooking Tips & Techniques
I’ve made these ghost treats at least twenty times now, and let me tell you, I’ve learned some things the hard way. Here are the tips I wish someone had told me before my first burnt-butter disaster.
Low heat is your friend. I know you’re in a hurry. I know the kids are screaming and the party starts in an hour. But cranking up the heat to melt the marshmallows faster will ruin everything. The butter burns, the marshmallows get rubbery, and your treats turn out tough. I learned this when I tried to rush through a batch before a neighborhood party. The treats were so hard my neighbor joked they could double as hockey pucks. Keep it on medium-low and be patient.
Wet your hands for pressing. If you’re shaping the treats by hand instead of pressing them in a pan, wet your fingers with cold water first. The marshmallow mixture is sticky and hot, and the water creates a barrier. I keep a small bowl of water nearby and dip my fingers between each press. It saves your skin and keeps the mixture from sticking to you. Same trick works for making popcorn balls or any sticky treat.
Don’t skip the salt. I used to think salt was optional in sweet recipes. Then I made a batch without it and everyone said the treats tasted “flat.” Salt doesn’t make them salty — it makes the sweetness taste sweeter. It’s like the secret ingredient nobody talks about. A quarter teaspoon is all you need. Trust me on this one.
Use a pizza cutter. Cutting through cooled rice krispie treats with a regular knife is frustrating. The marshmallow sticks to the blade and drags, leaving ragged edges. A pizza cutter rolls through cleanly and gives you straight lines. I wipe the blade between cuts with a damp paper towel. If you don’t have a pizza cutter, run your knife under hot water and dry it before each cut.
Timing is everything with the chocolate. The white chocolate drizzle needs to happen while the treats are still at room temperature, not cold. If the treats are too cold, the chocolate hardens immediately and doesn’t stick well. If they’re too warm, the chocolate runs off and pools underneath. Let the treats cool completely, then drizzle right away. That sweet spot is about 30 minutes after pressing.
Variations & Adaptations
These ghost treats are endlessly customizable. Here are some variations I’ve tried over the years:
Chocolate Ghosts: Swap the white chocolate for dark or milk chocolate. The dark chocolate version is less sweet and looks spookier. I made these for an adult Halloween party and they were a hit. Use the same melting method — just skip the coconut oil if your chocolate is already smooth.
Pumpkin Spice Ghosts: Add 1/2 teaspoon pumpkin pie spice to the marshmallow mixture along with the salt. It gives the treats a warm, fall flavor without being overpowering. I tried this last October and my neighbor asked if I’d bought them from a bakery. The spice blends right in with the marshmallow and makes the whole kitchen smell amazing.
Gluten-Free Version: Use certified gluten-free crisp rice cereal. Most generic brands are gluten-free, but check the label. The texture is identical to regular Rice Krispies. I’ve made these for my gluten-sensitive cousin and she couldn’t tell the difference. Just make sure your white chocolate chips are also gluten-free — some brands add wheat-based ingredients.
Monster Mash-Up: Instead of ghosts, shape the treats into monster faces. Add different colored candy eyes, use food coloring to tint the white chocolate green or purple, and draw silly mouths with melted chocolate. My kids love this version because each monster looks different. We use red gel food coloring for bloody monster mouths and green for Frankenstein faces.
No-Bake Ghost Pops: Press the mixture into a smaller pan for thicker treats, cut into rectangles, and insert a lollipop stick before the white chocolate sets. These are perfect for party favors or classroom treats. I made these for my daughter’s Halloween class party and the teacher said they were the easiest treat to hand out — no plates or napkins needed.
Serving & Storage Suggestions
These ghost treats are best served at room temperature. The marshmallow texture is chewy but soft, and the white chocolate snaps nicely when you bite into it. If you serve them straight from the fridge, the marshmallow gets firm and the chocolate might crack. Let them sit on the counter for 15 minutes before serving.
Presentation Ideas: Arrange the ghosts on a black platter or dark-colored plate so the white ghosts pop. Add some fake spider webs around the edge for a spooky vibe. I like to sprinkle a few orange and black sprinkles over the white chocolate while it’s still wet for extra Halloween flair. For a party, stack them on a cake stand in a ghostly pyramid.
Storage: Store the treats in an airtight container at room temperature for up to 5 days. Layer them between sheets of wax paper or parchment to prevent sticking. Don’t store them in the fridge — the moisture makes the treats soggy and the white chocolate gets cloudy. If you live in a humid climate, add a silica gel packet to the container to absorb excess moisture.
Freezing: These freeze beautifully for up to 3 months. Place the undecorated treats in a single layer on a baking sheet and freeze until solid (about 2 hours). Then transfer to a freezer-safe bag or container. When you’re ready to serve, thaw them at room temperature for 30 minutes, then add the white chocolate drizzle and eyes. I do this every year for Halloween — make a double batch in September, freeze half, and pull them out for parties throughout October.
Flavor Development: These treats actually taste better the next day. The marshmallow softens slightly and the flavors meld together. If you can resist eating them all on day one, you’re in for a treat on day two. The white chocolate sets up firmer overnight too, so the drizzle stays put instead of smudging.
Nutritional Information & Benefits
Let’s be real — these are treats, not health food. But they’re not as bad as you might think. Here’s the breakdown per ghost (based on 24 servings):
- Calories: Approximately 165 per treat
- Total Fat: 8g (4g saturated)
- Carbohydrates: 23g
- Sugar: 14g
- Protein: 2g
- Sodium: 120mg
Health Highlights: Rice Krispies are fortified with iron and B vitamins, so there’s a tiny nutritional upside. The white chocolate contains calcium from milk solids. And honestly? These treats are portion-controlled at about the size of a standard cookie. You’re not eating a whole sheet cake here. One treat satisfies that Halloween sugar craving without sending you into a full sugar coma.
Dietary Considerations: This recipe contains dairy (butter, white chocolate) and gluten (cereal). For a dairy-free version, use vegan butter and dairy-free white chocolate. For gluten-free, use certified GF crisp rice cereal. The treats are nut-free as written, making them school-safe. Always check your ingredient labels for hidden allergens — some white chocolate brands are processed in facilities that handle nuts.
My Take: I’m not here to pretend these are a health food. They’re a holiday treat, meant to be enjoyed in moderation. I make them once a year for Halloween and we go through the whole batch in three days. The joy on my kids’ faces when they see the ghosts is worth every calorie. Sometimes food is about more than nutrition — it’s about making memories.
Conclusion
These Easy Halloween Rice Krispie Ghost Treats are proof that you don’t need fancy skills or expensive ingredients to win Halloween. I’ve made them for parties, classroom events, and quiet nights at home with the kids. Every single time, they bring the same reaction — smiles, laughter, and sticky fingers reaching for seconds. That burnt-butter disaster from years ago turned into a tradition I actually look forward to.
I hope you give these a try, whether you’re a seasoned baker or a panicked parent like I was that first year. Customize them however you like — make them spooky, silly, or somewhere in between. That’s the beauty of a simple recipe. It leaves room for your own touch. And honestly? The imperfect ones always taste the best. The ones where the chocolate drips a little sideways or the eyes are a bit crooked. Those are the ghosts with personality.
If you make these, I’d love to hear about it. Drop a comment below and tell me how they turned out, or tag me in your photos if you share them online. Did your kids help? Did you try a fun variation? Did you burn the butter like I did and start over? No judgment here. We’ve all been there. Happy Halloween, friends. Go make some ghosts.
Frequently Asked Questions
Can I use regular marshmallows instead of mini marshmallows?
Yes, but you’ll need to cut them into smaller pieces first. Mini marshmallows melt faster and more evenly, which is why I recommend them. If you only have jumbo marshmallows, use about 40 large ones (roughly 10 ounces) and snip each one into quarters with kitchen shears before melting.
How do I keep the treats from getting too hard?
The secret is not pressing them too firmly into the pan and not overcooking the marshmallow mixture. Press gently — you want the cereal coated but not compressed. Also, melt the marshmallows on low heat and remove from heat as soon as they’re smooth. Overcooked marshmallows turn into cement.
Can I make these ahead of time for a party?
Absolutely. You can make the undecorated treats up to 3 days ahead and store them in an airtight container at room temperature. Add the white chocolate drizzle and eyes the day of your event for the freshest look. If you want to make them even further ahead, freeze the undecorated treats for up to 3 months.
My white chocolate seized up and got grainy. What went wrong?
White chocolate is sensitive to heat and moisture. If you microwaved it too long or got even a drop of water in the bowl, it will seize up. To fix it, stir in 1 teaspoon of coconut oil or vegetable shortening at a time until it smooths out. If that doesn’t work, start over with fresh chocolate and melt it more gently.
Can I use a different cereal?
Yes, but the texture will change. Cocoa Krispies make chocolate ghosts that taste like a different treat entirely. Fruity Pebbles give you colorful monsters that kids love. Just keep the cereal-to-marshmallow ratio the same — 6 cups of cereal to 10 ounces of marshmallows. Avoid anything too dense or heavy, like granola, because it won’t hold together properly.
PrintEasy Halloween Rice Krispie Ghost Treats
These Easy Halloween Rice Krispie Ghost Treats are the perfect last-minute Halloween recipe that looks adorable and tastes amazing. Made with simple pantry ingredients, they come together in under an hour and are a guaranteed crowd-pleaser.
- Prep Time: 15 minutes
- Cook Time: 10 minutes
- Total Time: 45 minutes
- Yield: 24 servings 1x
- Category: Dessert
- Cuisine: American
Ingredients
- 6 tablespoons unsalted butter
- 1 (10-ounce) bag mini marshmallows
- 6 cups Rice Krispies cereal
- 1/4 teaspoon salt (optional)
- 1 cup white chocolate chips
- 1 tablespoon coconut oil or vegetable shortening
- 48 candy eyes
Instructions
- Line a 9×13-inch baking pan with parchment paper, leaving overhang on two sides. Lightly spray with non-stick cooking spray.
- In a large pot over medium-low heat, melt the butter, swirling occasionally, until melted (about 2-3 minutes).
- Add the mini marshmallows and stir constantly until completely melted and smooth (about 5-7 minutes). Remove from heat.
- Stir in the salt (if using), then add the Rice Krispies cereal all at once. Fold gently until evenly coated.
- Scrape the mixture into the prepared pan. Spray a spatula with cooking spray and press into an even layer. Let cool completely at room temperature (about 30 minutes).
- Lift the block out using the parchment overhang. Cut into 24 rectangles (about 2×2 inches) using a sharp knife or pizza cutter. Round corners if desired.
- In a microwave-safe bowl, combine white chocolate chips and coconut oil. Microwave in 20-second intervals, stirring between each, until smooth (about 60-90 seconds total).
- Dip a fork into the melted white chocolate and drizzle over the treats in a thin, uneven pattern.
- While the white chocolate is still wet, press two candy eyes onto each ghost near the top.
- Place decorated treats on a wire rack or parchment-lined sheet. Let sit at room temperature until white chocolate is firm (about 20-30 minutes).
Notes
For best texture, melt marshmallows on low heat and do not press the mixture too firmly into the pan. The treats taste even better the next day. Store in an airtight container at room temperature for up to 5 days. Freeze undecorated treats for up to 3 months.
Nutrition
- Serving Size: 1 ghost treat
- Calories: 165
- Sugar: 14
- Sodium: 120
- Fat: 8
- Saturated Fat: 4
- Carbohydrates: 23
- Protein: 2
Keywords: Halloween treats, Rice Krispie treats, ghost treats, easy Halloween recipe, no-bake dessert, kid-friendly Halloween


