I was standing in the frozen foods aisle last Tuesday, holding a bag of peas I didn’t need, when the smell hit me. It wasn’t anything in the store—it was a phantom scent, the kind your brain conjures up for no good reason. Warm walnuts. Overripe banana. A whisper of cinnamon. And just like that, I was seven years old, sitting cross-legged on a cracked linoleum floor in my aunt’s kitchen, watching her pull a loaf pan from the oven with a dish towel wrapped around her hands.
My aunt wasn’t much of a baker, honestly. She was more of a “dump everything in one bowl and hope for the best” kind of cook. But her banana bread? That was different. She had this way of letting the bananas get so brown and spotty they looked almost rotten, and then she’d mash them with a fork until they were practically liquid. The walnuts went in whole, not chopped, because she said “little pieces just get lost.” I remember thinking that was the smartest thing I’d ever heard.
She passed away a few years ago, and I’ve been trying to recreate that exact loaf ever since. The problem is, I never wrote down her recipe. I just watched her do it, over and over, until the motions felt like my own. But memory is a funny thing—it fills in gaps with what you want to remember, not what actually happened. So this banana bread is my best guess, my love letter to that kitchen, to that cracked linoleum, to her.
Maybe you’ve got a recipe like that. Something you’re chasing, trying to get just right. If so, this one’s for you. It’s cozy, it’s forgiving, and it comes together in one bowl with no fancy equipment. Let’s make it together.
Why You’ll Love This Recipe
This isn’t just another banana bread recipe floating around the internet. I’ve tested this one at least a dozen times, tweaking the flour ratio, the baking time, the temperature of the butter. I wanted something that felt like a hug in loaf form—moist, tender, with those big, buttery walnut pieces in every bite. And you know what? I think I finally nailed it.
- One Bowl, No Fuss: You don’t need a stand mixer or even a hand mixer. Just a big bowl, a wooden spoon, and about ten minutes of your time. The fewer dishes, the better, am I right?
- Pantry Staples: Butter, sugar, eggs, flour, baking soda, salt. If you’ve got bananas on the counter that are past their prime, you’re already halfway there.
- Perfect for Cozy Evenings: Cold weather, a rough day, or just a Tuesday that feels a little too long—this bread fixes all of that. Slice it warm, slather it with butter, and let the world slow down.
- Crowd-Pleaser: I’ve brought this to potlucks, book clubs, and casual dinners. It disappears fast. Kids love it, adults love it, and nobody ever guesses it took almost no effort.
- Unbelievably Moist: The secret is using really, really ripe bananas. I’m talking black spots, soft to the touch, almost smelling like banana candy. That’s where the magic lives.
This recipe is different because it doesn’t try to be healthy or trendy. It’s just good, honest banana bread with big chunks of walnut in every slice. No cottage cheese, no almond flour, no weird substitutions. Just the kind of loaf that makes you close your eyes after the first bite and forget about your to-do list for a minute.
What Ingredients You Will Need
This recipe uses simple, wholesome ingredients to deliver bold flavor and satisfying texture without the fuss. Most of these are probably in your kitchen right now, which is exactly how I like it.
- Unsalted butter, melted (1/2 cup, or 1 stick) — I use salted butter in a pinch and just skip the added salt. But unsalted gives you more control over the final flavor. Let it cool slightly after melting so it doesn’t cook the eggs.
- Granulated sugar (3/4 cup) — You could use brown sugar for a deeper, more caramel-like flavor, but I like the clean sweetness of white sugar here. It lets the banana shine.
- Large eggs, room temperature (2) — Cold eggs can seize the melted butter. If you forgot to take them out, place them in a bowl of warm water for five minutes. Problem solved.
- Vanilla extract (1 teaspoon) — Pure vanilla is best, but imitation works fine. I’m partial to Nielsen-Massey, but honestly, any brand will do.
- Ripe bananas, mashed (3 medium, about 1 to 1.5 cups) — The riper, the better. If your bananas aren’t spotty yet, you can roast them in the oven at 300°F for 15 minutes to speed things up. It works like a charm.
- All-purpose flour (1.5 cups) — Spoon and level it into the measuring cup. Scooping directly can pack the flour and make your bread dry. I learned that the hard way.
- Baking soda (1 teaspoon) — Make sure it’s fresh. If it doesn’t fizz when mixed with a little vinegar, toss it and buy new.
- Salt (1/2 teaspoon) — Just regular table salt. It balances the sweetness and brings out the banana flavor.
- Walnuts, roughly chopped (1 cup) — I leave mine in fairly large pieces because I love that crunch. Toast them first in a dry pan for 3-4 minutes for extra flavor. It’s not required, but it makes a difference.
Equipment Needed
You don’t need a fancy kitchen for this recipe. Here’s what you’ll need:
- Large mixing bowl — Any bowl will do, but a wider one makes mashing and mixing easier. I use a ceramic one my aunt gave me years ago.
- Wooden spoon or silicone spatula — A whisk works too, but a spoon is gentler and prevents overmixing.
- 9×5-inch loaf pan — Glass, metal, or ceramic all work. If using glass, reduce the oven temperature by 25°F to prevent over-browning.
- Parchment paper (optional but helpful) — Lining the pan makes lifting the bread out a breeze. If you don’t have it, just grease the pan well with butter or cooking spray.
- Cooling rack — Letting the bread cool in the pan for 10 minutes, then transferring it to a rack, keeps the bottom from getting soggy.
- Fork or potato masher — For mashing the bananas. A fork works fine, but a masher is faster and more satisfying.
That’s it. No stand mixer, no hand mixer, no food processor. Just basic tools and a little patience.
Preparation Method
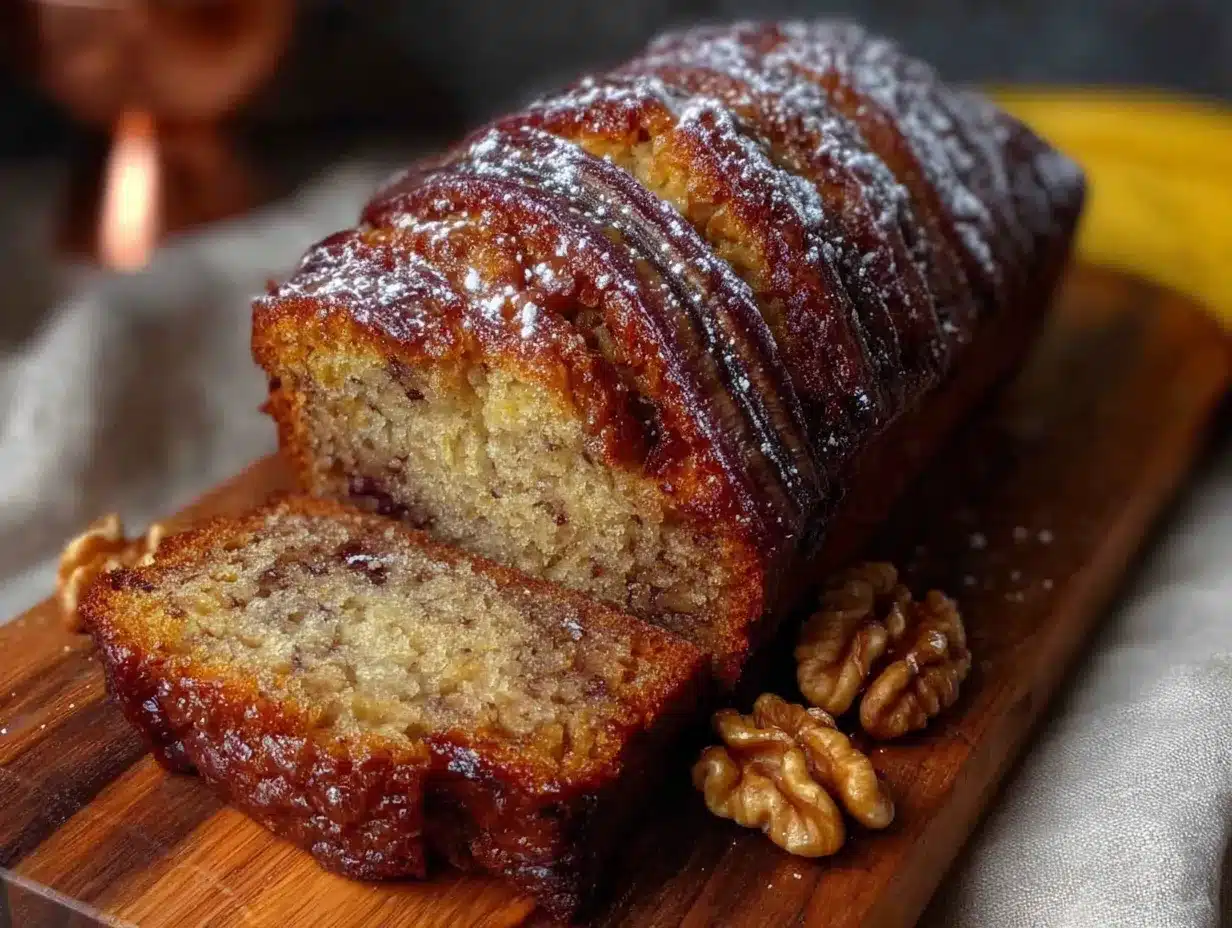
- Preheat your oven to 350°F (175°C). Grease a 9×5-inch loaf pan with butter or line it with parchment paper. If you’re using parchment, leave a little overhang on the long sides—it makes lifting the bread out so much easier.
- Melt the butter in a small saucepan or in the microwave. Let it cool for a couple of minutes while you gather the rest of the ingredients. You don’t want it hot enough to scramble the eggs.
- In a large bowl, combine the melted butter and sugar. Stir until they’re well mixed. It’ll look a little grainy, and that’s fine. Don’t worry about creaming it—we’re not making a cake.
- Add the eggs and vanilla extract. Stir until the mixture is smooth and glossy. The eggs should be fully incorporated, but don’t overmix. A few streaks are okay.
- Mash the bananas in a separate small bowl or right in the same bowl if you’re feeling bold. I usually mash them in the bowl with the wet ingredients to save on dishes. Mash until mostly smooth, with a few small lumps for texture. Fold them into the butter-sugar-egg mixture.
- Add the flour, baking soda, and salt directly on top of the wet mixture. Stir gently with a wooden spoon until just combined. A few streaks of flour are okay—overmixing will make the bread tough. This is the most important step, honestly. Stop when you can’t see dry flour anymore.
- Fold in the chopped walnuts. Reserve a handful to sprinkle on top if you want a pretty loaf. Gently stir until the walnuts are evenly distributed. The batter will be thick and slightly lumpy—that’s exactly what you want.
- Pour the batter into the prepared loaf pan and spread it evenly with a spatula. Sprinkle the reserved walnuts on top, pressing them gently into the batter so they stick.
- Bake for 55 to 65 minutes, or until a toothpick inserted in the center comes out clean or with a few moist crumbs. If the top is browning too quickly (around the 40-minute mark), tent the pan loosely with aluminum foil.
- Let the bread cool in the pan for 10 minutes, then transfer it to a wire rack to cool completely. I know it’s tempting to slice it right away, but it needs time to set. If you cut too soon, it’ll crumble. Trust me, I’ve made that mistake more times than I can count.
Cooking Tips & Techniques
I’ve made this recipe enough times to know where things can go wrong. Here are a few tips I’ve picked up along the way—some from success, some from spectacular failure.
Don’t overmix the batter. This is the number one mistake people make with quick breads. Stir until the flour is just incorporated, then stop. Overmixing develops gluten, and too much gluten makes banana bread dense and rubbery. You want tender, not tough.
Check your baking soda freshness. Baking soda loses its potency over time. If your bread doesn’t rise properly, that’s usually the culprit. A quick test: drop a teaspoon of baking soda into a little vinegar. If it fizzes vigorously, you’re good. If not, buy a new box.
Use room temperature ingredients. Cold eggs can make the melted butter clump up, which leads to an uneven batter. Let everything sit out for 20 minutes before you start. It makes a difference.
Rotate the pan halfway through. Ovens have hot spots, and the back of your loaf might brown faster than the front. Halfway through baking, give the pan a quick 180-degree turn for even browning.
Let it cool completely before slicing. I know, I know. The smell is torture. But cutting into warm banana bread is like opening the oven door on a soufflé—it collapses. Give it at least an hour on the cooling rack. Your patience will be rewarded.
Variations & Adaptations
This banana bread is forgiving, which means you can play around with it. Here are a few variations I’ve tried and loved:
- Chocolate Chip Banana Bread: Swap the walnuts for 1 cup of semi-sweet chocolate chips. The warm, melty chocolate pairs beautifully with the banana. My kids beg for this version.
- Gluten-Free Option: Use a 1:1 gluten-free flour blend (I like Bob’s Red Mill). The texture will be slightly more crumbly, but it’s still delicious. Add an extra tablespoon of milk or yogurt to compensate for the dryness.
- Vegan Banana Bread: Replace the butter with melted coconut oil or vegan butter, and use two flax eggs (2 tablespoons flaxseed meal + 6 tablespoons water, let sit for 5 minutes). The bread will be a little denser but still moist and flavorful.
- Spiced Banana Bread: Add 1 teaspoon of cinnamon, 1/2 teaspoon of nutmeg, and a pinch of cloves to the flour mixture. It gives the bread a warm, holiday-like flavor that’s perfect for fall.
- Nut-Free Version: Simply omit the walnuts or swap them for sunflower seeds or pumpkin seeds. Toasted seeds add a similar crunch without the allergens.
I once made a version with dried cranberries and orange zest, and it was surprisingly good. Don’t be afraid to experiment—banana bread is one of those recipes that loves a little creativity.
Serving & Storage Suggestions
This banana bread is best served warm, with a generous pat of butter that melts into the nooks and crannies. A drizzle of honey or a sprinkle of flaky sea salt takes it to another level. For a cozy breakfast, pair it with a hot cup of coffee or a chai latte. For dessert, a scoop of vanilla ice cream on top is never a bad idea.
Storage: Wrap the cooled loaf tightly in plastic wrap or aluminum foil and store it at room temperature for up to 4 days. If you live in a humid climate, keep it in an airtight container to prevent mold. The flavors actually deepen after a day or two—if it lasts that long.
Freezing: This bread freezes beautifully. Slice it first, then wrap each slice individually in plastic wrap and place them in a freezer-safe bag. They’ll keep for up to 3 months. To thaw, just pop a slice in the microwave for 20 seconds or toast it directly from frozen.
Reheating: For that just-baked texture, reheat slices in a toaster oven or in a skillet with a little butter. The edges get slightly crispy while the inside stays soft and tender. It’s my favorite way to eat leftovers.
Nutritional Information & Benefits
Per slice (based on 10 slices):
- Calories: 285
- Fat: 14g
- Carbohydrates: 37g
- Fiber: 2g
- Sugar: 18g
- Protein: 5g
This banana bread isn’t health food, but it does have some redeeming qualities. Bananas are rich in potassium and vitamin B6, which support heart health and energy metabolism. Walnuts provide omega-3 fatty acids and antioxidants that are great for brain health. And hey, it’s made from real ingredients—no preservatives, no artificial flavors. That counts for something.
If you’re watching your sugar intake, you can reduce the granulated sugar to 1/2 cup and rely on the natural sweetness of very ripe bananas. The texture will be slightly less tender, but it’s still delicious.
Conclusion
This banana bread is more than just a recipe—it’s a ritual. It’s the thing I make when I need to slow down, when the world feels too loud, when I want to fill my kitchen with a smell that says “everything’s going to be okay.” I hope it becomes that for you too.
Don’t be afraid to make it your own. Use different nuts, add chocolate chips, sprinkle cinnamon on top. The beauty of this recipe is that it’s forgiving and flexible, just like the best comfort food should be. And if you end up with a few crumbs on the counter and a happy belly, well, that’s the whole point.
I’d love to hear how yours turns out. Drop a comment below and let me know if you tried any variations, or just tell me about the memory this bread brings back for you. Happy baking, friend.
Frequently Asked Questions
Can I use frozen bananas for this recipe?
Absolutely. Thaw them completely, then drain off any excess liquid before mashing. Frozen bananas are actually sweeter and more flavorful than fresh ones, so they work wonderfully here.
Why did my banana bread turn out dry?
Dry banana bread is usually a sign of overmixing or too much flour. Make sure you’re spooning and leveling your flour, not scooping it directly from the bag. Also, check your oven temperature—an oven that runs hot can dry out the bread.
Can I make this into muffins instead of a loaf?
Yes! Divide the batter among a greased or lined 12-cup muffin tin. Bake at 350°F for 18-22 minutes, or until a toothpick comes out clean. Muffins will be done faster, so start checking at the 18-minute mark.
How do I know when the banana bread is fully baked?
Insert a toothpick or a thin knife into the center of the loaf. If it comes out clean or with just a few moist crumbs, it’s done. If there’s wet batter on it, give it another 5 minutes and check again.
Can I omit the walnuts?
Of course. The bread will still be delicious without them. You can replace them with chocolate chips, dried fruit, or simply leave them out entirely. No adjustments to the recipe are needed.
PrintBest One-Bowl Banana Walnut Bread- Easy & Cozy Recipe
This one-bowl banana walnut bread is moist, tender, and packed with big walnut pieces in every bite. It’s a cozy, forgiving recipe that comes together with simple pantry staples and no fancy equipment.
- Prep Time: 10 minutes
- Cook Time: 55 minutes
- Total Time: 1 hour 5 minutes
- Yield: 10 servings 1x
- Category: Dessert
- Cuisine: American
Ingredients
- 1/2 cup (1 stick) unsalted butter, melted
- 3/4 cup granulated sugar
- 2 large eggs, room temperature
- 1 teaspoon vanilla extract
- 3 medium ripe bananas, mashed (about 1 to 1.5 cups)
- 1.5 cups all-purpose flour
- 1 teaspoon baking soda
- 1/2 teaspoon salt
- 1 cup walnuts, roughly chopped
Instructions
- Preheat your oven to 350°F (175°C). Grease a 9×5-inch loaf pan with butter or line it with parchment paper, leaving overhang on the long sides.
- Melt the butter in a small saucepan or microwave. Let it cool for a couple of minutes.
- In a large bowl, combine the melted butter and sugar. Stir until well mixed.
- Add the eggs and vanilla extract. Stir until smooth and glossy.
- Mash the bananas in a separate bowl or directly in the bowl with the wet ingredients. Fold them into the butter-sugar-egg mixture.
- Add the flour, baking soda, and salt on top of the wet mixture. Stir gently with a wooden spoon until just combined. Do not overmix.
- Fold in the chopped walnuts, reserving a handful for topping if desired.
- Pour the batter into the prepared loaf pan and spread evenly. Sprinkle reserved walnuts on top, pressing gently into the batter.
- Bake for 55 to 65 minutes, or until a toothpick inserted in the center comes out clean or with a few moist crumbs. If the top browns too quickly, tent with foil at the 40-minute mark.
- Let the bread cool in the pan for 10 minutes, then transfer to a wire rack to cool completely before slicing.
Notes
Use very ripe bananas with black spots for maximum sweetness and moisture. Do not overmix the batter to avoid dense bread. Let the bread cool completely before slicing to prevent crumbling. For a prettier loaf, reserve some walnuts to sprinkle on top before baking.
Nutrition
- Serving Size: 1 slice
- Calories: 285
- Sugar: 18
- Sodium: 220
- Fat: 14
- Saturated Fat: 6
- Carbohydrates: 37
- Fiber: 2
- Protein: 5
Keywords: banana bread, walnut bread, one-bowl banana bread, easy banana bread, cozy banana bread


