My Aunt Carol had claimed to hate powdered sugar for as long as I could remember. “It’s just messy,” she’d say, waving a hand at my mother’s dusted holiday cookies. “It gets everywhere, and honestly, what’s the point?” For years, she avoided anything that called for a snowy finish. Then, last December, I caught her at my kitchen counter, elbow-deep in a batch of these Classic Russian Tea Cake Cookies. She had one halfway to her mouth, powdered sugar smudged across her cheek like a five-year-old caught in a cookie jar. “These are different,” she mumbled, not even looking guilty.
That moment is exactly why I keep making these cookies. They aren’t flashy or complicated, but they have this quiet power to change minds. I mean, I wasn’t trying to convert her. I was just baking for a small gathering, and she showed up early to “help.” But that first bite—the way the buttery, nutty dough just crumbles against your tongue—it does all the talking for you. Honestly, maybe you’ve had that experience where a simple recipe completely floors someone who thought they had it all figured out. That’s the magic of a good tea cake.
These aren’t just any cookies. They’re a classic for a reason. They’re the kind of thing you set out on a pretty plate, and suddenly, everyone at the party is asking for the recipe. I’ve been making them for years, tweaking the technique just a little to get that perfect melt-in-your-mouth texture. Let me tell you, getting that balance of butter, nuts, and just a whisper of sweetness is a skill worth having. And once you nail it, you’ll understand why my aunt—a sworn powdered sugar hater—now asks me to bring them to every single family dinner.
Why You’ll Love This Recipe
These Classic Russian Tea Cake Cookies are more than just a pretty face at a party. They are a tested, family-approved recipe that delivers on every single promise. I’ve made them for casual Sunday afternoons and big holiday buffets, and they never fail to get that “oh, wow” reaction. Here is why they deserve a permanent spot in your baking rotation:
- Quick & Easy: The dough comes together in about 15 minutes. No chilling required, and you only need one bowl. It’s the perfect last-minute recipe when you remember you have guests coming in an hour.
- Simple Ingredients: You probably have everything in your pantry right now. Butter, flour, sugar, nuts, vanilla, and salt. No fancy extracts or hard-to-find items.
- Perfect for Hosting: These are the ideal make-ahead cookie. They store beautifully, and that double coating of powdered sugar makes them look like a professional bakery item on your serving tray.
- Crowd-Pleaser: They are not too sweet, which is exactly what makes them so addictive. Kids love the powdery fun, and adults appreciate the sophisticated, buttery flavor.
- Unbelievably Delicious: The texture is what gets everyone. It’s not chewy or crisp. It’s a delicate, crumbly shortbread that dissolves into pure buttery bliss with a hint of toasted nut.
What makes this version different from the rest? It’s the technique of toasting the pecans first. I know, it’s one extra step, but it changes everything. Toasting brings out the oils and deepens the flavor, so your cookies have this warm, nutty backbone that you just can’t get from raw nuts. It is my little secret for making them taste like they came from a high-end bakery, not your home kitchen. This recipe isn’t just good—it is the kind that makes you close your eyes after the first bite. It is comfort baking reimagined: simpler, faster, but with the same soul-soothing satisfaction. Perfect for impressing guests without stress, or turning a simple Tuesday into something memorable.
What Ingredients You Will Need
This recipe uses simple, wholesome ingredients to deliver that signature melt-in-your-mouth texture. You don’t need anything exotic, just good quality staples that work together perfectly. Here is what you will need and why each one matters.
- Unsalted Butter, softened (1 cup / 226g): This is the star of the show. Use a good quality butter like Kerrygold or Land O’Lakes for the best flavor. It needs to be at room temperature so it creams properly with the sugar.
- Powdered Sugar (1/2 cup / 60g for the dough, plus 1 cup / 120g for rolling): We use it in the dough for a delicate sweetness, and then generously coat the baked cookies. It creates that signature snowy look. (Be careful not to use granulated sugar here—it changes the texture completely.)
- All-Purpose Flour (2 cups / 240g): Standard all-purpose flour gives the cookies their structure. I recommend King Arthur Flour for consistent results. Spoon it into your measuring cup and level it off for accuracy.
- Finely Chopped Pecans (1 cup / 100g): Pecans are my go-to for their sweet, buttery flavor, but walnuts work beautifully too. Toast them lightly in a dry pan for 3-4 minutes until fragrant before chopping. This step is non-negotiable for the best taste.
- Vanilla Extract (1 teaspoon): Pure vanilla extract adds warmth and depth. Avoid imitation vanilla if you can—it makes a noticeable difference in a simple recipe like this.
- Salt (1/4 teaspoon): A little salt balances the sweetness and enhances the buttery flavor. If you use salted butter, reduce this to a pinch.
Substitution Guidance: If you need a gluten-free option, swap the all-purpose flour with a good 1:1 gluten-free baking blend that contains xanthan gum. I’ve had great success with Bob’s Red Mill. For a nut-free version, you can substitute the pecans with an equal amount of finely chopped toasted sunflower seeds or simply omit them for a plain butter cookie—though the texture will be slightly different. If you are dairy-free, use a high-quality vegan butter stick, but know that the texture may be a little less tender. I always recommend sticking with the real butter for the best classic result, especially when you are baking for a crowd.
Equipment Needed
You don’t need a fancy kitchen to make these cookies. In fact, I’ve made them in a tiny apartment with just a few basic tools. Here is what you will need:
- Large Mixing Bowl: A standard bowl for creaming the butter and sugar. Glass or stainless steel works best.
- Electric Hand Mixer or Stand Mixer: You can absolutely cream the butter by hand with a wooden spoon, but a mixer makes it much faster and ensures a light, fluffy texture. I prefer my trusty KitchenAid stand mixer for this.
- Baking Sheets: Two large, rimmed baking sheets. Line them with parchment paper for easy cleanup and even baking.
- Cooling Rack: A wire rack is essential for cooling the cookies properly before the second coating of powdered sugar.
- Small Skillet: For toasting the pecans. A non-stick skillet works perfectly.
- Chef’s Knife and Cutting Board: For chopping the nuts into fine, even pieces.
- Measuring Cups and Spoons: For accuracy. I cannot stress this enough—baking is a science.
- Fine-Mesh Strainer or Sifter: For dusting the final layer of powdered sugar. It gives a much prettier, more even coat than just sprinkling it on.
Budget-Friendly Note: If you don’t have a sifter, you can use a small mesh strainer from the dollar store. It works just as well. And if you don’t have a stand mixer, a hand mixer or even a sturdy whisk and some elbow grease will get the job done.
Preparation Method
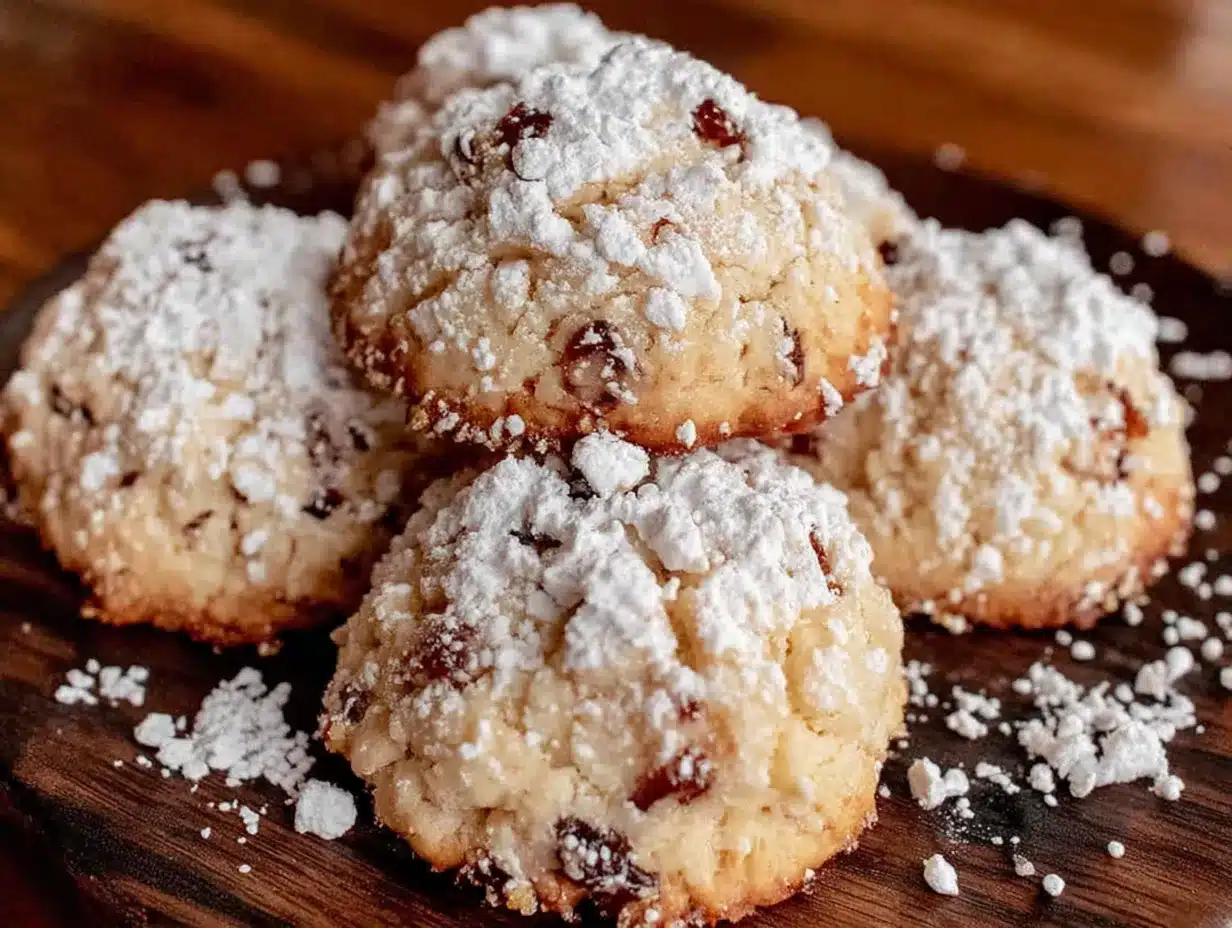
Let’s get these cookies into your oven. The process is straightforward, but a few specific techniques will ensure they turn out perfect every time. Follow these steps, and you will have a tray of snow-dusted beauties ready for your party.
- Preheat and Prep: First, preheat your oven to 350°F (175°C). Line two large baking sheets with parchment paper. This prevents sticking and makes cleanup a breeze.
- Toast the Pecans: Place your 1 cup of pecan halves in a dry skillet over medium heat. Shake the pan every 30 seconds. You will know they are done when they smell wonderfully nutty and are just a shade darker, about 3-4 minutes. Do not walk away—they burn fast! Immediately transfer them to a plate to cool. Once cool, finely chop them. You want small pieces, not dust. They should be about the size of small peas.
- Cream the Butter and Sugar: In your large mixing bowl, beat the 1 cup of softened unsalted butter with 1/2 cup of powdered sugar. Beat on medium speed for about 2 minutes until the mixture is light, fluffy, and pale in color. Scrape down the sides of the bowl with a spatula. This step is crucial—proper creaming creates the tender crumb.
- Add the Vanilla and Salt: Pour in the 1 teaspoon of vanilla extract and 1/4 teaspoon of salt. Mix on low just until combined.
- Incorporate the Flour: Gradually add the 2 cups of all-purpose flour. Mix on low speed until the dough just comes together. It will look crumbly at first, then form a soft, cohesive dough. Do not overmix, or the cookies will be tough. I usually stop as soon as I see no more dry flour streaks.
- Mix in the Nuts: Fold in the finely chopped toasted pecans with a spatula or your mixer on the lowest setting. Make sure they are evenly distributed throughout the dough.
- Shape the Cookies: Scoop out tablespoon-sized portions of dough. Roll each one between your palms into a 1-inch ball. Place them on the prepared baking sheets, spacing them about 2 inches apart. They do not spread much, so you can fit about 12 per sheet.
- Bake: Bake for 12-15 minutes, or until the bottoms are lightly golden and the tops are set but still pale. The cookies should not brown on top. If they do, your oven runs hot. At 13 minutes, they are usually perfect in my oven. The edges will look just slightly firm.
- First Powdered Sugar Coat: Let the cookies cool on the baking sheet for exactly 5 minutes. While they are still warm, roll each one gently in a bowl of powdered sugar. The heat will make the sugar stick and form a thin, sweet crust. Place them on a wire rack to cool completely—about 20 minutes.
- Second Powdered Sugar Coat: Once the cookies are completely cool, roll them in the powdered sugar again. This second coat is what gives them that signature snowy, professional look. Use a fine-mesh strainer to dust on an extra layer for good measure. I always do this right before serving for the prettiest result.
Troubleshooting Tip: If your cookies are spreading too much, your butter was too soft. Pop the shaped dough balls in the fridge for 15 minutes before baking. If they are too crumbly to roll, the dough is too dry—add a teaspoon of milk next time.
Cooking Tips & Techniques
I have made these cookies more times than I can count, and I have definitely learned a few things the hard way. Here are my best tips for getting them perfect every single time.
Don’t Skip the Toasting: I cannot say this enough. Toasting the pecans is the single most important step for flavor. I once tried to save time by using raw nuts, and the cookies were flat and boring. The toasted nuts add a depth that makes people think you spent hours on these. It takes four minutes. Just do it.
Watch the Oven Temperature: These cookies are delicate. They should not brown on top. If your oven runs hot, reduce the temperature to 325°F (165°C). I burned my first batch because I walked away to answer the phone. The bottoms were dark, and the tops were cracked. Set a timer and stay close. The cookies are done when the bottoms are just barely golden.
The Double Coat is Key: The first coat of powdered sugar, applied while the cookies are warm, melts slightly and creates a smooth, sweet shell. The second coat, applied when they are cool, gives that fluffy, snowy appearance. Do not skip either step. I tried just doing one coat once, and they looked sad and patchy. Trust the process.
Keep a Steady Hand: When rolling the warm cookies in sugar, be gentle. They are fragile fresh out of the oven. If one breaks, just eat it immediately. It is a baker’s privilege. I usually have a few “testers” that mysteriously disappear before anyone else sees them.
Multitasking Strategy: While the first batch is baking, I roll the second batch of dough balls. This way, as soon as the first sheet comes out, the second goes in. It keeps the workflow smooth and prevents you from standing around waiting.
Variations & Adaptations
This recipe is a wonderful canvas for creativity. I have tried several variations over the years, and they all have their own charm. Here are some of my favorites to try for different occasions.
Chocolate-Dipped Russian Tea Cakes: After the second coat of powdered sugar, dip half of each cooled cookie into melted dark chocolate. Let them set on parchment paper. It adds a touch of elegance and a rich contrast to the buttery cookie. I did this for a holiday party once, and they disappeared in minutes.
Spiced Holiday Version: Add 1/2 teaspoon of ground cinnamon and 1/4 teaspoon of ground nutmeg to the flour mixture. It gives the cookies a warm, festive aroma that is perfect for Christmas baking. You can also add a pinch of cardamom for a more exotic twist.
Almond or Pistachio Variation: Swap the pecans for finely chopped toasted almonds or pistachios. For an almond version, add 1/2 teaspoon of almond extract along with the vanilla. The green color of pistachios makes them especially beautiful for spring gatherings or bridal showers.
Gluten-Free Adaptation: As mentioned, use a 1:1 gluten-free baking flour blend. I have found that adding an extra tablespoon of flour helps the dough hold together better. The texture will be slightly more crumbly, but the flavor is still spot on.
Lemon Zest Twist: Add the zest of one lemon to the butter and sugar mixture. It brightens the flavor and makes them feel lighter and more refreshing. This is my go-to version for summer parties.
Serving & Storage Suggestions
These cookies are a host’s best friend because they are so versatile and easy to manage. Here is how to serve and store them for the best experience.
Serving Temperature and Presentation: Serve these cookies at room temperature. Arrange them on a beautiful platter or cake stand in a single layer. I like to dust them with a little extra powdered sugar right before setting them out. They look like little snowballs on a winter table. For a dinner party, place them on a tray with fresh berries and a cup of strong coffee or tea. They pair beautifully with a dark roast or a chai latte.
Complementary Dishes: These cookies are perfect alongside a fruit tart, a cheese board, or even a simple chocolate mousse. For a dessert spread, I often serve them with my classic baklava recipe for a mix of textures. They are also wonderful with a scoop of vanilla ice cream.
Storage Instructions: Store the cookies in an airtight container at room temperature for up to one week. Place a sheet of wax paper between layers to prevent them from sticking together. Do not refrigerate them, as the cold can dry them out.
Freezing Instructions: These freeze beautifully. You can freeze the baked, uncoated cookies for up to 3 months. When you are ready to serve, thaw them at room temperature, then roll them in powdered sugar. Alternatively, you can freeze the unbaked dough balls on a baking sheet, then transfer them to a freezer bag. Bake them directly from frozen, adding 2-3 extra minutes to the baking time.
Flavor Development: Here is a little secret—these cookies taste even better the next day. The flavors meld together, and the texture becomes even more tender. I always make them a day ahead of time for parties. Just do the final sugar coating right before serving.
Nutritional Information & Benefits
While these are definitely a treat, they are made with simple, real ingredients. Here is a general nutritional breakdown per cookie (based on making 30 cookies):
- Calories: 120
- Fat: 8g
- Carbohydrates: 11g
- Protein: 1g
- Sugar: 5g
Health Benefits of Key Ingredients: Pecans are a great source of healthy fats, fiber, and antioxidants. They can help support heart health and reduce inflammation. Butter, in moderation, provides fat-soluble vitamins A, D, E, and K. These cookies are also free from artificial preservatives and additives, which is always a win in my book.
Dietary Considerations: This recipe is vegetarian. For a gluten-free version, use a 1:1 gluten-free flour blend. For a vegan version, you can try using a high-quality vegan butter stick, but the texture will be different and less tender. The main allergens are dairy (butter) and tree nuts (pecans). Always check your powdered sugar label, as some brands contain cornstarch, which is gluten-free.
Personal Wellness Perspective: I believe in balance. Baking these cookies is a joyful act, and sharing them with loved ones is good for the soul. I don’t worry about the calories when I’m enjoying one with a cup of tea after a long day. It is about the experience, not the numbers.
Conclusion
These Classic Russian Tea Cake Cookies are more than just a recipe—they are a little moment of joy. They are the cookie that makes people stop mid-conversation and say, “Wait, what is this?” They are the cookie that my Aunt Carol, a lifelong powdered sugar skeptic, now requests by name. And they are the cookie that I turn to again and again because they are simple, forgiving, and absolutely delicious.
I encourage you to make them your own. Add a little spice, swap the nuts, or dip them in chocolate. The base is so good that you can play with it endlessly. And when you bring them to your next gathering, watch what happens. Watch the smiles, the double-takes, the hands reaching for just one more.
Now, I want to hear from you. Have you ever tried Russian tea cakes before? What is your favorite nut to use? Drop a comment below and share your baking adventures. And if you try this recipe, please let me know how it turned out. I love hearing about your kitchen wins—and your happy, powdered-sugar-covered faces. Happy baking, friend!
Frequently Asked Questions
Can I use salted butter instead of unsalted?
Yes, you can. Just reduce the added salt in the recipe to a tiny pinch or omit it entirely. The cookies might be slightly saltier, but some people love that sweet-salty contrast. I personally stick with unsalted so I have full control over the flavor.
Why did my cookies spread too much?
This usually happens if the butter was too soft or if the dough was overmixed. Make sure your butter is at room temperature—soft but not melted. If your kitchen is warm, chill the shaped dough balls for 15 minutes before baking. Also, be gentle when mixing in the flour.
Can I make the dough ahead of time?
Absolutely. You can prepare the dough, roll it into balls, and refrigerate them on a baking sheet for up to 24 hours. Cover them with plastic wrap. Bake them straight from the fridge, adding an extra minute or two to the baking time.
What is the best way to chop the pecans?
I prefer to use a chef’s knife on a cutting board. Pulse them in a food processor if you want, but be very careful not to over-process them into a paste. You want small, even pieces, not nut dust. A few larger chunks are fine—they add nice texture.
How do I keep the powdered sugar from melting off?
The double-coating method is the key. The first coat, applied while the cookies are warm, creates a base layer that absorbs slightly. The second coat, applied when they are completely cool, stays powdery and fresh. If you are storing them, wait to do the final coat until just before serving.
PrintClassic Russian Tea Cake Cookies – Easy Homemade Treat
These Classic Russian Tea Cake Cookies are buttery, nutty, and melt-in-your-mouth tender. A simple, family-approved recipe with toasted pecans and a snowy double coat of powdered sugar, perfect for holidays or any gathering.
- Prep Time: 15 minutes
- Cook Time: 15 minutes
- Total Time: 30 minutes
- Yield: 30 cookies 1x
- Category: Dessert
- Cuisine: Russian
Ingredients
- 1 cup (226g) unsalted butter, softened
- 1/2 cup (60g) powdered sugar (for dough)
- 1 cup (120g) powdered sugar (for rolling)
- 2 cups (240g) all-purpose flour
- 1 cup (100g) finely chopped pecans, toasted
- 1 teaspoon vanilla extract
- 1/4 teaspoon salt
Instructions
- Preheat oven to 350°F (175°C). Line two large baking sheets with parchment paper.
- Toast pecans in a dry skillet over medium heat for 3-4 minutes until fragrant. Cool completely, then finely chop.
- In a large mixing bowl, beat softened butter and 1/2 cup powdered sugar on medium speed for 2 minutes until light and fluffy.
- Add vanilla extract and salt; mix on low until combined.
- Gradually add flour, mixing on low until a soft dough forms. Do not overmix.
- Fold in toasted chopped pecans until evenly distributed.
- Scoop tablespoon-sized portions and roll into 1-inch balls. Place 2 inches apart on prepared baking sheets.
- Bake for 12-15 minutes until bottoms are lightly golden and tops are set but pale.
- Cool on baking sheet for 5 minutes. While still warm, roll gently in powdered sugar. Place on wire rack to cool completely (about 20 minutes).
- Once cool, roll again in powdered sugar. Use a fine-mesh strainer to dust with extra sugar before serving.
Notes
Toast pecans for best flavor. Double coat with powdered sugar for signature snowy look. Cookies taste even better the next day. For gluten-free, use 1:1 gluten-free flour blend. For nut-free, substitute with toasted sunflower seeds or omit nuts.
Nutrition
- Serving Size: 1 cookie
- Calories: 120
- Sugar: 5
- Sodium: 30
- Fat: 8
- Saturated Fat: 4
- Carbohydrates: 11
- Fiber: 0.5
- Protein: 1
Keywords: Russian tea cakes, snowball cookies, pecan cookies, powdered sugar cookies, holiday cookies, easy cookie recipe


