My neighbor Karen wasn’t trying to impress anyone. I’d stopped by to borrow a bag of sugar—typical last-minute baking panic—and the smell hit me before I even made it past her front door. Something sweet and faintly toasty, like vanilla and warm air. She waved me into the kitchen where these little white ghosts were cooling on the counter, looking so ridiculously cute I almost forgot why I came. “Oh, those,” she said, wiping her hands on her jeans. “Just something silly for the kids.” Just something silly. Karen has no idea she changed my entire October baking game forever.
I mean, honestly? I’d spent years buying those overpriced bakery ghost cookies that taste like sweetened cardboard. Here she was, throwing together meringues like it was nothing, using ingredients I already had in my pantry. The casualness of it all stopped me cold. She wasn’t hosting a party or trying to post on social media. She was just making a cozy Halloween treat because it was October and that’s what you do when it’s chilly outside and the leaves are falling.
These cozy Halloween ghost meringue cookies have become my favorite thing to bake when the weather turns crisp and I need something that feels like a warm hug but looks like a spooky celebration. Maybe you’ve been there—wanting to make something festive without spending hours in the kitchen or hunting down specialty ingredients. These little ghosts are the answer. They’re light, they’re sweet, they melt in your mouth, and they make everyone smile. I’ve been making them every October since that day, and they never get old.
Why You’ll Love This Recipe
I’ve tested this recipe more times than I care to admit, and let me tell you—it’s foolproof. After several batches that ended up flat or sticky (we’ll get to those lessons later), I nailed down the technique that works every single time. Here’s why this version is the one you’ll keep coming back to:
- Only 4 Ingredients: Eggs, sugar, vanilla, and cream of tartar. That’s it. No strange extracts, no food coloring, nothing you have to hunt down at a specialty store.
- Quick Prep Time: You’ll spend about 15 minutes getting these ready. The oven does the rest of the work while you sip coffee or watch the leaves fall outside.
- Perfect for Halloween Gatherings: These are the hit of every party, potluck, or cozy movie night. Kids adore them, and adults love how light and not-too-sweet they are.
- Naturally Gluten-Free and Low-Fat: If you’re hosting friends with dietary restrictions, these are a lifesaver. No flour, no butter, just pure cloud-like goodness.
- Unbelievably Cute: Let’s face it—they look like tiny ghosts floating on your baking sheet. The visual payoff is enormous for how little effort they take.
What makes these different from other meringue recipes is the texture. I learned the hard way that humidity is the enemy of meringue, so I’ve included specific tips to keep these crisp and dry. Plus, the addition of cream of tartar isn’t just for show—it stabilizes the egg whites so your ghosts hold their shape perfectly. No deflated spirits here.
This recipe is the kind you make when you want to feel like a kitchen wizard without actually doing much. It’s comfort in cookie form, cozy and nostalgic, perfect for a chilly October evening when all you want is something sweet and a little bit magical.
What Ingredients You Will Need
This recipe uses simple, pantry-friendly ingredients to create something that looks like it took hours of effort. The magic is all in the technique, not the grocery list. Here’s what you’ll need:
For the Ghost Meringues
- 4 large egg whites, room temperature (cold eggs don’t whip as well—trust me on this one)
- 1 cup (200g) granulated sugar (regular white sugar works best; avoid superfine or powdered sugar here)
- 1/2 teaspoon cream of tartar (this stabilizes the meringue and prevents weeping)
- 1 teaspoon vanilla extract (pure vanilla, not imitation—it makes a difference in flavor)
For the Ghost Faces (Optional but Adorable)
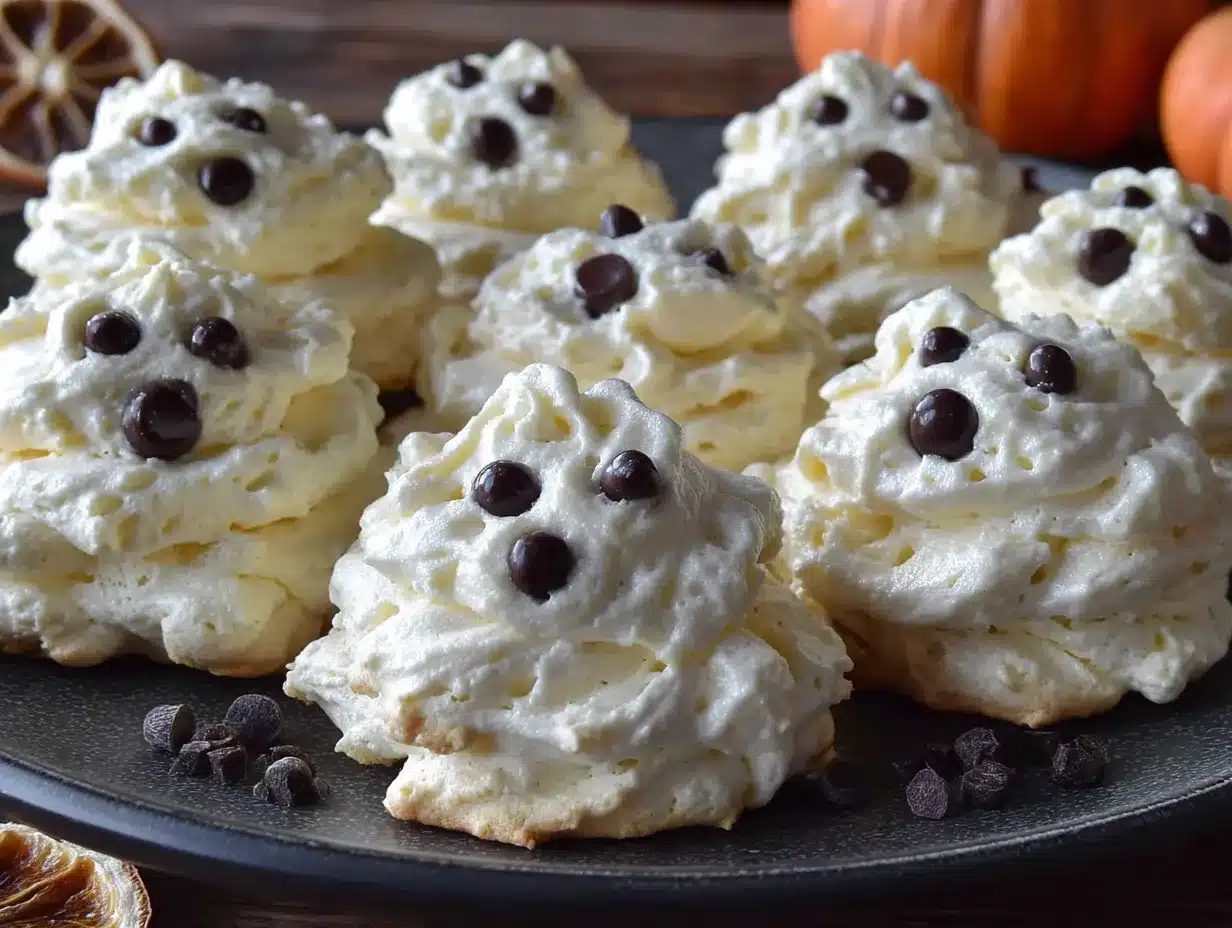
- Mini chocolate chips or black decorating gel (for eyes and mouths)
- Powdered sugar for dusting (gives them a snowy, ethereal look)
I recommend using organic eggs if you can find them—the whites whip up a bit more reliably, and the flavor is cleaner. For the sugar, I’ve had great results with regular C&H or Domino granulated sugar. Don’t try to substitute with brown sugar or coconut sugar; the moisture content will ruin your meringue.
One thing I learned from Karen that day—she uses a copper bowl for whipping her egg whites. I don’t have one, but I’ve found that a clean glass or stainless steel bowl works fine. Just make sure it’s absolutely grease-free. A tiny bit of oil or yolk will keep your whites from reaching their full fluffy potential.
If you’re making these for a party with vegan guests, you can try aquafaba (the liquid from canned chickpeas) instead of egg whites. I’ve tested it, and it works! Use 3 tablespoons of aquafaba per egg white, and add an extra 1/4 teaspoon of cream of tartar.
Equipment Needed
You don’t need a fancy kitchen to make these ghost cookies, but having the right tools makes everything easier. Here’s what I use:
- Electric mixer (stand mixer or hand mixer—both work, but a stand mixer saves your arm)
- Large mixing bowl (glass or stainless steel; avoid plastic as it can retain grease)
- Baking sheets (two standard-sized sheets work well for this batch)
- Parchment paper (silicon baking mats are great too—just don’t use greased paper)
- Piping bag with a large round tip (or a zip-top bag with the corner snipped off)
- Cooling rack (for letting the meringues cool completely)
If you don’t have a piping bag, don’t stress. I’ve used a sturdy gallon-sized zip-top bag more times than I can count. Just fill it, squeeze out the air, snip a 1/2-inch corner, and pipe away. It’s not fancy, but it works perfectly.
For the baking sheets, avoid dark non-stick pans—they conduct heat too quickly and can brown your meringues. Light-colored aluminum sheets are your best bet. And please, please use parchment paper. Wax paper will melt, and foil will make your ghosts stick.
One tip I picked up from a pastry chef friend: wipe your mixing bowl and beaters with a little vinegar on a paper towel before you start. This removes any trace of grease and helps your egg whites whip up higher and more stable.
Preparation Method
Alright, let’s make some ghosts! Take your time with these steps—rushing is the number one reason meringues fail. I’ve made every mistake in the book so you don’t have to.
- Preheat your oven to 200°F (95°C). This is crucial—meringues bake low and slow. Line two baking sheets with parchment paper and set them aside.
- Separate your eggs while they’re cold. Cold eggs separate more cleanly, and you don’t want any yolk in your whites. Crack each egg into a small bowl first, then transfer the white to your mixing bowl. This way, if one yolk breaks, you haven’t ruined the whole batch. Let the whites sit at room temperature for about 15-20 minutes before whipping.
- Start whipping the egg whites on medium speed until they become foamy and bubbly—about 1-2 minutes. You’ll see lots of tiny bubbles forming. This is the sign to add your cream of tartar. Sprinkle it in while the mixer is running.
- Gradually add the sugar. Here’s the trick: add it one tablespoon at a time, letting each addition dissolve before adding the next. This takes about 3-4 minutes total. If you dump all the sugar in at once, your meringue will be grainy and won’t hold its shape. I learned this the hard way after making a batch that looked like sad, flat pancakes.
- Keep whipping until stiff peaks form. Turn the mixer to high speed and beat until the meringue is glossy, thick, and holds a firm peak when you lift the beater. This usually takes 5-7 minutes with a stand mixer. You should be able to hold the bowl upside down without anything falling out—but don’t actually do that unless you’re feeling brave.
- Add the vanilla extract. Pour it in and beat on low speed for just 10-15 seconds until combined. Overmixing at this point can deflate your beautiful meringue.
- Fill your piping bag. Spoon the meringue into your piping bag fitted with a large round tip. If you’re using a zip-top bag, stand it up in a tall glass and fold the edges over the rim—this makes filling so much less messy.
- Pipe the ghosts. Hold the bag straight up and down, about 1/2 inch above the baking sheet. Squeeze gently to create a round base, then lift the bag slightly as you continue squeezing to form a tall teardrop shape. Pull straight up and stop squeezing to create a little peak on top. Leave about 1 inch between each ghost—they don’t spread much, but you want air to circulate.
- Bake for 60-75 minutes. The meringues are done when they’re dry to the touch and can be lifted easily off the parchment paper. They should be pale white or just barely ivory—if they’re turning brown, your oven is too hot. Turn the oven off and leave the ghosts inside with the door slightly ajar for another 30 minutes to dry out completely.
- Cool completely on the baking sheets. Don’t try to move them while they’re warm—they’re fragile and will crack. Once they’re completely cool, gently peel them off the parchment and add your ghost faces.
- Add faces (optional). Use mini chocolate chips for eyes and a little mouth, pressing them gently into the meringue. Or use black decorating gel to draw faces. I like to dust them with a light sprinkle of powdered sugar to make them look like little snowy ghosts.
Cooking Tips & Techniques
I’ve made these cozy Halloween ghost meringue cookies at least two dozen times, and I’ve learned a few things the hard way. Here are the tips that will save you from my mistakes:
Humidity is your enemy. Don’t make meringues on a rainy or humid day. The sugar absorbs moisture from the air, and your cookies will turn out sticky and chewy instead of light and crisp. I ruined an entire batch during a summer thunderstorm—never again.
Your bowl must be spotless. Any trace of grease, oil, or egg yolk will prevent your whites from whipping properly. Wash your bowl and beaters with hot soapy water, then wipe them with a little lemon juice or vinegar. I keep a dedicated “meringue bowl” that never touches oily foods.
Don’t rush the sugar. I know it’s tempting to dump it all in at once, but patience pays off here. Adding sugar slowly gives it time to dissolve completely, which creates that smooth, glossy texture. Rub a little meringue between your fingers—if it feels gritty, keep beating.
Low and slow is the rule. Meringues bake at a very low temperature for a long time. They’re not really baking—they’re drying out. If your oven runs hot, consider dropping the temperature to 190°F (88°C) and baking a little longer.
Let them cool in the oven. After the baking time is up, turn off the oven and leave the ghosts inside with the door cracked open. This gradual cooling prevents cracking and ensures they’re completely dry all the way through.
Store them properly. Meringues are hygroscopic, meaning they absorb moisture from the air. Store them in an airtight container at room temperature, and don’t refrigerate them. If you add chocolate faces, layer them between sheets of parchment paper so the faces don’t smudge.
Variations & Adaptations
One of the best things about these ghost cookies is how easy they are to customize. Here are some variations I’ve tried and loved:
Flavor Variations
- Peppermint Ghosts: Replace the vanilla extract with 1/2 teaspoon peppermint extract. Crush a few candy canes and sprinkle them on top before baking for a wintery twist.
- Chocolate Ghosts: Sift 2 tablespoons of cocoa powder with the sugar before adding it to the egg whites. You’ll get pale brown ghosts that look like they’ve been playing in the dirt—still adorable.
- Lemon or Orange Ghosts: Add 1 teaspoon of lemon or orange zest along with the vanilla. The citrus brightens the flavor and makes them feel more refreshing.
Dietary Adaptations
- Vegan Ghosts: Replace each egg white with 3 tablespoons of aquafaba (chickpea liquid). Add an extra 1/4 teaspoon cream of tartar and whip for a few minutes longer—aquafaba takes more time to reach stiff peaks.
- Sugar-Free Version: Use a granulated monk fruit sweetener or erythritol instead of sugar. Note that the texture will be slightly different—less crisp and more delicate—but they still taste great.
Shape Variations
- Pumpkin Shapes: Pipe round mounds instead of teardrops, then use a toothpick to create ridges. Add a tiny piece of green candy melt for a stem.
- Bat Shapes: Pipe small rounds for bodies and use a piping tip to create little wings on the sides. These are trickier but so worth it.
My personal favorite variation is the peppermint version. I make them every December for holiday parties, and they disappear faster than anything else on the dessert table. The mint flavor pairs beautifully with the light, airy texture.
Serving & Storage Suggestions
These cozy Halloween ghost meringue cookies are best served at room temperature, right after they’ve cooled completely. They have a light, airy texture that practically melts on your tongue, and the slight crunch gives way to a soft, chewy center.
For presentation, I love arranging them on a white platter with a few sprigs of rosemary or eucalyptus to look like little ghosts floating in a misty forest. A dusting of powdered sugar just before serving makes them look even more ethereal. If you’re serving them at a Halloween party, arrange them around a carved pumpkin or scatter them on a dark tablecloth for maximum spooky effect.
These cookies pair beautifully with hot apple cider, pumpkin spice lattes, or a warm mug of chai tea. The sweetness of the meringue balances the spiciness of the drinks perfectly. For a kids’ party, serve them with cold milk or vanilla milkshakes.
Storage Tips:
- Store in an airtight container at room temperature for up to 2 weeks.
- Do not refrigerate—the moisture will make them sticky and soft.
- If you live in a humid climate, add a food-safe silica gel packet to the container to absorb excess moisture.
- Layer meringues between sheets of parchment paper to prevent them from sticking together or breaking.
- Do not freeze meringues—they become soggy when thawed.
The flavor actually improves after a day or two as the vanilla settles. I’ve found that they’re even better on day two, with a slightly more pronounced sweetness and a perfectly dry texture. Just make sure they’re sealed tight so they don’t absorb any weird fridge odors.
Nutritional Information & Benefits
While these ghost cookies are definitely a treat, they’re surprisingly light compared to most Halloween desserts. Here’s the estimated nutritional breakdown per cookie (based on making about 24 ghosts):
| Nutrient | Amount per Cookie |
|---|---|
| Calories | 35-40 |
| Total Fat | 0g |
| Sodium | 10mg |
| Total Carbohydrates | 8-9g |
| Sugars | 8g |
| Protein | 1g |
The main ingredient here is egg whites, which are pure protein—no fat, no cholesterol. They’re also a good source of selenium and riboflavin. The sugar is the only significant source of calories, so these are a lighter alternative to butter-laden cookies or heavy chocolate treats.
These cookies are naturally gluten-free, nut-free, and dairy-free, making them safe for most common food allergies. If you’re using the chocolate chip faces, just make sure to use certified gluten-free chocolate chips if that’s a concern.
From a wellness perspective, I love that these satisfy a sweet craving without weighing you down. They’re the kind of treat you can enjoy a few of without feeling overly indulgent. Perfect for when you want something festive but don’t want to derail your healthy habits completely.
Conclusion
These cozy Halloween ghost meringue cookies have become my go-to recipe for October gatherings, and I honestly can’t imagine the season without them. They’re proof that you don’t need elaborate techniques or expensive ingredients to create something truly special. Four simple ingredients, a little patience, and you’ve got a batch of adorable ghosts that will make everyone smile.
What I love most about this recipe is how versatile it is. You can keep them plain and ghostly, dress them up with chocolate faces, or experiment with different flavors and shapes. They’re forgiving enough for beginners but impressive enough to serve at any party. And the best part? They taste incredible—light, sweet, and perfectly crisp.
I’d love to hear how your ghosts turn out! Did you add faces? Try a different flavor? Share your creations in the comments below—honestly, seeing your photos makes my whole day. And if you have any questions along the way, just ask. Happy Halloween baking, friends. May your ghosts be crisp, your kitchen smell like vanilla, and your heart feel full of cozy autumn warmth.
Frequently Asked Questions
Can I make these ghost meringues ahead of time?
Absolutely! These cookies store beautifully for up to two weeks in an airtight container at room temperature. In fact, they’re even better after a day or two as the flavors settle. Just make sure they’re completely cool before storing, and don’t refrigerate them.
Why did my meringues turn out flat and sticky?
This usually happens because of humidity or underbaking. If it’s a rainy or humid day, the sugar absorbs moisture from the air and your meringues won’t dry properly. Also, make sure you’re baking them long enough—they should be completely dry to the touch before you turn off the oven. Leaving them in the oven with the door cracked for an extra 30 minutes helps too.
Can I use liquid egg whites from a carton?
I don’t recommend it. Carton egg whites often have stabilizers and preservatives that prevent them from whipping up properly. Fresh egg whites from whole eggs give you the best volume and texture. If you must use carton whites, look for ones labeled “pasteurized” with no added ingredients.
How do I pipe the ghost shape perfectly?
Practice makes perfect! Hold your piping bag straight up and down, about 1/2 inch above the baking sheet. Start squeezing to create a round base, then slowly lift the bag as you continue squeezing to form a tall teardrop. Stop squeezing and pull straight up to create a little peak. If your first few look a little wonky, don’t worry—they’ll still taste amazing.
Can I add food coloring to make colorful ghosts?
Yes, but use gel food coloring instead of liquid. Liquid coloring adds too much moisture and can deflate your meringue. Add a tiny amount of gel color after you’ve reached stiff peaks, then beat on low just until combined. Pastel colors work best—neon or dark colors require too much dye and can affect the texture.
PrintCozy Halloween Ghost Meringue Cookies: Easy 4-Ingredient Recipe
These light, airy ghost meringue cookies are made with just 4 simple ingredients and are perfect for Halloween gatherings. They’re naturally gluten-free, low-fat, and unbelievably cute.
- Prep Time: 15 minutes
- Cook Time: 60-75 minutes
- Total Time: 1 hour 45 minutes
- Yield: 24 cookies 1x
- Category: Dessert
- Cuisine: American
Ingredients
- 4 large egg whites, room temperature
- 1 cup (200g) granulated sugar
- 1/2 teaspoon cream of tartar
- 1 teaspoon vanilla extract
- Mini chocolate chips or black decorating gel (optional, for faces)
- Powdered sugar for dusting (optional)
Instructions
- Preheat your oven to 200°F (95°C). Line two baking sheets with parchment paper.
- Separate your eggs while they’re cold. Let the whites sit at room temperature for 15-20 minutes before whipping.
- Start whipping the egg whites on medium speed until foamy and bubbly, about 1-2 minutes. Add cream of tartar while the mixer is running.
- Gradually add the sugar, one tablespoon at a time, letting each addition dissolve before adding the next (about 3-4 minutes total).
- Increase speed to high and beat until stiff, glossy peaks form, about 5-7 minutes. The meringue should hold a firm peak when the beater is lifted.
- Add vanilla extract and beat on low speed for 10-15 seconds until combined.
- Spoon the meringue into a piping bag fitted with a large round tip (or a zip-top bag with a corner snipped off).
- Pipe ghosts onto the prepared baking sheets: hold the bag straight up, squeeze to create a round base, then lift slightly to form a tall teardrop shape. Leave about 1 inch between each ghost.
- Bake for 60-75 minutes, until dry to the touch and easily lifted off the parchment. Turn off the oven and leave the ghosts inside with the door slightly ajar for another 30 minutes to dry completely.
- Cool completely on the baking sheets before moving.
- Optional: Add faces using mini chocolate chips or black decorating gel. Dust with powdered sugar for a snowy effect.
Notes
Humidity is the enemy of meringues—avoid making them on rainy or humid days. Ensure your bowl and beaters are completely grease-free; wipe with vinegar or lemon juice before starting. Add sugar slowly to avoid graininess. Store in an airtight container at room temperature for up to 2 weeks; do not refrigerate or freeze.
Nutrition
- Serving Size: 1 cookie
- Calories: 3540
- Sugar: 8
- Sodium: 10
- Carbohydrates: 89
- Protein: 1
Keywords: Halloween cookies, ghost meringues, easy meringue recipe, 4-ingredient cookies, gluten-free Halloween treats, low-fat cookies, meringue cookies


