This was supposed to be a proper chocolate mousse. A grown-up dessert, you know? The kind you serve in little stemmed glasses after the kids have gone to bed, something to sip coffee with and feel a little fancy about. I had the good dark chocolate out, the heavy cream, the whole bit. And then, well, Tuesday happened. My youngest decided that 3:00 PM was the perfect time to “help” me in the kitchen, which in his language means grabbing the bag of chocolate pudding mix I had stashed for a rainy day and dumping it, along with a good quarter cup of cocoa powder, all over the floor. Honestly, the dog had a field day. I was already late, the kitchen looked like a chocolate bomb had gone off, and the fancy mousse plan was officially dead in the water.
So I did what any sensible, slightly frazzled parent does. I pivoted. Hard. I grabbed the crushed Oreos left over from a birthday cake disaster last month, the little clear cups from the party store, and a bag of gummy worms I’d bought as a joke. I figured, let’s just layer this mess and call it a day. The kids can have a sugar high and I can have a glass of wine. What came out of that chaotic, flour-dusted, dog-licking-the-floor moment was nothing like the plan. And it was better. So much better. The kids went absolutely silent, which is the highest compliment you can get in my house. They thought I was a kitchen genius. I just smiled and nodded, not letting on that this “recipe” was born from a complete, utter, and delicious failure. Maybe you’ve been there—the best things often come from a good old-fashioned kitchen disaster.
Why You’ll Love This Recipe
Let me tell you, this isn’t just another dessert. It’s a whole experience, and one that won’t break the bank or send you into a stress spiral. I’ve tested this with my own crew—picky eaters, sugar-crazed monsters, the whole range—and it gets a clean plate every single time. Here’s why this dirt cup recipe is a total winner for your family table:
- Quick & Easy: We’re talking 15 minutes of active prep, maybe less if you have little hands helping. No baking, no fussing, just layering. Perfect for that after-school Halloween party or a last-minute classroom treat.
- Simple, Budget-Friendly Ingredients: Chocolate pudding, Oreos, gummy worms, and cream. That’s it. No fancy grocery trips needed; you probably have most of this in your pantry right now. This is smart cooking for a sensible budget.
- Perfect for Halloween (and Beyond): Obviously, these are a hit for Halloween parties. But you know what? They work for birthday parties, “just because” Tuesdays, or even a fun weekend project. The kids love the “dirt” and the creepy crawlies.
- Crowd-Pleaser: I’ve yet to meet a kid (or a grown-up, let’s be honest) who can resist a cup of chocolate pudding with cookies and candy. They disappear faster than a ghost at dawn. It’s the kind of recipe that makes you look like a hero for zero effort.
- Unbelievably Customizable: This isn’t a rigid recipe. It’s a template for fun. You can swap the pudding, change the cookies, add different candies. It’s a choose-your-own-adventure dessert that always works.
What makes this different from every other dirt cup out there? It’s the texture. We don’t just crush the Oreos into a fine dust. We leave some chunky bits, some sandy bits, and a few bigger pieces. It gives you that real “dirt” feel—a little rocky, a little crumbly. Plus, the way the pudding seeps into the cookie crumbs overnight creates this incredible, almost cake-like texture in places. It’s not just a layered parfait; it’s a transformation. This is the kind of dessert that makes you feel like you’ve pulled off something magical, even when you know it was basically an accident. It’s comfort food for the whole family, no stress required.
What Ingredients You Will Need
This recipe uses simple, wholesome (okay, mostly fun) ingredients to deliver a dessert that’s all about the experience. You can find everything at your regular grocery store without spending a fortune. Here’s your shopping list, broken down by what does what.
For the Chocolate Pudding Base:
- 2 (3.9-ounce) boxes of instant chocolate pudding mix: I prefer Jell-O brand for its consistent, smooth texture. It sets up perfectly every time. Make sure it’s the “instant” kind, not the cook-and-serve, or you’ll be waiting forever. (The instant kind is a lifesaver for busy parents).
- 4 cups (960 ml) cold whole milk: Whole milk gives the richest, creamiest pudding. You can use 2% in a pinch, but it won’t be as luscious. For a dairy-free version, use a good quality oat milk or full-fat coconut milk—just know the texture will be slightly less firm.
For the “Dirt” Layer:
- 1 (14.3-ounce) package of Oreo cookies (about 36 cookies): Regular Oreos are the gold standard here. The dark cookie and the white creme center are perfect for creating that dark, earthy “dirt” look. Don’t bother with the Double Stuf; the extra creme makes the crumbs stickier and less “dirty.” You can use the generic chocolate sandwich cookies, but the color is often a bit lighter. (I always grab a second package because someone inevitably eats a few during prep).
For the Topping & Decoration:
- 1 (8-ounce) container of frozen whipped topping (like Cool Whip), thawed: This is for the optional “grass” layer and adds a nice creamy element. You can also use a can of whipped cream for a lighter touch, but Cool Whip holds its shape better for layering.
- 1 (4-ounce) bag of gummy worms: The classic choice! I like the sour worms for a little tang, but the regular ones work great. You can also use gummy spiders, bugs, or even plastic toy spiders for a non-edible, reusable decoration. (Pro-tip from a mom who learned the hard way: don’t use the giant sour worms; they’re too thick and hard to “plant” in the dirt).
Optional Garnishes (for extra fun):
- Green food coloring: A drop or two mixed into the Cool Whip makes it look like creepy, swampy grass.
- Chocolate shavings or sprinkles: For a little extra texture on top.
- Small plastic shovels or flower pots: For serving, if you want to get really creative. You can find these at the dollar store.
Equipment Needed
You don’t need any fancy equipment for this one, which is part of the beauty. Here’s what you’ll need to grab from your kitchen drawers:
- Two large mixing bowls: One for the pudding, one for crushing the Oreos. I use my trusty Pyrex glass bowls, but any large bowl will do.
- A whisk or electric hand mixer: A whisk works fine, but an electric hand mixer makes the pudding come together in a flash. If you’re making this with kids, the whisk is a great arm workout for them!
- Measuring cups: A 4-cup liquid measuring cup for the milk is super helpful.
- A rolling pin or a sturdy zip-top bag and a heavy pan: For crushing the Oreos. The bag-and-pan method is my go-to—it’s less messy and the kids love to “smash” things. You can also use a food processor, but it tends to make the crumbs too fine.
- 8 to 10 small clear cups or glasses: This is key for the visual! Clear plastic cups (like the 9-ounce Solo cups) are perfect. You can also use small mason jars, little glass tumblers, or even small flower pots. The clear sides let you see the layers of “dirt” and “worms.”
- A small spoon or spatula: For layering.
- A piping bag or a small zip-top bag: If you’re doing the Cool Whip “grass” layer, this makes it much easier to pipe on top. Snip a small corner off the zip-top bag to use as a piping tip.
Preparation Method
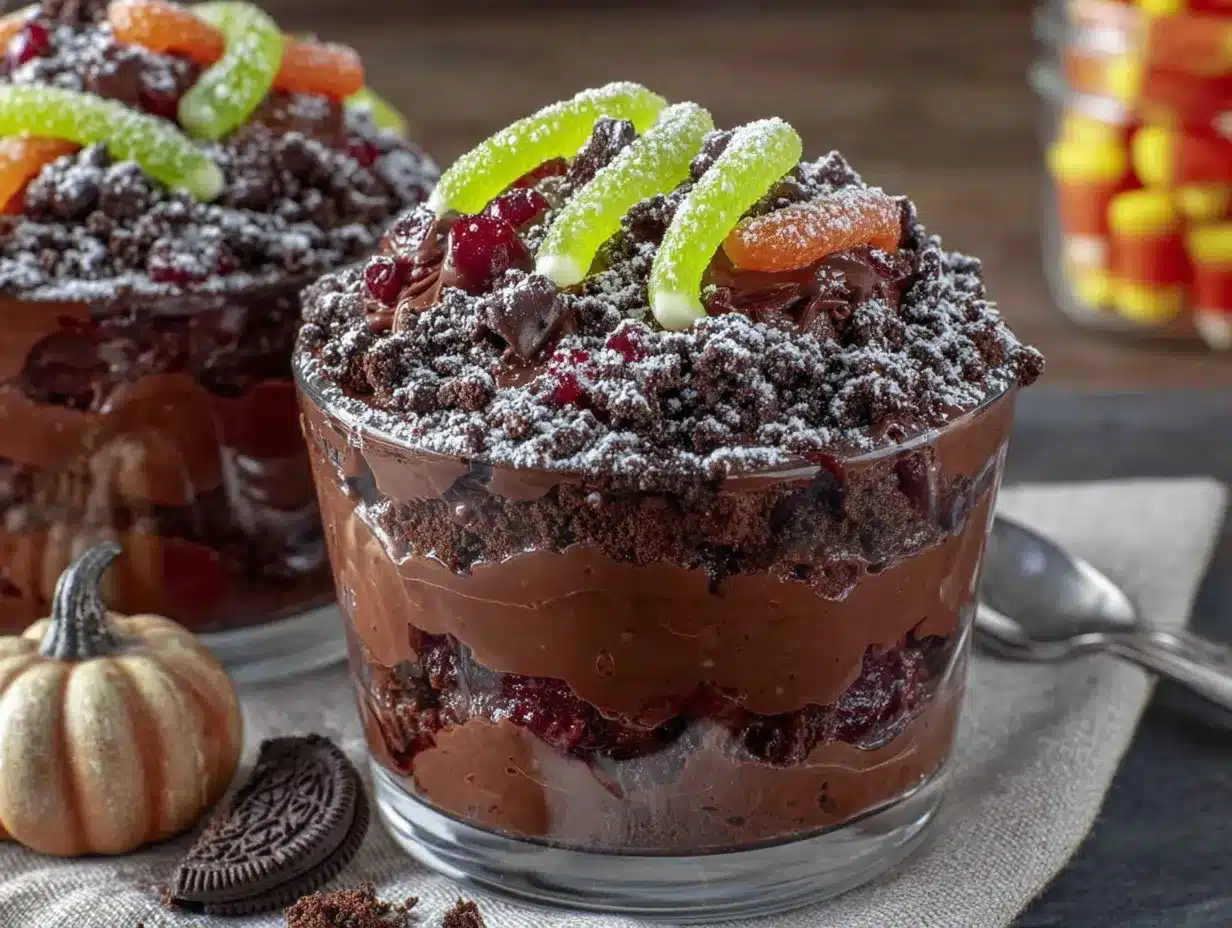
Alright, let’s get our hands dirty! This is the fun part. The whole process takes about 15 minutes of active work, plus a couple of hours in the fridge to set. Here’s the step-by-step, with all the little tricks I’ve learned from making these a dozen times.
- Make the Chocolate Pudding: In your large mixing bowl, whisk together the two boxes of instant chocolate pudding mix and the 4 cups of cold whole milk. Whisk vigorously for about 2 minutes, until the mixture starts to thicken. It will be very thin at first, but don’t panic. That’s normal. If you’re using an electric hand mixer, beat on low speed for 1-2 minutes. You’ll know it’s ready when it starts to look like a thick, glossy milkshake. Set it aside to firm up while you work on the Oreos. (Pro-tip: For an even richer flavor, you can substitute 1 cup of the milk with cold, strong brewed coffee. The kids will never know, and it deepens the chocolate flavor beautifully.)
- Crush the Oreos: This is the part the kids will fight over. Place the whole package of Oreos (creme and all) into a large, sturdy zip-top bag. Squeeze out all the air and seal it tight. Now, take your rolling pin (or a heavy skillet, or even a can of beans) and gently crush the cookies. You don’t want a fine powder. You want a mix of textures: some fine sandy crumbs, some small pebbly bits, and a few slightly larger chunks. This is what gives you that realistic “dirt” look. If you use a food processor, pulse it just a few times—don’t let it run, or you’ll end up with Oreo dust. (I learned this the hard way when I made “mud” instead of “dirt.”)
- Prepare Your Cups: Arrange your 8 to 10 clear cups on a baking sheet. This makes it easy to move them to the fridge later without spilling. Trust me on this one.
- Layer the Dirt and Pudding: Now for the fun part. Spoon about 2 tablespoons of the crushed Oreos into the bottom of each cup. This is your first layer of “dirt.” Gently press it down with the back of the spoon to make a solid base. Next, spoon or pour the chocolate pudding on top, filling each cup about halfway. Give the cups a gentle tap on the counter to settle the pudding and remove any air bubbles. Then, add another generous layer of the crushed Oreos on top of the pudding. You want a nice, thick layer of “dirt” on top.
- Add the Gummy Worms: This is the best part. Take 2 or 3 gummy worms and gently push them into the top layer of “dirt.” Leave a bit of the worm sticking out, as if it’s crawling out of the ground. You can also tuck one or two worms against the side of the cup so they’re visible through the clear plastic. For a really fun effect, push a worm all the way down to the bottom layer of dirt, so it looks like it’s burrowing.
- Chill and Set: Place the baking sheet with your dirt cups in the refrigerator. They need at least 2 hours to set properly, but overnight is even better. This allows the pudding to fully firm up and the Oreo crumbs to soften slightly, creating that amazing, almost cake-like texture. Don’t skip this step—it’s what takes these from “good” to “magical.”
- Optional “Grass” Topping: If you want to add a “grass” layer, wait until right before serving. In a small bowl, stir a drop or two of green food coloring into the thawed Cool Whip until it’s evenly tinted. Spoon the green Cool Whip into a small zip-top bag, snip off a tiny corner, and pipe little dollops or a thin layer on top of the “dirt” before adding the worms. It adds a fun, creepy, swampy vibe.
Cooking Tips & Techniques
I’ve made more dirt cups than I care to count, and I’ve made every mistake in the book. Here are the lessons I’ve learned so you don’t have to repeat them.
On the Oreos: The biggest mistake is over-crushing them. You want texture, not dust. Think of real garden soil—it has pebbles and clumps. If your crumbs are too fine, they’ll turn into a paste when they mix with the moisture from the pudding. A little chunkiness is your friend. Also, don’t be tempted to scrape out the white creme. It’s part of what gives the “dirt” its structure and flavor.
On the Pudding: Patience is key. Let the pudding sit for a full 5 minutes after whisking before you start layering. It needs time to thicken up. If you layer it too soon, it will be too runny and will soak into the bottom Oreo layer, making it a soggy mess. Also, whole milk is non-negotiable for the best texture. Skim milk makes a watery pudding that won’t hold its shape.
On the Layering: Don’t just dump the pudding in. Spoon it gently over the back of a spoon to avoid disturbing the bottom layer of Oreos. And for the top layer of “dirt,” make sure it’s thick enough to completely hide the pudding. You want a solid, dark brown top. If you can see the chocolate pudding peeking through, add more crumbs.
On Timing: These are a make-ahead dream. You can assemble them the day before your Halloween party and they’ll be perfect. The flavors actually meld together better overnight. Just don’t add the gummy worms until a few hours before serving, or they’ll get too soft and lose their fun, chewy texture. I’ve had a few sad, soggy worms in my time.
Variations & Adaptations
One of the best things about this recipe is how easily it adapts. It’s a template for fun, not a rigid formula. Here are some of my favorite twists.
- Peanut Butter Cup Dirt: Use chocolate pudding made with chocolate milk for an extra-chocolatey base. Swap the Oreos for crushed chocolate peanut butter cups (like Reese’s) or even crushed Nutter Butter cookies. Use gummy worms or peanut butter cup “bugs.”
- Pumpkin Patch Dirt: For a fall twist, use butterscotch or vanilla pudding instead of chocolate. Crush up some ginger snaps or shortbread cookies for the “dirt.” Decorate with candy pumpkins or candy corn instead of worms. It looks like a little pumpkin patch!
- Dairy-Free & Vegan Version: This is super easy. Use a high-quality instant chocolate pudding mix that is dairy-free (many are accidentally vegan) and substitute the milk with cold oat milk or full-fat coconut milk. Use a vegan whipped topping and a vegan chocolate sandwich cookie. No one will know the difference.
- Berry “Garden” Dirt: Use vanilla or cheesecake-flavored pudding. Crush up graham crackers or vanilla wafers for the “dirt.” Instead of worms, use fresh raspberries or blackberries to look like little “bugs” or “berries” in the garden. A few mint leaves on top look like little plants.
- Spooky Spider Cups: Stick with the chocolate pudding and Oreo dirt. Instead of gummy worms, use gummy spiders or plastic spider rings (wash the rings first!). You can also add a few candy eyeballs to the top for an extra-creepy face.
Serving & Storage Suggestions
These little cups are best served cold, straight from the fridge. The contrast between the cold, creamy pudding and the crunchy-yet-soft “dirt” is the whole point.
Serving: I like to serve them on a tray with a few extra gummy worms scattered around for a dramatic effect. You can also stick a little plastic shovel or a sprig of mint in each cup for a fun “gardening” theme. For a Halloween party, set up a “dirt cup bar” with different toppings—extra gummy worms, crushed cookies, candy corn, sprinkles—and let the kids decorate their own. It’s a guaranteed hit and keeps them busy for a good 20 minutes.
Storage: Store any leftover dirt cups in the refrigerator, tightly covered with plastic wrap or in an airtight container. They will keep well for up to 3 days. The texture will change slightly over time as the Oreo crumbs continue to soften, but many people (including my kids) actually prefer them after a day or two when the whole thing has melded into a soft, almost cake-like dessert.
Reheating? No. Do not reheat these. They are a cold dessert. Trust me on this one.
Freezing: I don’t recommend freezing these. The pudding will become watery and the Oreos will turn into a weird, icy mush when thawed. Just keep them in the fridge.
Nutritional Information & Benefits
Let’s be real—this is a treat, not a health food. But that doesn’t mean we can’t be smart about it. Here’s a general idea of what you’re working with per serving (based on 10 servings, using whole milk and regular Oreos). These are estimates; your numbers will vary based on brands and specific ingredients.
| Nutrient | Amount Per Serving (approx.) |
|---|---|
| Calories | 350-400 |
| Total Fat | 15-18g |
| Saturated Fat | 7-9g |
| Carbohydrates | 55-60g |
| Sugar | 40-45g |
| Protein | 5-7g |
| Calcium | 10-15% DV |
Health Benefits (sort of): The whole milk provides a good dose of calcium and vitamin D, which is great for growing bones. The cocoa in the pudding and Oreos contains some antioxidants (hey, it counts!). And honestly, the biggest benefit is the joy it brings to a kid’s face. Sometimes, that’s the most important nutrient of all. For a slightly lighter version, you can use 2% milk and light Cool Whip, but I wouldn’t recommend fat-free pudding—it’s just not the same.
Dietary Considerations: This recipe contains gluten (from the Oreos), dairy (from the milk and Cool Whip), and soy (often in the pudding mix). It is not suitable for vegans unless you make the substitutions listed above. Always check labels for specific allergen information, especially if serving to a crowd.
Conclusion
So there you have it. The recipe that started as a floor-covered-in-cocoa-powder disaster and ended up as a family legend. These Halloween Dirt Cups are proof that you don’t need fancy ingredients or hours in the kitchen to create something truly magical for your kids. They’re fun, they’re forgiving, and they taste like a happy memory. Honestly, every time I make them, I remember that Tuesday afternoon—the chaos, the dog, the look of pure triumph on my kid’s face when he “helped.” That’s what this recipe is really about. It’s not about being a perfect parent or a perfect cook. It’s about making something fun out of a mess, and sharing the joy with the people you love.
I’d love to see your dirt cup creations! Tag me in your photos or leave a comment below telling me what fun variations you came up with. Did you use spiders? Candy corn? Did your kids help crush the Oreos? I want to hear all about it. Go on, get your hands dirty—you’ve got this!
Frequently Asked Questions (FAQs)
Can I make these dirt cups ahead of time?
Absolutely! In fact, they’re better when made a day in advance. The flavors meld and the texture becomes even more amazing. Just wait to add the gummy worms until a few hours before serving so they stay nice and chewy. Store them covered in the fridge.
Can I use homemade chocolate pudding instead of instant?
You can, but it will change the texture and the set time. Instant pudding is designed to set quickly and hold its shape for layering. Homemade pudding is often softer and more custard-like. If you use homemade, you’ll need to let it chill for at least 4 hours, and the layers might not be as distinct. It’ll still taste great, though!
My pudding turned out runny. What did I do wrong?
This usually happens for one of two reasons. First, you might have used the wrong type of milk. Instant pudding needs a certain amount of fat to set properly, so skim milk won’t work well. Second, you might not have whisked it long enough. Whisk for a full 2 minutes, then let it sit for 5 minutes to thicken. If it’s still runny after that, pop it in the fridge for 15 minutes before layering.
Can I use a different type of cookie for the “dirt”?
Yes! This is one of the best parts of the recipe. Ginger snaps, chocolate graham crackers, shortbread cookies, or even vanilla wafers all make excellent “dirt.” Just crush them the same way you would the Oreos. The color and flavor will be different, but it’s a fun way to customize the dessert.
How can I make these look extra spooky for a Halloween party?
Get creative! Use green food coloring in the Cool Whip for “swamp grass.” Add plastic spider rings (clean ones!) on top. Sprinkle some black or orange sprinkles over the “dirt.” You can even use a small, clean paintbrush to dust a little cocoa powder on the sides of the cup for a “grungy” look. The key is to have fun with it!
Pin This Recipe!

Easy Halloween Dirt Cups Recipe with Gummy Worms

These no-bake Halloween Dirt Cups are a fun and easy dessert made with layers of creamy chocolate pudding, crushed Oreo ‘dirt,’ and gummy worms. Perfect for parties and a guaranteed hit with kids and adults alike.
- Prep Time: 15 minutes
- Cook Time: 0 minutes
- Total Time: 2 hours 15 minutes (includes chilling time)
- Yield: 8-10 servings 1x
- Category: Dessert
- Cuisine: American
Ingredients
- 2 (3.9-ounce) boxes instant chocolate pudding mix
- 4 cups (960 ml) cold whole milk
- 1 (14.3-ounce) package Oreo cookies (about 36 cookies)
- 1 (8-ounce) container frozen whipped topping (like Cool Whip), thawed
- 1 (4-ounce) bag gummy worms
- Green food coloring (optional, for grass topping)
- Chocolate shavings or sprinkles (optional, for garnish)
Instructions
- In a large mixing bowl, whisk together the instant chocolate pudding mix and cold whole milk for about 2 minutes until thickened. Set aside to firm up.
- Place the whole package of Oreos (creme and all) into a large zip-top bag. Seal and crush with a rolling pin or heavy pan until you have a mix of fine crumbs and small chunks.
- Arrange 8 to 10 clear cups on a baking sheet. Spoon about 2 tablespoons of crushed Oreos into the bottom of each cup and press down gently.
- Spoon or pour the chocolate pudding on top of the Oreo layer, filling each cup about halfway. Tap the cups gently on the counter to settle the pudding.
- Add another generous layer of crushed Oreos on top of the pudding.
- Gently push 2-3 gummy worms into the top Oreo layer, leaving part of them sticking out. Optionally, tuck a worm against the side of the cup for visibility.
- Refrigerate for at least 2 hours, or overnight, to set.
- Optional: Before serving, mix a drop or two of green food coloring into the thawed Cool Whip. Pipe or spoon the green Cool Whip on top of the ‘dirt’ for a swampy grass effect. Add extra gummy worms if desired.
Notes
For best texture, use whole milk and instant pudding. Let the pudding sit for 5 minutes after whisking before layering. For a richer flavor, substitute 1 cup of milk with cold brewed coffee. Add gummy worms a few hours before serving to keep them chewy. Store leftovers in the refrigerator for up to 3 days.
Nutrition
- Serving Size: 1 cup
- Calories: 375
- Sugar: 42.5
- Sodium: 480
- Fat: 16.5
- Saturated Fat: 8
- Carbohydrates: 57.5
- Fiber: 2
- Protein: 6
Keywords: Halloween dirt cups, gummy worms, chocolate pudding, Oreo dirt, no-bake dessert, kids dessert, Halloween party treat


