Quick Pumpkin-Shaped Fruit Platter: Easy 15-Minute Snack
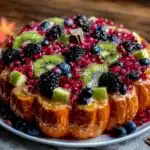
This quick pumpkin-shaped fruit platter is a beautiful and impressive snack that comes together in just 15 minutes using simple ingredients. Perfect for fall gatherings, Halloween parties, or a fun after-school snack, it’s a crowd-pleaser that makes healthy eating feel like a treat.
- Prep Time: 15 minutes
- Cook Time: 0 minutes
- Total Time: 15 minutes
- Yield: 8 servings 1x
- Category: Appetizer
- Cuisine: American
Ingredients
- 1 large cantaloupe or honeydew melon (or a large orange or small pumpkin-shaped squash)
- 1 banana (for the stem, or use a slice of apple or pear)
- 1 cup orange segments (from about 2–3 oranges, or use canned mandarin oranges, drained)
- 1 cup pineapple chunks (fresh or canned, drained)
- 1 cup green grapes (for leaves and contrast)
- 1/2 cup blueberries or blackberries (for the pumpkin face, optional)
- 1/2 cup strawberries, sliced (optional, for extra color)
- Fresh mint leaves (for decoration, optional)
- Pomegranate seeds (for decoration, optional)
- Edible flowers (for decoration, optional)
Instructions
- Prepare the Base (3 minutes): Wash and dry your cantaloupe or honeydew melon. Using a sharp chef’s knife, carefully cut the melon in half horizontally (through the equator, not from top to bottom). Scoop out the seeds and discard them. Place the melon cut-side down on your platter. It should sit flat and look like a round dome.
- Create the Pumpkin Shape (3 minutes): Using a small paring knife, gently score vertical lines from the top of the melon dome down to the bottom, about 1 inch apart. Don’t cut too deep — just score the surface to create a visual guide. Then, using your knife, carefully cut shallow wedges between the scored lines to create the classic pumpkin ridges.
- Add the Stem (2 minutes): Take your banana and cut off the top 2 inches, including the stem. This will be your pumpkin stem. If you are using an apple slice, cut a small rectangle about 2 inches long and 1/2 inch wide. Gently press the stem into the top center of the melon dome. If it doesn’t stay, use a toothpick to secure it.
- Arrange the Ridges (4 minutes): Starting at the top of the melon, arrange the orange segments in a line following the scored ridges. Place the pineapple chunks between the orange segments to add texture and color. Work your way down the melon, covering the entire surface. Overlap the fruit slightly to create a seamless look.
- Add the Leaves and Details (2 minutes): Arrange the green grapes around the base of the stem to look like pumpkin leaves. You can also place a few grape vines by using long, thin slices of green apple or cucumber. If you are making a Halloween-themed platter, use blueberries or blackberries to create a spooky face — two triangles for eyes and a jagged line for a mouth.
- Fill the Platter (1 minute): Fill any empty spaces around the melon base with the remaining fruit — strawberries, blueberries, pomegranate seeds, or any other fruit you have. Tuck fresh mint leaves here and there for a pop of green and a fresh scent.
- Final Touches (1 minute): Step back and look at your platter. Adjust any fruit that looks out of place. Add a few extra mint leaves or pomegranate seeds for a finished look. Serve immediately or cover with plastic wrap and refrigerate until ready to serve. If making ahead, add the banana stem just before serving.
Notes
Choose a firm, slightly under-ripe melon for the best structure. Pat all fruit dry before assembling to prevent sliding. For a Halloween version, use blackberries to create a spooky face. The platter is best served within an hour of making; if prepping ahead, store cut fruit separately and assemble just before serving. The banana stem will brown, so add it last.
Nutrition
- Serving Size: 1 serving (about 1 c
- Calories: 135
- Sugar: 26
- Sodium: 20
- Fat: 0.5
- Carbohydrates: 33
- Fiber: 4.5
- Protein: 2
Keywords: pumpkin-shaped fruit platter, Halloween fruit platter, fall fruit platter, easy fruit platter, 15-minute snack, healthy snack, fruit art